We are reader supported. When you purchase through links on our site, we may earn an affiliate commission. Also, as an Amazon affiliate, we earn from qualifying purchases.
Markets and fairs move fast, and your jewelry booth must work even faster. A clear plan, smart displays, and tidy systems will help you sell more, reduce stress, and pack out smoothly. This guide breaks down practical ideas you can set up with simple tools, DIY hacks, and clean organizing habits. Read through, choose what fits your brand and budget, and build a booth that is easy to run and hard to walk past.
Start With Your Goals and Constraints
Know your space and traffic flow
Confirm the size of your booth or table and the placement of aisles. A 6 foot table needs a different plan than a 10 by 10 booth. Plan how shoppers will enter, move, and exit without bumping into each other. If the aisle sits only on one side, keep your tallest pieces at the back so the front stays open for hands-on browsing.
Match display to price point
High ticket items need fewer pieces displayed with more space and secure fixtures. Lower price items can sit in tidy bins or boards with clear price signs. Do not mix both without separating the zones. A clean layout supports quick decisions and builds trust.
Prepare for setup time and transport
Choose fixtures that pack flat, stack, or nest. If you carry everything by yourself, use light materials like foam boards, acrylic risers, foldable stands, and small crates. Aim to set up in one hour or less so you have buffer time for cleaning, pricing checks, and lighting tests.
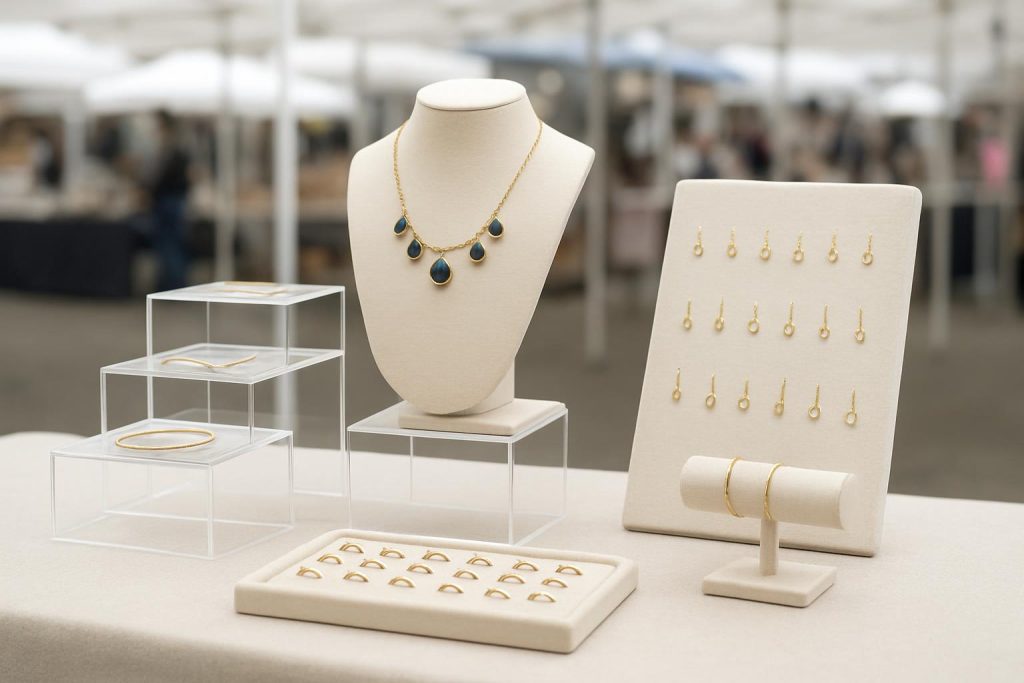
Core Display Principles That Always Work
Build vertical levels and strong sightlines
Height draws eyes from across the aisle. Use three levels on every table section. For example, 45 cm tall at the back, 25 cm in the middle, and 10 cm at the front. Keep taller items away from the aisle so nothing blocks the view. Repeat these levels across the booth so the layout looks intentional from every angle.
Use a cohesive color palette and backdrop
Pick one base color for linens and boards, then add a single accent color. For silver jewelry, cool grays and soft white work well. For gold or brass, warm beige or linen helps metal pop. Avoid busy prints, reflective clutter, or mixed textures that fight with the jewelry. A neutral palette looks clean and makes cleaning easier because dust and fingerprints are obvious.
Control glare and reflections
High gloss fabrics and mirrors cause glare that hides detail. Use matte or lightly textured fabrics. Limit mirrors to one or two framed pieces placed at chest height. Angle them slightly down so you can maintain line of sight over the table.
Table Layouts That Sell
The L shaped booth
Place one table across the front and one down the side. This layout creates a natural corner for your hero pieces. Put rings and small impulse items on the front edge. Keep necklaces and sets on risers along the back and side. Add a small checkout station at the corner with a mobile payment device, baggies, and care cards.
The U shaped browsing lane
If you have a 10 by 10 space, three tables in a U brings shoppers inside and slows them down. Keep the entrance open and use a tall sign at the back wall. Anchor each side with a different category so people can navigate by type. Place new arrivals in the center back to reward those who step in.
Shared or small table strategy
On a 4 foot shared table, use vertical fixtures to win space. One narrow bust stand, one earring board, one ring tray, and a small bracelet bar can cover most lines. Keep backup stock in labeled pouches under the table. Use one concise price sign so you do not waste surface space with multiple tags.
Display Fixtures on a Budget
DIY risers from common items
Stack nested boxes, covered books, or lightweight crates under your tablecloth to create levels. Wrap shoeboxes in neutral kraft paper or fabric for a clean look. Use non slip liner on top so trays and boards do not slide.
Simple jewelry stands and boards
A foam or cork board wrapped in linen makes a fast earring display. Add small slits or rows of pins to hold cards. For necklaces, use a dowel across two small blocks or a compact T bar. For rings, use a velvet insert tray or a DIY foam sheet with evenly spaced cuts. Keep spacing consistent so the board looks tidy even as pieces sell.
Travel ready crates and foldables
Wood crates double as storage and risers. Pack jewelry inside in padded pouches, then flip the crate at the market to create height. Foldable acrylic risers stack flat and wipe clean. Choose fixtures you can sanitize and repack quickly.
Organizing Inventory for Speed
Prep trays and replenishment bins
Before the event, pre arrange pieces on shallow trays that match your table plan. Label a backup bin for each tray with the same layout. When an item sells, pull the next piece from the matched bin. This prevents hunting and keeps the display full and neat.
Tagging and pricing that saves time
Use small tags with product code, material, and price. Group items by price when possible and add a clean sign per section such as studs, hoops, and drop earrings. This reduces repeated questions and frees you to engage on style and fit.
Cleaning and maintenance on site
Pack a soft brush, microfiber cloths, alcohol wipes for metal parts that touch skin, and a silver polishing cloth if you sell sterling. Wipe fingerprints from displays and mirrors every hour. Carry lint rollers for fabrics. Clean tables before opening and after restocks so the booth always looks fresh.
Styling by Jewelry Type
Necklaces
Show different lengths clearly. Use one tall bust for statement pieces and flat boards or low bars for chains. Place small tags near the clasp to keep the pendant area clean. If you sell layering sets, show two to three lengths styled together on a bust and add a small sign for the bundle price.
Earrings
Use boards with even rows and card everything. Keep pairs aligned at the same angle so shoppers can compare size and drop easily. Put best sellers at eye level. Place one mirror nearby so customers can try a pair without blocking the board.
Rings
Use ring trays or cones with size labels. Group by metal or stone so the look stays consistent. Place a small sizing guide at the tray corner. Keep a sanitized ring sizer at checkout and clean it between uses.
Bracelets and bangles
Use a bar stand with space between styles to avoid tangles. For delicate chains, lay them in shallow grooves or on a flat board with pins. Add a wrist measurement card to reduce fit questions.
Gift sets and upsells
Bundle a necklace and matching studs on one card. Show the set on a bust and add a simple price sign that explains the saving. Keep a small box or pouch display next to sets to prompt gifting.
Signage That Earns Attention
Price signs and bundles
Use one main price sign per section. Keep text large and high contrast. Avoid cluttered boards with too many fonts. If you run a mix and match deal, place that message at hand level where the picking happens, not at the back wall.
Story, materials, and care
Add one short sign that explains materials, plating, and allergy info. Tell shoppers how to care for the finish and how to store pieces. Provide a small care card with each purchase to reduce returns and build trust.
Payment and policies
Place a small sign near checkout that lists accepted payment methods and a short return policy. This prevents repeat questions and speeds transactions.
Lighting and Power Plan
Battery options and runtime basics
If the venue has no power, use LED clip lights or puck lights with rechargeable power banks. As a rough guide, two 5 watt lights draw about 10 watts total. A common 26800 mAh power bank rated at about 99 watt hours can run that load for around 8 to 9 hours depending on efficiency. Test your exact setup at home and pack one spare power bank for safety.
Light placement and color temperature
Place lights above and slightly in front of the displays to avoid harsh shadows. Aim for warm white around 3000 to 3500 K for gold and neutral white around 4000 to 4500 K for silver. Keep light beams even across boards so no piece gets lost in the dark.
Security and Durability
Tethering and anti sweep tactics
Anchor lightweight stands with museum putty or double sided tape. Use clear fishing line to tether high value items to the display. Keep only one of each expensive piece on the table and store duplicates under the table. Place cash and the mobile device on your body, not on the table.
Weatherproof and wind control
Use canopy weights at all four corners if outdoors. Clip tablecloths to tables so wind does not lift them. Choose sturdy acrylic or wood stands over narrow wire stands on windy days. Bring clear covers or shallow cases for dust and drizzle. Keep a dry microfiber cloth ready after any moisture.
Customer Flow and Engagement
Touch friendly zones
Invite touch by placing sturdy trays and bracelet bars at the front edge. Use small signs that say try me near durable items. Keep delicate chokers and fine chains a little farther back with a bust or a staff assist sign so you can help with unclasping.
Queue handling and checkout
Designate a small checkout zone with bags, tissue, boxes, care cards, and business cards within reach. Keep a simple tray there to hold selected items during payment. If a queue forms, greet new arrivals and point to categories so they can browse while waiting.
Hygiene and cleaning at the booth
Provide hand sanitizer near the mirror. Wipe the mirror and stands often. Clean any tried on earrings with alcohol wipes and set them aside to dry before returning them to the board. Replace polishing cloths when they look worn so displays stay crisp.
Packing List and Setup Routine
One hour setup checklist
Place tablecloths and add non slip liners. Set risers from back to front. Place boards, bars, and busts. Add price and story signs. Lay out jewelry by type and confirm spacing. Install lights and test brightness. Stock backup bins under the table in the same order as the display. Wipe all surfaces. Do a quick walk by from the aisle to check sightlines.
Tear down and storage
Pack sold out spaces first to prevent mixing styles. Move jewelry from tables back into labeled pouches and matched bins. Wrap fragile stands in soft cloths. Coil light cords and store power banks in a dry pouch. Wipe dust from crates and fabrics before loading the car so the next setup starts clean.
Real World Booth Styles You Can Recreate
Clean minimalist brand
Use white or soft gray linens, acrylic risers, and matte earring boards. Limit the palette to one metal tone per table. Keep one tall bust with a single hero necklace and three to five supporting pieces below. Use one concise price sign per category.
Boho handmade brand
Choose natural linen, wood crates, and simple linen wrapped boards. Add a single woven tray for bracelets to add texture without clutter. Use warm white lighting and a short materials sign that highlights natural stones and handmade findings.
Vintage inspired brand
Pick a taupe cloth, velvet ring trays, and a small framed mirror. Keep displays sturdy and clean to avoid a flea market look. Group by era or motif. Use neutral signs with large text so the story reads clearly from the aisle.
Testing and Improving Every Market
Track what gets touched and what sells
Notice which zones attract hands and which get skipped. Adjust height, lighting, or spacing in low traffic areas. Move best sellers to eye level and place new pieces nearby. Aim to reduce any spot where customers hesitate or ask the same question.
Refine for speed and clarity
Cut any sign that does not answer a common question. Remove any fixture that wobbles or collects dust. Simplify your palette if photos look busy. Keep your layout consistent across events so packing and restocking stay efficient.
Conclusion
A strong jewelry booth is clean, vertical, and simple to navigate. Plan your space, use sturdy and tidy fixtures, and keep every category clear. Light evenly, price clearly, and keep tools for fast cleaning at hand. Organize backup stock to restock without fuss. With these habits, your display will look professional, your workflow will stay calm, and your results will improve market after market.
FAQ
Q: How do I set up a small 4 foot table at a market
A: Use vertical fixtures to win space. One narrow bust stand, one earring board, one ring tray, and a small bracelet bar can cover most lines. Keep backup stock in labeled pouches under the table and use one concise price sign for clarity.
Q: What lighting should I use if there is no power on site
A: Use LED clip lights or puck lights with rechargeable power banks. Two 5 watt lights draw about 10 watts total, and a 26800 mAh power bank rated at about 99 watt hours can run that load for around 8 to 9 hours depending on efficiency.
Q: How can I prevent theft during busy times
A: Anchor stands with museum putty, tether high value items with clear fishing line, and keep only one of each expensive piece on the table. Place cash and your mobile device on your body, not on the table.
Q: What is the best way to organize backup inventory for fast restock
A: Pre arrange pieces on shallow trays that match your table plan and label a backup bin for each tray with the same layout. When an item sells, pull the next piece from the matched bin so the display stays full and neat.
Q: How do I make pricing clear without clutter
A: Use small tags with product code, material, and price, then add one main price sign per section. Keep text large and high contrast and avoid multiple fonts or repeated signs across the same category.