We are reader supported. When you purchase through links on our site, we may earn an affiliate commission. Also, as an Amazon affiliate, we earn from qualifying purchases.
Water on the bathroom counter is not a small problem. It invites mildew, damages caulk, stains stone, and makes the whole space feel messy. The solution is not constant wiping. The solution is a system that prevents water from landing, channels it back to the sink, and dries what remains in seconds. Follow this guide, start small, and stack improvements until the counter stays dry without effort.
Introduction
A dry counter starts with control. Control how water leaves the faucet, where it lands, how the counter drains, and who does what after using the sink. You will build a routine that takes under a minute a day, a setup that guides water away, and a few targeted upgrades that eliminate chronic puddles. Keep reading and apply the sections in order. You will see results with the first change.
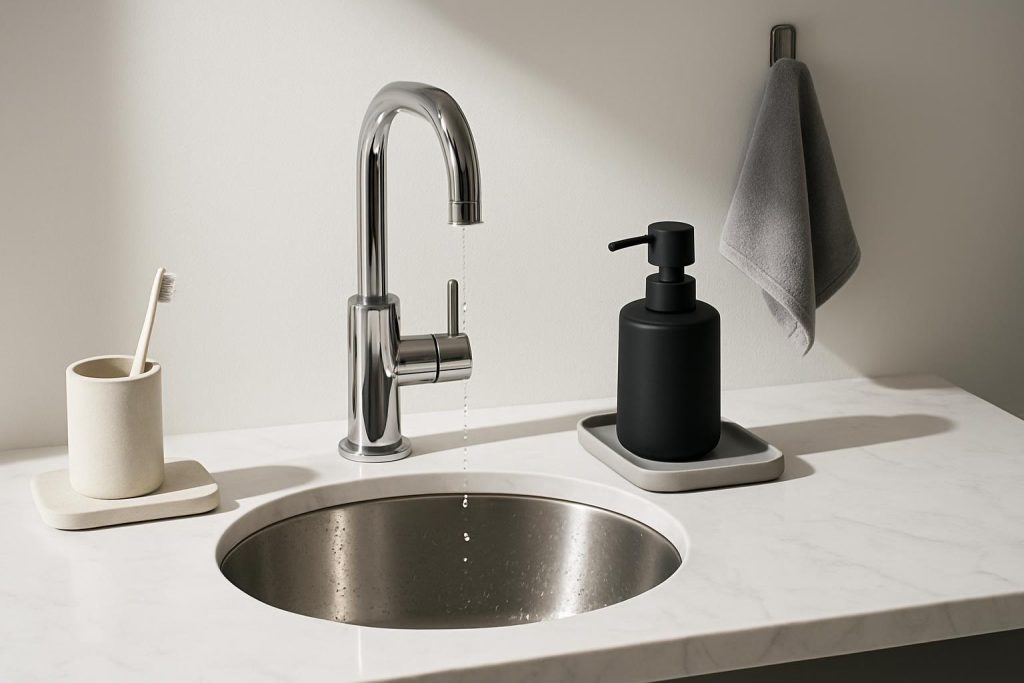
Find Where the Water Comes From
Do not guess. Turn on the faucet at your normal pressure and watch. If the stream hits the sink wall and splashes up, you have a reach or angle issue. If you see fine spray in all directions, your aerator needs cleaning or replacement. If drops collect near the faucet base, the seal is failing. If puddles appear under soap or toothbrush cups, you have drip sources. If the back edge of the counter stays damp, the surface likely slopes toward the wall or capillary action along the backsplash is pulling water up.
Do a quick test after brushing teeth or washing hands. Dry the counter fully, do your normal routine, then check where water sits. Note the exact location. One cause at a time makes solving fast.
Create a Daily Micro Routine
Keep a cloth at arm’s reach
Place one dedicated microfiber cloth on a small hook or over-sink shelf. Use it only for the counter. When it is visible and easy to grab, you will use it. Replace or wash every two to three days so it stays absorbent.
Wipe sequence in under 30 seconds
Turn off water. Dry your hands over the sink before stepping back. Use two quick passes with the cloth from faucet base outward, then along the front edge. If you see beads near the backsplash, pull water forward with the cloth toward the basin. Return the cloth to its spot. Done.
Morning and night reset
Each morning, do one fast wipe after brushing. Each night, repeat. Two short resets prevent buildup and stop stains. Train all family members to follow the same sequence. Place a hand towel right beside the faucet so hands get dry before leaving drips across the counter.
Control Splash At The Source
Set the right water flow
Most splash is velocity. Reduce handle opening to achieve a smooth, controlled stream. If your valve is too sensitive, have a plumber adjust the cartridge stop or replace a worn mixer cartridge. On homes with high pressure, add a pressure reducing valve at the main or a lower flow aerator on the faucet.
Install or replace the aerator
A clean, quality aerator turns a solid jet into controlled bubbles that reduce rebound. If you already have one, remove it, soak it in vinegar for 20 minutes, brush debris, and reinstall. If it still sprays, replace with a 1.0 to 1.5 gpm aerator that matches your faucet thread size. Choose an aerator that centers the stream in your sink bowl.
Check spout reach and angle
The stream should land near the drain, not on the bowl wall. If your spout is too short or too long for the sink, consider a faucet with better reach. Slightly rotate a swivel spout to aim toward the deepest part of the basin. If the faucet neck wobbles at the base, tighten the mounting nut below to stop vibration that creates random spray.
Designate Wet and Dry Zones
Decide where water is allowed to exist. Keep a small wet zone right at the faucet, and keep everything else dry. Move bottles, cosmetics, and chargers away from the splash radius. Elevate items on trays or shelves so the counter beneath stays dry and easy to wipe.
Use trays that save the counter
Choose a silicone lip tray under soap and toothbrushes to catch drips. For faster drying, use a diatomaceous stone tray under cups and soap dispensers. It absorbs water and releases it quickly. Place a compact dish drying mat or ribbed silicone mat to the side if you wash small items at the sink. Remove and rinse trays weekly.
Wall mount what you can
Mount a soap dispenser or toothbrush holder on the wall or mirror. Drips then fall into the sink, not onto the counter. Over-sink shelves are also effective. They catch small drips and keep the main surface clear.
Improve Surface Drainage
Add subtle slope toward the sink
If your counter holds water near the backsplash, create a micro slope. For stone or solid surface, install a slim, removable counter saver that angles water forward. For a permanent fix during a renovation, request a slight pitch toward the basin. Even one millimeter across the depth will reduce pooling.
Build a water stop where needed
Apply a thin, continuous bead of clear silicone along the back edge where the counter meets the backsplash. Tool it to form a low ridge that blocks water from creeping behind. Keep it neat and low. This is a simple weekend project and prevents hidden rot.
Seal porous materials
Granite, marble, and concrete can darken and stain from standing water. Clean with a pH neutral cleaner and apply a penetrating sealer every 6 to 12 months as recommended. Wipe spills quickly and avoid acidic cleaners on marble and limestone.
Stop Leaks and Hidden Drips
Faucet base and handle leaks
If water collects around the faucet base after use, the gasket or O rings may have failed. Remove the faucet handle and spout following the manufacturer guide, replace O rings, and reseat with plumber’s grease. If you are not comfortable, a plumber can do this in under an hour.
Supply line and drain checks
Open the vanity cabinet and run the water. Look for beads forming on supply lines, shutoff valves, and the underside of the faucet. Replace old plastic lines with braided stainless lines and new washers. Check the pop up drain for seepage around the flange. Reseat with plumber’s putty if needed.
Condensation and cold cups
Cold cups sweat in humid bathrooms and create rings. Set a small stone coaster or a diatomaceous tray for cups. Teach family to keep drinks out of the bathroom or to place them only on the coaster.
Choose Products That Do Not Drip
Soap that stays put
Liquid soap dispensers with short, downward spouts reduce drips. Foaming pumps release less water and make less mess. If using bar soap, use a ventilated soap dish that drains into the sink or onto a tray. Clean the dish weekly to prevent slime.
Toothbrush and toothpaste setup
Use a holder that drains, not a cup that holds water. Squeeze toothpaste over the sink. If toothpaste tends to pool on the counter, wall mount the holder and place it above the basin so any residual falls into the sink.
Declutter For Instant Dryness
Every object on the counter creates a dam that holds water. Remove extras. Keep only daily essentials and relocate the rest to a drawer or cabinet. Use one open tray to group daily items. You will find wiping becomes a single motion rather than weaving around bottles.
Kid Friendly Adjustments
Children create splash with high flow and short reach. Add a faucet extender so the stream lands closer to their hands, reducing slap against the bowl. Lower the flow by partially closing the angle stop valve under the sink. Place a stool to give proper height, and keep foam soap at the front so they finish quickly. Use a bright cloth and a simple rule: dry hands over the sink, then two wipes of the counter.
Renter Friendly Upgrades
Use removable, adhesive splash guards at the back edge of the counter. Add silicone gap tape along the faucet base to stop creep without permanent sealant. Install an over-sink caddy that hangs from the faucet or sits across the basin to store wet items. Use adhesive hooks for cloths and small squeegees. All upgrades can be removed without damage when you move out.
Deep Clean And Weekly Maintenance
Daily
Wipe after use. Ring out the cloth. Keep the faucet set to a moderate flow. Place items back on trays.
Weekly
Lift everything off the counter. Clean the surface with a suitable cleaner. For stone, use a pH neutral product. For laminate or quartz, a mild all purpose cleaner works. Clean trays, the base of the faucet, and the backsplash line. Dry everything before putting items back. Inspect the aerator and rinse it.
Monthly
Check caulk lines and touch up as needed. Inspect supply lines for moisture. Tighten loose mounting nuts. Evaluate the system and remove any item that is not used weekly to keep the surface quick to wipe.
Troubleshooting Stubborn Puddles
Puddle behind the faucet
Likely negative slope or capillary creep. Build a thin silicone ridge at the backsplash and add a shallow counter saver mat that drains forward. If the faucet base leaks, replace O rings or the base gasket.
Spray in all directions
Clean or replace the aerator. Reduce water pressure. Verify the stream lands near the drain, not on the bowl wall.
Water along the front edge
Hands are leaving the sink wet. Move the hand towel closer to the faucet. Train users to dry hands over the basin. Add a small lip tray in front of soap to block runoff.
Drips under soap dispenser
Switch to a non drip model or a wall mounted unit. Add a stone or silicone tray until you replace it.
Persistent damp under items
Moisture is trapped. Elevate items on slatted or ridged trays. Dry the counter fully once a day before resetting items.
Small Upgrades That Make A Big Difference
Microfiber cloth set
Keep three to five soft, absorbent cloths in rotation. Label by room or color code to avoid cross use. Wash without fabric softener to maintain absorption.
Mini squeegee
A compact squeegee makes fast work after shaving or makeup. Pull water toward the sink in two passes, then finish with a quick cloth wipe.
Diatomaceous stone accessories
Use one for soap, one for cups, and one for under the dispenser. They dry fast and cut down on wiping frequency.
Better faucet
If your faucet is the main culprit, upgrade to one with proper spout reach for your sink, a smooth valve, and an included aerator. Choose a finish that hides spots if that bothers you. Quality valves also hold steady flow, which reduces splash.
Protect Edges And Seams
Edges and seams fail when water sits. Inspect front edges for chips and fill small chips with an epoxy repair kit matched to your counter material. Re caulk the sink rim if you notice gaps or discoloration. When applying caulk, clean the area, dry it completely, use painter’s tape for clean lines, apply a thin bead, smooth it, and let it cure the full time before getting it wet.
Organize Under The Sink To Support The Habit
Store refills, extra cloths, and a small trash bin within reach. Keep a backup aerator and a small bottle of vinegar for cleaning it. Use a shallow bin labeled for trays and accessories so seasonal or guest items can be swapped without clutter. When tools are easy to access, a dry counter becomes automatic.
Budget To Premium Path
Start free by changing habits and reducing water flow. Add a microfiber cloth and place the hand towel near the faucet. Next, add trays and a mini squeegee. Then adjust or replace the aerator. If needed, seal the backsplash seam and fix leaks. Finally, consider a faucet upgrade or a slight counter slope during a remodel. Each step adds control and lowers daily effort.
A Simple Daily Checklist
Turn off water at a moderate flow; dry hands over the sink; two quick wipes from faucet outward; return cloth to its spot; keep items on trays; place hand towel close to faucet; reset morning and night. This sequence is enough to keep most counters dry once splash is controlled.
Conclusion
A dry bathroom counter is a system, not a chore. Identify the splash sources, set an easy routine, use trays and tools that direct water back to the sink, maintain seals and hardware, and keep only essentials on the surface. Start with the quick wins today and add one upgrade each week. Your counter will stay dry with less work, your bathroom will look fresher, and your surfaces will last longer.