We are reader supported. When you purchase through links on our site, we may earn an affiliate commission. Also, as an Amazon affiliate, we earn from qualifying purchases.
You want a clear answer before you spend on repairs or a new fridge. This guide explains how long a KitchenAid refrigerator lasts, what shortens or extends that life, and exactly what to do to get more years from yours. Keep reading for a simple plan you can follow today.
How long does a KitchenAid refrigerator last
Most KitchenAid refrigerators last 12 to 15 years with normal use. Well-maintained units can reach 15 to 18 years. Heavy use, poor installation, and skipped maintenance can cut that to under 10 years.
Expectations by category:
French door and side by side models last around 12 to 15 years. Built-in or panel ready models can last longer due to serviceable parts and pro installation, often 15 years or more. Counter depth units last about the same as full depth if airflow is adequate. Compact or beverage centers tend to have shorter lives, often 8 to 12 years.
The first 5 years are usually low trouble. Years 6 to 10 bring ice maker, fan, and control issues. After year 10, compressors, sealed system parts, and door seals are the key risk areas. Plan and budget accordingly.
What determines how long it lasts
Build and model complexity
More features mean more failure points. Dual ice makers, in-door water, multiple evaporators, and smart boards add convenience and repair risk. Simpler top freezer models often outlast feature-heavy French door models. High-end built-ins use better components, but parts cost more when they fail.
Installation and environment
Poor airflow overheats the compressor and shortens life. Leave clear space around the cabinet and do not block the toe grille. Avoid tight enclosures without ventilation. Keep it level so doors seal and drain lines work.
Ambient temperature matters. Very hot rooms force longer run time. Very cold rooms can confuse the thermostat and stop the compressor. Keep the refrigerator in a climate controlled space. Garages with extreme seasons reduce lifespan unless the model is rated for garage use.
Usage patterns
Frequent door openings, long open times, and overfilling make the compressor work harder. Big warm grocery loads cause long recovery times. Family kitchens and rentals see faster wear than light use homes.
Maintenance habits
Dust on condenser coils raises operating temperature. Worn door gaskets leak cold air. Clogged water filters stress valves and ice makers. A short maintenance routine adds years and lowers energy use.
Power quality and surges
Voltage spikes can damage control boards and compressors. A whole home surge protector or a properly rated appliance surge protector helps. Use a dedicated outlet. Avoid extension cords. If unsure, ask a licensed electrician.
Maintenance schedule that actually works
Monthly
Wipe door gaskets with warm soapy water. Dry fully. Check for tears, hardened spots, or gaps. Make sure doors close on their own from a slight angle. Remove spills quickly to prevent odor and mold.
Confirm temperatures with a fridge thermometer. Aim for 37 to 38 F in the refrigerator and 0 F in the freezer.
Every 3 to 6 months
Replace the water filter if your model uses one, or when the indicator advises. Use an NSF certified filter. If you use an external filtration system, install the bypass plug per the manual.
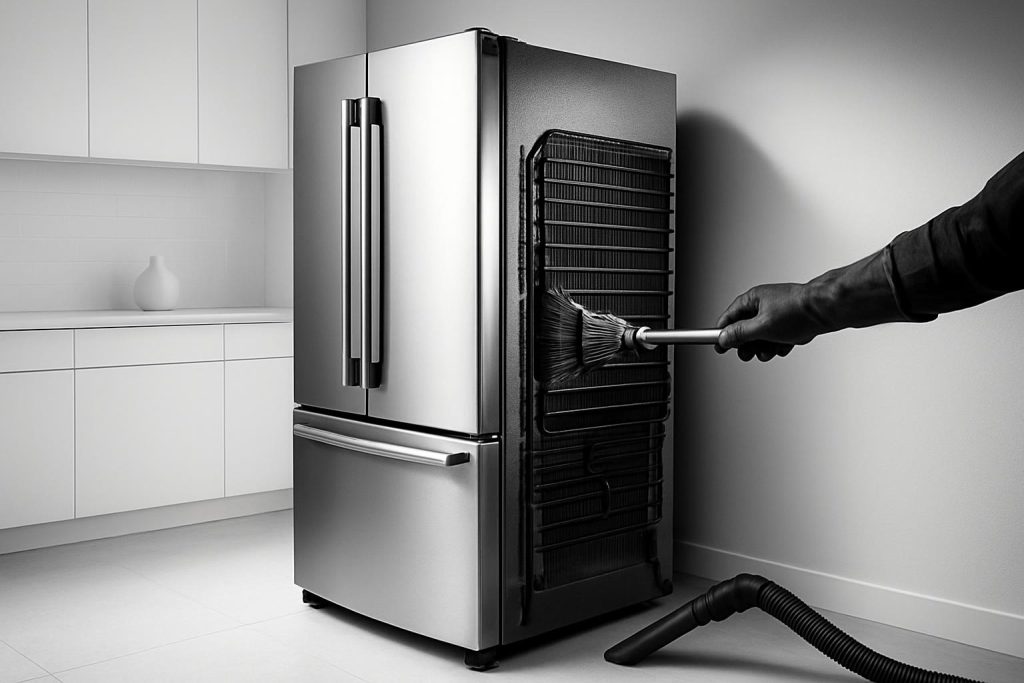
Clean condenser coils. Unplug the unit. Remove the front toe grille or access panel. Vacuum dust and pet hair. Use a soft brush on the fins. If the coils are on the back, pull the unit out carefully and vacuum. Reinstall panels and restore power. This one task can add years.
Clean and check the ice bin. Break up clumps. Run a sanitize cycle if your model supports it.
Once a year
Pull out the unit carefully to check the rear area, water line, and floor condition. Look for kinks or slow leaks. Inspect the drain pan for sludge. Clean it with warm water and a little vinegar, then dry.
Check door alignment. If doors are uneven, adjust the leveling feet or hinge per the manual. Misaligned doors strain gaskets and hinges.
After a power outage or move
Wait a few hours before restarting if the unit was tilted during a move. If the fridge was laid on its side, wait up to 24 hours before plugging in. After power returns, give it 24 hours to stabilize temperatures. Toss perishable food if temperatures were unsafe.
Settings that protect the compressor and food
Temperature targets
Set refrigerator to 37 to 38 F and freezer to 0 F. Do not run colder than necessary. Colder settings do not cool faster; they only make the compressor run longer.
Airflow and loading
Keep vents clear. Do not pack items tight against the back wall. Leave space above and around shelves for air to move. Aim for about three quarters full. Use bins to keep airflow paths open.
Water filtration and ice system
Replace water filters on schedule. Hard water builds scale in valves and the ice maker. If your water is very hard, consider a whole home softener or a point of use filter. If the ice looks cloudy or small, change the filter and check pressure. Cycle the ice maker after filter changes to clear air.
Common repairs, costs, and when to stop repairing
Typical failures and symptom checklist
Not cooling well: dirty coils, failed evaporator fan, stuck damper, low refrigerant from a sealed system leak, failing compressor, or a faulty thermistor or control board.
Ice maker issues: clogged filter, frozen fill tube, bad water inlet valve, broken ice maker module, or low water pressure.
Noises: clicking relays during start attempts, buzzing from a failing compressor, rattling from loose panels or lines, or whooshing from normal refrigerant flow. Intermittent loud fan noise often points to a worn evaporator or condenser fan.
Water on floor or inside: blocked defrost drain, cracked water line, or a loose connection at the filter head.
Frost in freezer: door not sealing, overloading, frequent door opening, failed door heater or gasket, or auto defrost issues.
Average repair costs
Door gasket: 80 to 200 plus labor.
Evaporator or condenser fan: 150 to 350.
Ice maker assembly: 150 to 300.
Water inlet valve: 150 to 250.
Control board: 300 to 600.
Compressor or sealed system work: 600 to 1,200 or more. These are major repairs.
Actual costs vary by model, region, and labor rates. Always request a written estimate.
The 50 percent rule and age trigger
Use this simple rule. If a repair costs more than half the price of a comparable new unit and the fridge is over 8 years old, replace it. If the unit is under 8 years and in good shape otherwise, repair makes sense unless it is a major sealed system issue.
Energy use and replacement math
How much you can save
Older refrigerators can use 700 to 1,000 kWh per year. New efficient models often use 350 to 500 kWh. At a power cost of 0.15 per kWh, dropping 300 kWh saves about 45 dollars per year. Dropping 500 kWh saves about 75 dollars per year. Over 10 years that can offset a big part of the purchase price.
You also gain better temperature stability and quieter operation. If your KitchenAid is over 12 years old and needs a major repair, the energy savings and reliability of a new unit often justify replacement.
Features worth paying for next time
Dual evaporators for better humidity and food life. High efficiency compressor. Good door seals and adjustable hinges. A simple, clear control panel. Reliable ice and water systems with standard filter sizes. Confirm easy access to condenser coils for cleaning.
Warranty and support
What most KitchenAid warranties cover
Most models include a 1 year limited warranty for parts and labor. Many also include additional coverage for sealed refrigeration system parts beyond year one, often up to 5 years, and sometimes parts coverage for years 6 through 10 on specific components. Terms vary by model and region, so check your user guide and warranty statement.
How to keep coverage valid
Install per the manual. Do not modify water or electrical connections outside specifications. Use certified filters. Keep proof of purchase. Do not use the unit in an unapproved location such as an unheated garage unless the manual allows it. For service, use authorized technicians when possible.
Troubleshooting quick wins before service
If it is not cooling well
Verify power and outlet. Make sure the condenser coils are clean. Check that doors are closing and nothing is blocking them. Confirm temperature settings and do not set them colder to compensate; fix the cause. Ensure airflow around the cabinet is not blocked. Remove any tall items blocking interior vents. If it was recently loaded with warm groceries, wait 24 hours.
If it is noisy
Pull the unit forward slightly so it does not touch cabinets. Level front to back and side to side. Tighten loose shelves and bins. Clean coils and fans. Normal sounds include gentle hums, short clicks during defrost, and water flow noises after ice fill. Persistent loud buzzing, grinding, or a rapid click every few minutes needs service.
If you see frost, water, or odors
Frost on items or walls points to a door not sealing, overloading, or long door openings. Defrost drain leaks cause water under drawers. Flush the drain with warm water mixed with a little vinegar. For odors, toss spoiled food, wipe interior with baking soda solution, clean the drain pan, and let air out for a few hours with doors open while powered off and emptied.
Buying tips if you decide to replace
Size and ventilation
Measure the opening, doorways, and path into the kitchen. Leave airflow space around the unit as the manual requires. Counter depth gives a cleaner look but reduces capacity. If your kitchen runs hot, avoid tight cabinetry without venting.
Fewer failure points or must have features
If reliability is top priority, pick a model with a single ice maker, simple controls, and easy coil access. If features matter, choose dual evaporators, internal water and ice to reduce door dispenser issues, and a common filter type. Check parts availability and service options in your area.
Delivery, install, and old unit removal
Confirm the seller includes door removal and reinstallation if needed. Ask for water line setup with a braided stainless hose. Verify they level the unit and check for leaks. Request haul away of the old unit and proper recycling.
Frequently asked questions
Is 10 years old too old to repair
Repair simple, low cost issues like gaskets, fans, or valves. For sealed system or compressor failures at 10 years, replacement is often smarter unless the unit is a high end built-in with strong parts support.
How do I know if the compressor is failing
Signs include warm temperatures despite clean coils and good seals, frequent clicking with short run times, tripped overload, or a hot compressor shell. A technician can confirm with pressure tests and amperage checks.
Can I extend life by lowering the temperature
No. Running colder makes the compressor work harder and can shorten life. Use correct set points and improve airflow and maintenance instead.
Does a full fridge run better
Moderately full is best. Too empty causes temperature swings when doors open. Overfilled blocks vents and strains the system. Aim for about three quarters full and keep vents clear.
Should I turn off the ice maker if I do not use ice
Yes. Turn it off to avoid wear on the valve and to prevent stale ice.
Action checklist to add years starting today
Set fridge to 37 to 38 F and freezer to 0 F. Clean condenser coils. Wipe and inspect gaskets. Replace or bypass the water filter as needed. Level the unit and align doors. Clear interior and exterior airflow paths. Add surge protection if power is unstable. Log the install date and service history.
Conclusion
Most KitchenAid refrigerators last 12 to 15 years, and many reach 15 to 18 years with proper care. Lifespan depends on model complexity, installation, environment, maintenance, and usage. Follow the simple maintenance schedule, keep temperatures on target, protect airflow, and fix small issues early. Use the 50 percent rule and age guide to decide on repair versus replace. With smart care and timely decisions, you get more years, fewer breakdowns, and lower energy costs from your KitchenAid refrigerator.