We are reader supported. When you purchase through links on our site, we may earn an affiliate commission. Also, as an Amazon affiliate, we earn from qualifying purchases.
Gnomes are an easy, fast, and low-cost craft that looks great on shelves, mantels, and tiered trays. You can build them with simple items from Dollar Tree, and no sewing is required. If you are new to crafting, this tutorial shows two methods you can master in one sitting. You will see exactly what to buy, how to assemble each part, and how to avoid common mistakes. Follow along, and you will finish your first gnome with clean lines, a snug hat, and a beard that does not shed.
Introduction
This tutorial keeps you focused on clear steps and simple materials. You will learn a sock gnome method and a foam cone method. Both use hot glue, basic cutting, and easy shaping. You will also get timing, budget notes, storage tips, and quick fixes if something goes wrong. Read the preparation section before you start, then choose your method and follow it from base to hat.
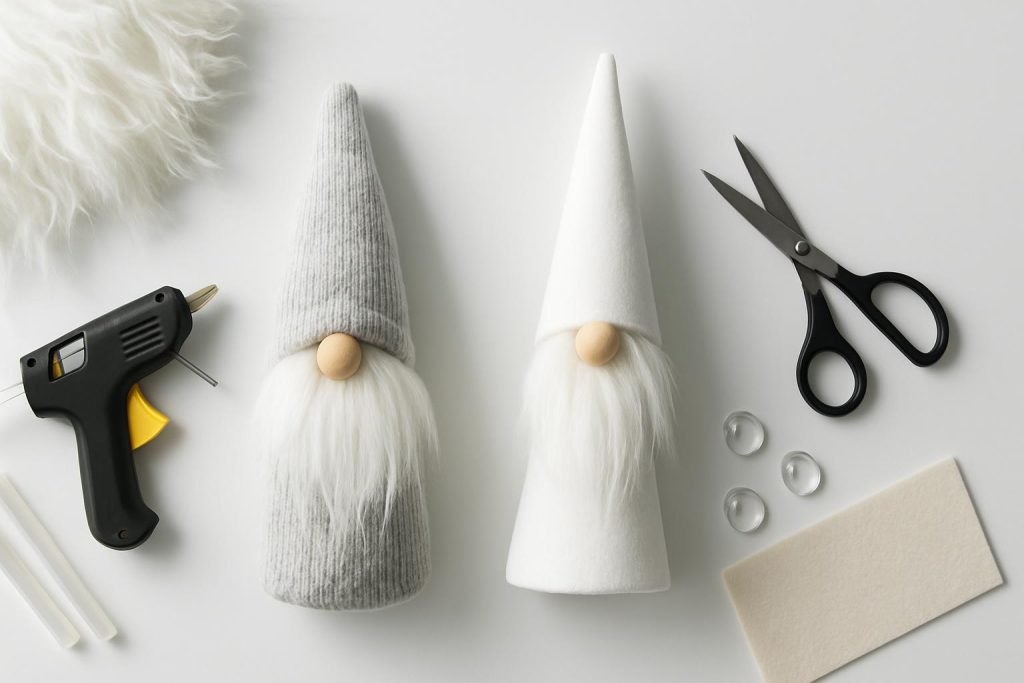
What You Will Use From Dollar Tree
Core materials
Pick one base: a solid crew sock or a small foam cone from the floral aisle. For weight, use decorative stones, glass gems, or aquarium gravel. For body filling, use polyester fiberfill from a pillow, stuffing from a plush, or extra socks. For the beard, choose faux fur fabric, a chenille mop pad, a microfiber duster, or chunky yarn unraveled into strands. For the nose, use a wooden bead, a small pom pom, or a foam ball. For the hat, use a fuzzy sock, a beanie, or a sheet of felt. Have ribbon or twine if you want a trim. These items are widely available at Dollar Tree, and you can mix them based on stock.
Tools and adhesives
Use a low temperature hot glue gun with mini glue sticks. Low temperature helps avoid melting foam and reduces burns. Have sharp scissors for clean cuts. A rubber band or a small zip tie helps close the sock body. Keep a ruler or your hand as a quick guide for size. If hot glue is not available, fabric glue works but dries slower.
Optional upgrades
Grab felt sheets for nose backing and hat lining. Add small wooden buttons, seasonal picks, or mini signs for accents. A lint roller or painter tape strip helps clean glue strings. A small piece of cardboard can become a hat brim insert.
Before You Start
Time, cost, and space
Set aside 25 to 45 minutes per gnome, depending on your method and how many you batch. A single gnome often uses 5 to 8 items, so the cost stays low. Work on a flat surface with a heat-safe mat or a piece of cardboard. Keep a small trash bag for trims and fur scraps.
Safety
Use low temperature glue and keep fingertips away from fresh beads of glue. Let the glue set for a few seconds before pressing. When cutting faux fur, cut only the backing to avoid shedding. Keep small beads and stones away from young children and pets.
Method 1: Sock Gnome
Step 1: Fill and weight the base
Open a solid crew sock and push the toe into the heel to create a sturdy bottom. Pour in decorative stones or glass gems to create a stable weight at the base, about one to two inches deep. Add fiberfill until the body reaches the height you want. Aim for a firm, rounded shape that stands on its own. Test the balance by tapping the side. If it leans, add a few more stones to the base and adjust the stuffing.
Step 2: Close the body
Gather the open end of the sock and pull it tight. Secure it with a rubber band or a zip tie. Trim excess fabric, but leave a small tail you can tuck. Add a dot of hot glue to the gathered area and fold the trimmed end down to seal it. The top does not need to look perfect because the hat will cover it.
Step 3: Prepare the beard
If you use faux fur, turn the fur to the back. Mark a wide U shape that fits the front of your gnome. Cut only the backing with the tip of your scissors. Avoid cutting the long strands. If you use a chenille mop pad or a microfiber duster, cut a piece as wide as the body and long enough to reach from mid-torso to just above the base. If you use yarn, cut many strands the same length, then glue them in a row to a felt strip to make a beard panel. Comb the beard with your fingers to remove loose fibers.
Step 4: Add the nose
Choose a wooden bead, pom pom, or small foam ball. If the bead has a hole, face the hole down. Glue a small felt circle to the back of the nose to create a flat mounting surface. This helps the nose sit cleanly on the beard and resist popping off. Set the nose aside for final placement.
Step 5: Make the hat
If you use a fuzzy sock as a hat, cut it just above the heel to form a tube. For a slouch look, leave extra length. If you use felt, cut a wide triangle with a curved base. Glue the long edge to form a cone. Test fit over the body. The hat should cover the top of the body and overlap the beard area by about a half inch. If it feels loose, glue a small strip of felt inside the brim to tighten it.
Step 6: Assemble the face
Glue the beard to the front of the sock body. Place it low enough to allow room for the nose and hat. Press and hold until secure. Glue the nose at the top center of the beard. Let it set. Slip the hat over the top, pull it down to just kiss the top of the nose, and align it evenly. Run a thin line of glue under the front brim to lock it to the body. Add a tiny dot of glue behind the hat to anchor the slouch if you want a fold.
Step 7: Finish details
Trim the beard for a neat shape. Pinch and glue a small fold in the hat tip if you want more character. Add ribbon, a small bow, or a seasonal pick to the hat. Clean stray glue strings with a quick twirl of cooled glue, a lint roller, or tape.
Method 2: Foam Cone Gnome
Step 1: Prep the cone
Use a small foam cone from the floral aisle. If the base is rough, gently press it on the table to level it. If the cone squeaks with glue, use low temperature glue and light pressure.
Step 2: Wrap the body
Wrap the cone with felt or a cut sock to create a clean body color. Start at the base, apply a thin line of glue, and smooth the fabric around the cone. Overlap the seam at the back. Trim extra fabric at the base for a flat stand. The wrap hides foam texture and gives the hat and beard a clean surface to stick.
Step 3: Place the beard
Cut a beard panel as wide as the front of the cone and as long as you prefer. Glue it to the front, about halfway down the cone, leaving space for the hat to cover the top edge. If the beard seems puffy, glue a felt backing strip first and then glue the strip to the cone. This improves adhesion.
Step 4: Add the nose and hat
Glue the prepared nose at the top of the beard. Make a felt hat cone or use a fuzzy sock tube. Test fit over the cone and beard. Glue the brim to the body fabric, not to the fur strands. Press gently to avoid crushing the foam. Add a dot of glue at the back to hold the hat angle.
Step 5: Final touches
Trim visible glue, tidy the beard shape, and add a button, bow, or twine band. The cone method produces a tall, slim gnome that fits narrow shelves and tiered trays.
Clean Work, Fewer Glue Strings
Control the glue
Use small, controlled lines of glue and let each bead cool a few seconds before touching. Pull glue strings while the glue is still slightly warm. If a string appears later, roll it off with a finger or use a lint roller. Avoid flooding the fur with glue. Always glue to backing or fabric, not to loose fibers.
Cutting faux fur without mess
Mark the back of the fur. Cut through the backing only. Gently shake the piece outside or over a trash can to release loose hairs. Comb with fingers to fluff the pile back into place.
Fit and Proportion Tips
Body and hat balance
For a squat, cute look, keep the body wide with a short hat. For a taller look, use a slim cone and a longer hat. The nose should sit centered and close to the hat brim. Leave a small gap under the nose to show beard depth. If the hat covers too much, trim the beard top and reset the brim with a thin line of glue.
Beard shaping
Trim the beard into a soft V or rounded U. Cut a little at a time. Comb and check symmetry often. A tidy beard makes the entire gnome look finished, even with simple materials.
Seasonal Ideas and Variations
Holiday style
Use red or green hats with white faux fur for winter. Add a small ornament or a snowflake button. Wrap twine around the brim and tie a tiny bow.
Fall style
Use a plaid sock hat and a warm brown beard. Add a mini leaf pick or a small pumpkin accent at the base.
Spring style
Use pastel felt for the hat and a light gray beard. Add a small ribbon and a floral pick. Keep the body color soft and neutral.
Everyday neutral style
Use gray, cream, or black hats with a classic white or salt and pepper beard. Add a wood button or no embellishment for a clean, modern look.
Troubleshooting
Hat slips upward
Glue two small anchor dots inside the brim at the sides and one in the back. Add a rubber band under the hat to grip the body, then pull the hat down over it and glue the brim. The band disappears under the fabric and keeps the hat in place.
Beard sheds or looks thin
If fur sheds, you may have cut the pile. Trim the worst ends, then comb. For mop pad or yarn beards, add a felt backing and glue that to the body. This makes a thicker, cleaner beard panel. Avoid pulling on strands while the glue is fresh.
Body leans or falls
Add more weight to the base by pouring extra stones or glass gems. Check that the bottom is flat. If needed, glue a felt circle to the base to create traction on smooth shelves.
Glue shows on the beard
Lift the hat brim and peel off any visible glue dots with slow, gentle pressure. Reattach the brim with a thinner bead of glue directly to the body fabric, not to the beard fibers. Press with the side of a tool instead of fingers to avoid spreading glue.
Budget and Batch Planning
Single gnome estimate
One sock or one cone, one beard material, one nose, one hat, and one pack of glue sticks cover a single gnome with extra left over. Embellishments are optional. Buying neutral colors lets you reuse scraps across multiple gnomes.
Batch making
Cut all beards at once. Prep all noses with felt backers before gluing. Assemble bodies in a line. Then attach beards, noses, and hats in the same order. This cuts time per gnome and helps you maintain consistent size and fit across a set.
Display, Care, and Storage
Where to display
Place gnomes on mantels, bookshelves, tiered trays, and entry tables. Keep them away from moisture and direct heat. If pets are curious, position gnomes on higher shelves.
Cleaning and upkeep
Dust gently with a microfiber cloth. Use a lint roller on the beard if needed. If the hat shifts, reheat a small dot of glue and reset the brim. Store in a dry box with tissue around the beard and hat to protect the shape.
Conclusion
You can make stylish Dollar Tree gnomes in under an hour with simple supplies and basic glue work. The sock method gives you a soft, rounded body. The cone method gives you a tall, slim silhouette. Both look polished when you cut the beard cleanly, place the nose with a felt backer, and anchor the hat with a thin glue line. Start with one, learn the fit, then build a matching set for any season. With these steps and tips, you will get consistent results and a neat finish every time.
FAQ
Q1: What materials do I need to make a Dollar Tree gnome?
A1: Use a crew sock or a small foam cone for the base, decorative stones or glass gems for weight, fiberfill or extra socks for stuffing, faux fur or a chenille mop pad or a microfiber duster or chunky yarn for the beard, a wooden bead or pom pom or foam ball for the nose, a fuzzy sock or felt for the hat, a low temperature hot glue gun with glue sticks, scissors, and a rubber band or zip tie.
Q2: How long does one gnome take from start to finish?
A2: Plan for 25 to 45 minutes depending on the method and how many you make at once.
Q3: Can I make a gnome without using a sock?
A3: Yes, use the foam cone method by wrapping the cone with felt or a cut sock, gluing on the beard and nose, and finishing with a felt or fuzzy sock hat.
Q4: How do I stop the hat from slipping off?
A4: Glue small anchor dots inside the brim, add a rubber band around the body under the hat, pull the hat down over it, and then glue the brim to the body fabric.
Q5: What can I use for the beard if I cannot find faux fur?
A5: Use a chenille mop pad, a microfiber duster, or chunky yarn glued to a felt strip to make a beard panel.