We are reader supported. When you purchase through links on our site, we may earn an affiliate commission. Also, as an Amazon affiliate, we earn from qualifying purchases.
Kitchen cabinets set the tone for how your space looks and how it works. With smart IKEA hacks, you can lift storage, speed up daily tasks, and get a cleaner, high-end finish without a full remodel. This guide shows clear steps, exact parts to pick, and easy maintenance so beginners can upgrade with confidence.
Plan Your Upgrade
Measure and Map
Measure wall length, ceiling height, window and appliance locations, and note outlets and vents. Record cabinet widths and depths. Mark problem zones such as hard-to-reach corners, crowded drawers, and wasted gaps. A simple sketch with sizes helps you pick compatible IKEA parts and avoid returns.
Set Goals and Budget
List your top three outcomes. Examples are faster access to pans, a hidden trash zone, and more pantry space. Assign a budget per goal. Keep a 10 to 15 percent buffer for extra brackets, fillers, and fasteners.
Pick the Right IKEA Base System
Use IKEA Sektion for kitchen cabinets. Sektion carcasses accept modules like Utrusta hinges and Maximera drawers. This gives you soft-close motion, adjustable shelves, and many interior organizers. Plan cabinet widths in 20, 30, 40, 60, and 80 cm patterns for easy fit.
Tools and Safety Basics
Prepare a tape measure, pencil, drill and driver bits, level, stud finder, clamps, and a small hand saw. Wear eye protection. Turn off power when working near wires. Use wall anchors rated for the load if studs are not available. Follow IKEA instructions and add pilot holes for clean installs.
Core Cabinet Upgrades That Work in Any Kitchen
Upgrade to Soft-Close Hinges and Full-Extension Drawers
Swap old hinges for IKEA Utrusta soft-close hinges to stop door slams and protect finishes. Replace shallow drawers with Maximera full-extension drawers so you can see and reach everything. Use shallower Maximera near plumbing and deeper ones for pots and pantry zones. Check that drawers clear the door frame and adjust runners level before final tightening.
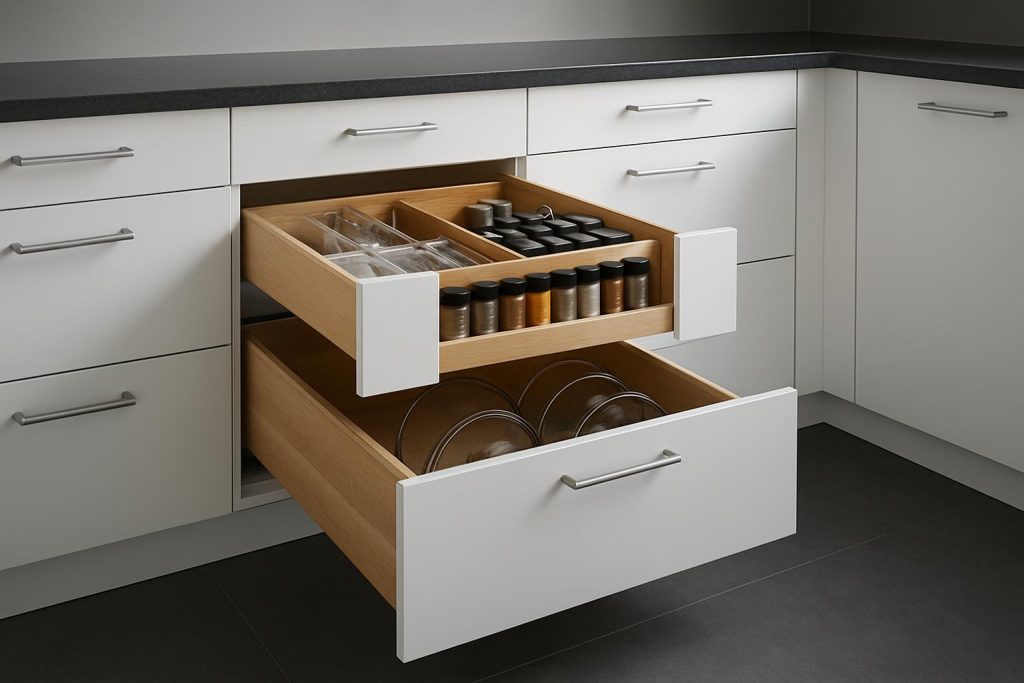
Add Inner Drawers Behind Doors
Inner drawers turn a basic door cabinet into high-capacity storage. Install one near the top for spices and baking tools, one in the middle for food storage containers, and one low for heavy pans. Use Maximera inner drawers and mount them to the side rails per the height marks. Set the door to open wide with the correct hinge opening angle so drawers slide out cleanly.
Turn Dead Space Into Toe-Kick Drawers
The plinth under base cabinets can hide slim storage for trays, baking mats, and cleaning cloths. Build a low drawer box with shallow slides and face it with a cut section of matching toe-kick. Keep clear of plumbing and dishwasher hoses. Use soft-close slides if possible. Add a discreet pull or a push-to-open catch. This is an advanced hack, so take your time on measurements and test-fit before drilling into cabinet legs.
Make the Most of Corner Cabinets
Install an Utrusta corner carousel to bring items to you. It prevents stacking and strain. For a blind corner, use an Utrusta pull-out corner unit so rear space does not go to waste. Keep heavy items on the lower shelf and lighter ones above. Adjust the stop so trays do not hit the door.
Build a Slim Pull-Out Pantry
For a narrow gap, use a 20 cm Sektion base cabinet with an Utrusta wire pull-out. Add Variera bins to group snacks, oils, and baking items. Align the cabinet plumb and level so the pull-out tracks run straight and do not rub. Secure the cabinet to adjacent units for stability. Label bins so restocking is quick.
Install Pull-Out Trash and Recycling
Pick a Sektion base that fits your bin needs. A 60 cm base can hold two larger bins or a bin plus caddy. Use an Utrusta pull-out frame with soft close. Mount rails at the same height on both sides, check square, and add the door to the front bracket. Test for full closure. Add a small deodorizer under the sink and clean spills right away to prevent odors.
Organizing Hacks Inside Cabinets
Create Order in Drawers
Use Variera cutlery trays and adjustable dividers to stop items from sliding. Set a layout that matches your cooking flow. Keep knives near prep space, spatulas near the stove, and wraps near food storage containers. Add a non-slip liner under trays to reduce movement.
Store Lids So They Do Not Tangle
Use the Variera pot lid organizer set to narrow spacing for small lids and wider spacing for large ones. Place the organizer sideways at the drawer front so you see grip points fast. If using a door cabinet, mount a lid organizer on an inner side panel. Confirm screw length will not pierce the exterior.
Stand Baking Sheets and Cutting Boards Upright
Turn a lower cabinet into a vertical zone using two Variera dividers spaced to match your largest sheet pan. Add a third divider for boards. Vertical storage prevents scratches and frees space for pots in the next drawer.
Lock Down Spices and Small Jars
Use an inner drawer with a Variera spice insert. Place spices label-up in shallow rows. Keep cooking spices low and baking spices higher. Restock with the same container style to keep rows consistent. Add a small light strip inside if the area is dark.
Mount a Magnetic Knife Rack Inside a Door
Use an IKEA magnetic knife rack on a thick cabinet door only if the door can accept short screws without breakthrough. Mark positions carefully and predrill shallow pilot holes. Keep blades away from shelf edges and child height. If unsure, mount the rack on a side panel instead of the door.
Style Upgrades on a Budget
Finish Ends with Cover Panels
Raw cabinet sides look unfinished. Add matching cover panels flush with door faces for a built-in look. Shim as needed so faces align. Use color-matched screws or finish nails sparingly and fill holes with putty. Run a thin bead of paintable caulk where panels meet walls for a clean line.
Add Trim and Fillers
Close small gaps with filler strips cut from a cover panel. Leave a tiny reveal rather than a tight fit so doors do not bind. At the ceiling, a simple trim hides gaps and dust. Paint filler edges before final install for a factory feel.
Refresh Doors with Paint the Right Way
Clean doors with degreaser, rinse, and dry. Lightly scuff with 220 grit, vacuum dust, and tack cloth. Use a bonding primer suitable for laminate. Apply two thin coats of a hard-wearing waterborne enamel. Let cure fully before reassembly. Do not paint in high humidity and do not rush dry times. Protect edges near the dishwasher with a thin silicone edge guard to resist steam.
Swap Handles and Knobs
New hardware updates the whole room. Use handles with the same center-to-center dimension as your old ones or add backplates to cover old holes. Tape a straight guide line to align pieces. Tighten by hand to avoid stripping the threads. Wipe fingerprints after install.
Add Under-Cabinet Lighting
Install IKEA Omlopp or Utrusta LED lights for bright work areas. Plan driver size and cable paths. Stick or screw the light bars to the cabinet underside, hide wires with a slim cover strip, and place the driver inside a nearby cabinet. Add a motion or remote switch if desired. Warm light makes wood tones cozy, while neutral light keeps whites crisp. Keep cables clear of hot areas.
Rental-Friendly Moves
Use Adhesive Surfaces and Shelf Inserts
Protect shelves with removable adhesive liner. Add Variera shelf inserts to create a second level for cups and bowls without drilling. Place soft felt pads under organizers so surfaces do not scratch. Remove liners slowly with heat to avoid residue at move-out.
Upgrade Without New Holes
Install inner drawers that mount to existing holes. Swap to soft-close hinges that reuse the same cup and screw points. Add non-permanent LED strips with adhesive backs and a plug-in driver. Use over-the-door hooks inside a pantry for towels and mitts.
Bring In Mobile Storage
Use a Raskog cart for produce, snacks, or coffee gear. Roll it near prep space when cooking, then park it out of the way. Place a cutting board on top for a quick extra surface. Use small bins so items do not shift when moving.
Step-by-Step Mini Projects
Install an Inner Drawer Behind a Door
Empty the cabinet and remove the shelf. Mark the desired drawer height, leaving clearance above contents. Snap the Maximera runners into the side holes at the same level left and right. Screw the runners to lock them. Assemble the drawer box, slide it on, and test. Adjust the door hinges so the door opens wide. Add the included stops so the drawer clears the door edge. Load items and check that weight slides smoothly.
Add a Toe-Kick Drawer
Remove the toe-kick panel and measure clear height. Build a shallow drawer box that leaves a few millimeters of clearance. Mount low-profile slides to the cabinet bases or a simple cleat screwed to the side panels, not to the plastic legs. Center the slides and ensure they are parallel. Attach a cut toe-kick piece as the drawer face. Add a push latch or a low-profile pull. Reinstall adjacent toe-kick pieces and check for smooth travel.
Fit a Pull-Out Trash and Recycling Unit
Choose an Utrusta pull-out frame sized for your base. Preassemble the frame on a flat surface. Mark rail height inside the cabinet, level side to side and front to back. Screw the rails in place. Slide the frame in, test closing and soft-close action, then attach bins. Mount the door bracket to the frame, adjust spacing so the door lines up with neighbors, and tighten. Add a small mat under the bins for easy wipe-down.
Cleaning and Care for Longevity
Daily and Weekly Care
Wipe doors and handles with warm water and mild dish soap. Dry with a soft cloth to prevent water spots. Clean spills quickly at sink and trash zones. Vacuum drawer boxes when crumbs collect. Remove bins and wash them monthly.
Protect Against Heat and Moisture
Run the range hood during cooking. Open the dishwasher only after steam drops. Use drip trays under sink cleaners. Add felt bumpers to doors to soften close and avoid finish wear. Keep a small silicone mat under oils to stop seeping onto shelves.
Tune Hardware Twice a Year
Tighten hinge screws and handle screws every six months. Relevel drawers if they drift. Lubricate slides lightly if they squeak. Check lighting cables for sagging and secure them with clips.
Common Mistakes to Avoid
Skipping Layout Checks
Do not install pull-outs without confirming door swing and hinge type. Wide drawers need doors to open far enough to clear faces.
Ignoring Clearances
Leave space for pipes, outlets, and appliance vents. Test-fit bins and organizers with the actual items you plan to store before final screws.
Rushing Surface Prep
Paint will fail without proper cleaning and bonding primer. Follow dry times and allow cure before reinstalling hardware.
Using the Wrong Fasteners
Do not use long screws in cabinet doors. Check thickness and use short screws or through-bolts with washers where needed. Use wall anchors rated for cabinets if studs are not at the right spots.
Budget, Time, and Order Checklist
Budget Smart
Prioritize the highest daily impact first. Soft-close hinges, inner drawers, and trash pull-outs deliver immediate wins. Save decorative trim and paint for later if needed to protect function-first work.
Stage the Work
Group tasks by zone. Do all drawer swaps in one session. Do all lighting in one session. Plan painting during a low-cook week. Keep a bin for hardware and label each bag so reassembly is smooth.
Order With Intention
List every cabinet and its upgrades. Add matching cover panels, fillers, hinges, drawers, organizers, handles, and lighting parts to one order. Include spares like extra brackets and a few more dividers than you think you need. This prevents mid-project delays.
Conclusion
Bring Function and Finish Together
IKEA cabinet hacks can transform how you cook and clean. Focus on soft-close motion, pull-outs that bring items to you, and organizers that lock in order. Finish with panels, trim, hardware, and light that match your style. Maintain with simple cleaning and quick tune-ups. Start with one cabinet, learn the steps, and build momentum across the whole kitchen.
FAQ
Q: Which IKEA cabinet system should I choose for a kitchen upgrade?
A: Use the Sektion system with Utrusta hinges and Maximera drawers for soft-close motion and flexible storage.
Q: What is the fastest beginner-friendly cabinet upgrade?
A: Add Utrusta soft-close hinges, install a Maximera inner drawer behind a door, swap handles, and drop in Variera shelf inserts.
Q: How do I add a pull-out trash and recycling unit?
A: Install an Utrusta pull-out frame in a Sektion base, mount rails level, add bins, then attach the door bracket and adjust for alignment.
Q: How can I make a slim pull-out pantry with IKEA parts?
A: Use a 20 cm Sektion base cabinet with an Utrusta wire pull-out and Variera bins, secure the cabinet plumb and level, and anchor it to neighbors.
Q: How do I keep IKEA cabinet doors and drawers clean and durable?
A: Wipe with mild dish soap and warm water, dry after cleaning, run the range hood, avoid steam blasts, add felt bumpers, and tighten hardware twice a year.