We are reader supported. When you purchase through links on our site, we may earn an affiliate commission. Also, as an Amazon affiliate, we earn from qualifying purchases.
Designing a walk in closet is not about size alone. It is about clear zones, smart storage, and lighting that helps you get dressed fast. This guide walks you through planning, layout, storage must haves, small space tricks, and a simple upkeep routine. Follow each step to build a closet that looks good and works every day.
Start With a Clear Plan
Measure the Space
Measure length, width, and ceiling height. Note door swings, windows, outlets, and vents. Sketch a simple floor plan. Mark any sloped ceilings or bulkheads. Record your aisle target. Aim for 36 inches for comfort. Thirty inches is the minimum you can live with in tight rooms.
Define Your Zones
Count what you own before you design. List long hang dresses and coats. List short hang shirts, blouses, and folded pants on hangers. Count shoes and note heels vs flats vs boots. Note bags, hats, jewelry, belts, and ties. Decide if you need a hamper, safe, or charging drawer. This list sets your storage mix. Design to the numbers, not the wish list.
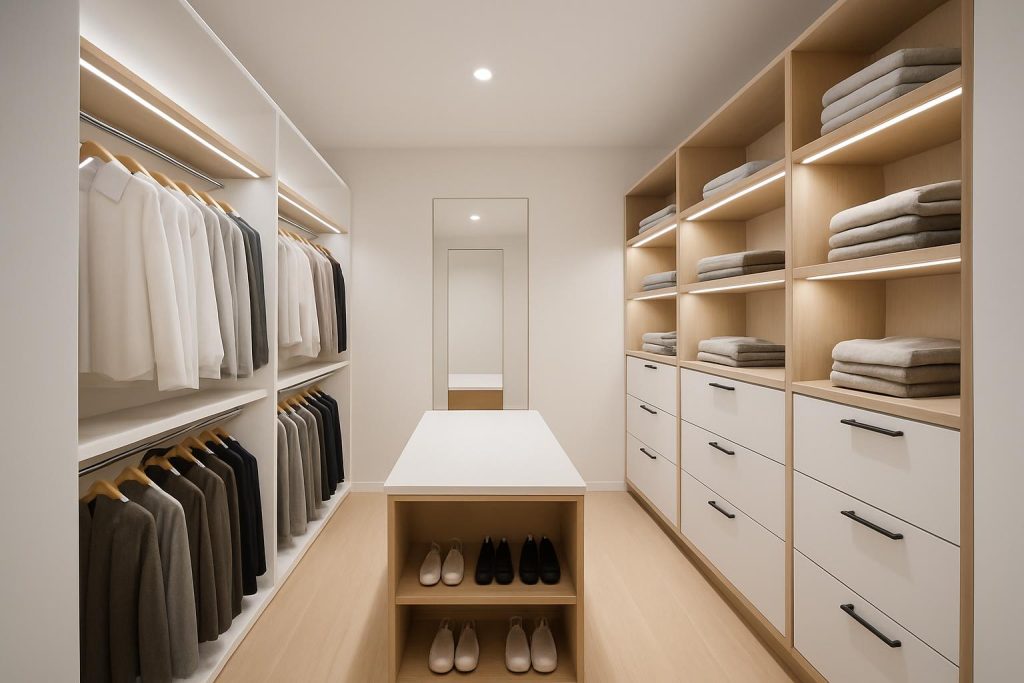
Choose a Layout
Pick a layout that fits the room shape. Use a single wall in very narrow rooms. Choose an L shape for small to medium rooms. Go U shape when you have width for two walls and an island. Keep hanging on the long walls. Place shelves and drawers near the entry for fast access. Leave full height space for a mirror or a bench at the end wall if possible.
Smart Storage That Fits Real Life
Hanging Heights
Use double hang for shirts and folded pants. Set lower rod around 40 inches from the floor. Set upper rod around 80 inches if your ceiling allows. If that is high for you, add a pull down rod. Keep long hang for dresses and coats at 60 to 72 inches of clear height. Add a shelf above each rod for boxes and bags.
Shelves That Work
Choose shelf depth by item. Shoes do best on 10 to 12 inch shelves. Sweaters and denim need 12 to 14 inches to stay neat. Tall stacks tip over, so keep stacks to 8 inches high. Add vertical dividers for bags to prevent sagging. Leave at least 10 inches between shelf levels for shoes and folded tees. Leave 12 to 14 inches for bulky knits.
Drawers and Dividers
Drawers hide small items and keep dust down. Use shallow drawers for underwear, socks, and jewelry. Use medium drawers for tees, gym wear, and sleepwear. Add adjustable dividers in top drawers for watches, sunglasses, and belts. Soft close slides prevent slamming and protect hardware.
Shoe Storage Options
Pick storage for the footwear you use most. Flat shelves are flexible and easy to clean. Slanted shelves with a toe stop show pairs clearly. Pull out shoe trays save time and fit under hanging. Tall boots need 18 to 22 inches of height. Use boot shapers to keep form. Store off season shoes on higher shelves. Keep daily pairs at knee to hip height.
Accessories and Add Ons
Add a valet rod to stage outfits. Use pull out belt and tie racks near the mirror. Install a pull out hamper with a washable liner. Include a locking drawer or a small safe for passports and spare cash. Add a charging drawer with cable grommets for watches and devices. Use a lint brush holder and a small sewing kit in a shallow drawer. These details reduce morning delays.
Lighting That Shows True Color
Layered Lighting
Use ambient, task, and accent light. Ambient light comes from a central ceiling fixture or an even grid of recessed lights. Task light comes from LED strips under shelves and above rods. Accent light highlights glass cabinets or display niches.
Placement Tips
Place ceiling lights down the center of the aisle to avoid shadows on the rods. Add LED strips at the front edge under each shelf to light the items below. Put a light above a full length mirror. Use toe kick lighting for soft night light and wayfinding.
Color and Quality
Choose warm to neutral white between 3000 and 3500 Kelvin for true clothing color. Aim for a color rendering index of 90 or higher. Diffuse lenses reduce harsh spots. Dimmers help mornings and late nights. Motion sensors are useful in small closets and for quick entries.
Mirrors, Seating, and Surfaces
Full Length Mirror
Install a full length mirror near the exit so you get a final check in natural hallway light. If space is tight, use a mirror on the back of the door or a slim mirrored panel on a side wall.
Island or Bench
A closet island adds drawers and a landing zone. Leave 36 inches of clearance on all sides. If the room is narrow, use a slim bench with shoe storage below. A rolling cart with trays can stand in for an island in small closets. Top surfaces should be easy to wipe and scratch resistant.
Countertops and Trays
Use a counter on the island for folding and staging. Add trays for watches, rings, and keys. A shallow lip keeps items from sliding off. Keep the counter clear to reduce clutter.
Doors, Glass, and Visibility
Open vs Closed Storage
Open shelves are fast to access and show what you own. Closed cabinets reduce dust and visual noise. Combine both. Keep daily wear open. Keep formal items behind doors. Use mesh bins or ventilated baskets for gym gear.
Glass Fronts and Dust
Glass fronts help visibility and cut dust. Frosted glass hides clutter. Clear glass works when you keep uniform folding. Use soft lighting inside glass units to avoid glare. Wipe glass weekly for a clean look.
Materials, Colors, and Style
Finishes and Hardware
Choose durable melamine, wood veneer, or painted MDF for systems. Use metal rods and quality brackets. Pick handles that match other home finishes. Matte finishes hide fingerprints. Gloss reflects light but shows smudges.
Color Strategy
Light colors brighten small closets and reflect light onto clothes. Dark systems look rich but need stronger lighting. Use a consistent color for structure and a contrasting back panel or hardware for interest. Matching hangers create an instant tidy effect.
Small Walk In Closet Solutions
Use Corners and Vertical Space
Install corner shelves or a corner hanging unit to use dead zones. Run shelves to the ceiling for off season storage. Add a step stool that folds flat. Use slim pull outs between sections for ties, belts, and scarves.
Pocket and Sliding Doors
Replace a swinging door with a pocket or sliding door to free floor space. This change often recovers the area needed for a bench or extra shelves.
Slim Island Alternatives
If you cannot keep a 36 inch aisle around an island, skip it. Use a narrow console with drawers on casters. Use wall mounted fold down counters for a quick surface that tucks away.
Shared Closets That Work
Equal Zones
Split the closet into clear zones for each person. Give each a long hang, a double hang, and a drawer bank. Use matching hanger styles but different colors for fast sorting. Share the island and hamper if possible.
Neutral Systems
Choose a neutral system color and hardware that suit both users. Add a shared accessories zone near the exit with a mirror, lint brush, and tray for wallets and keys. Keep the daily path simple to reduce traffic jams.
Airflow, Cleaning, and Care
Ventilation and Dehumidifying
Good airflow protects fabrics. Keep a vent open or add a low noise fan if the closet feels stuffy. Use a small dehumidifier in damp climates. Leave space above top shelves for air to move. Avoid blocking vents with boxes.
Weekly Reset Routine
Do a five to ten minute reset once a week. Rehang items by category. Empty and reline the hamper. Wipe counters and handles. Dust shelves you touch often. Vacuum the floor and baseboards. Return stray items to their zones. This keeps order without a full clean.
Seasonal Rotation
Rotate twice a year. Move off season items to top shelves or bins. Edit before you store. Clean shoes before boxing. Donate items you have not worn in a year. Label bins on the short side and face labels outward.
Budget and Timeline
Quick Wins Under a Weekend
Swap hangers to a single style. Add shelf dividers and labeled bins. Install a valet rod. Add motion sensor LED strips under one shelf run. Mount a full length mirror. These changes lift function fast.
Mid Range Upgrades
Install modular systems with adjustable shelves and rods. Add drawers with soft close slides. Upgrade lighting to a dimmable ceiling fixture plus under shelf LEDs. Replace a swing door with a pocket door.
Custom Build Considerations
Go custom when you need exact fit, angled ceilings, or built in islands. Plan power for lighting, a charging drawer, and a steamer outlet. Order materials with a finish sample in hand to ensure color match across pieces.
DIY vs Pro
When to DIY
DIY works for straight walls, standard ceilings, and modular systems. You need a level, a stud finder, a drill, and patience. Follow the manufacturer layout. Anchor into studs. Shim for level and plumb.
When to Hire
Hire a pro for complex layouts, uneven walls, or electrical and door changes. A pro speeds the project and ensures safe anchors. Use a licensed electrician for new circuits, recessed lights, and code compliance.
Common Mistakes to Avoid
Do not design before you count your clothes. Do not forget aisle clearance. Do not set shelves too deep for shoes. Do not skip task lighting. Do not scatter drawers in many places. Keep similar items together and close to where you dress. Do not overload a single wall and leave the rest empty. Balance storage on both sides for a calm look.
Step by Step Build Outline
Clear the room and patch walls. Paint now while the space is open. Mark stud locations. Lay out the plan on the floor with painter tape. Dry fit key pieces before drilling. Install vertical panels first. Add rails and rods next. Level each shelf run as you go. Install drawers and check smooth travel. Mount lighting and test switches. Add accessories last. Load items by category. Adjust shelf spacing after a week of use if needed.
Conclusion
A dream walk in closet is clear to use, simple to clean, and tailored to your wardrobe. Start with accurate measurements and a zone plan. Build smart storage with the right depths and hanging heights. Layer lighting so colors read true. Use mirrors and a landing zone to speed your routine. Keep airflow steady and run a weekly reset. With these steps, your closet will stay organized and ready every day.
FAQ
Q: What is the best layout for a small walk in closet
A: Use a single wall or L shape and keep at least 30 inches of aisle space. Choose double hang sections, run shelves to the ceiling, and use a pocket or sliding door to save space.
Q: How deep should shelves be for shoes and sweaters
A: Shoes work well on 10 to 12 inch shelves. Sweaters and denim need 12 to 14 inches to stay neat.
Q: What lighting works best in a walk in closet
A: Use layered lighting with ambient ceiling light, task LEDs under shelves and above rods, and accent lights for displays. Choose 3000 to 3500 Kelvin and a color rendering index of 90 or higher.
Q: How wide should the aisle be and can I fit an island
A: Aim for a 36 inch aisle for comfort, with 30 inches as the minimum. An island needs 36 inches of clearance on all sides. If you cannot keep that, use a bench or a rolling cart instead.
Q: How do I keep the closet organized week to week
A: Do a five to ten minute weekly reset. Rehang by category, empty and reline the hamper, wipe surfaces, dust shelves you use often, vacuum floors, and return stray items to their zones.