We are reader supported. When you purchase through links on our site, we may earn an affiliate commission. Also, as an Amazon affiliate, we earn from qualifying purchases.
Modern farmhouse kitchens blend warmth with clean lines. The result is a space that feels welcoming, works hard, and stays stylish for years. This guide breaks down the style into clear steps you can use today, from layout and finishes to storage, styling, and upkeep. You will see what to pick, what to skip, and how to pull it all together without stress.
Core Principles That Shape the Look
Warm Meets Clean
Modern farmhouse is built on contrast. Think simple cabinet lines with natural wood, soft whites with black accents, and crisp surfaces with textured pieces. Each element has a job. The space feels calm, not busy. The details are deliberate, not fussy.
Balance Old and New
Use modern materials that clean easily, then layer in classic touches. Pair quartz with a vintage style rug. Add a shaker cabinet with a sleek faucet. Mix one reclaimed piece with newer items. Keep the mix steady so the room feels cohesive.
Function Comes First
Every choice should support daily cooking and cleaning. Durable countertops, wipeable paint, and smart storage make the style livable. Beauty grows from function. Start with how you use the kitchen, then choose finishes that match.
Layout That Works Every Day
Work Zones and Flow
Group tasks into clear zones. Prep near the sink with knives and boards. Cooking around the range with pots, pans, and spices. Dish cleanup near the dishwasher with everyday plates and flatware. Keep the path between sink, cooktop, and fridge open. Aim for simple, direct routes with no crowding.
Island Sizing and Seating
Leave at least 36 inches of clearance around an island. Use 42 inches where it is a main work aisle. Allow 48 inches behind stools if it is a walkway. Plan 24 inches of width per stool and a 12 inch countertop overhang for knees. Keep the countertop surface uncluttered with outlets and a charging drawer so cords stay hidden.
Pantry Options
A full pantry closet is ideal, but not required. Use a tall cabinet with roll out trays. Add a slim pull out for oils and spices by the range. Use clear bins for baking zones. Label simply and keep top shelves for back stock. Good pantry order makes the whole kitchen feel larger.
Color and Finish Strategy
Base Palette
Start with soft whites, warm grays, or greige for cabinets and walls. Add black or charcoal for hardware, lighting, and accents. This base feels calm and timeless. It supports both stainless and wood tones.
Accent Tones
Bring in muted greens or soft blues on an island or pantry door. Keep saturation low so the room stays airy. Tie the accent to textiles or stool upholstery. Use the same undertone family across paint and tile to avoid clashing.
Wood Tones
Light to mid wood warms the space. White oak, maple, and ash fit well. Avoid orange or very red tones. If you have strong existing wood, balance it with cooler paint and matte black to neutralize warmth.
Cabinets and Hardware
Door Styles That Fit
Shaker doors define the look. For a sleeker bend, try slim rail shaker or slab drawer fronts with shaker doors. Add simple crown trim or keep lines clean to lean more modern. Glass fronts on one or two uppers avoid heaviness.
Paint or Stain
Painted cabinets in soft white or greige feel fresh and bright. Stained white oak reads natural and modern. Mix painted perimeter with a stained island for depth. Use a satin or matte sheen for a soft, durable finish that hides fingerprints.
Hardware Choices and Mixing Metals
Select sturdy pulls for drawers and small knobs for doors, or all pulls for a modern line. Matte black, warm brass, and brushed nickel all work. Choose one dominant finish, then add one secondary in a small dose. Repeat the dominant finish across hardware and lighting for unity. Avoid more than two finishes in one small space.
Surfaces That Last
Countertops
Quartz is the low maintenance leader and resists stains and scratches. Choose light patterns that echo marble without the upkeep. Butcher block on a small island adds warmth and can be maintained with food safe oil. Marble is classic but etches and stains easily, so use it only if you accept patina. Granite with mild movement can work if the palette is soft.
Backsplash
Subway tile is a staple. Use a handmade or matte finish for texture. Run it to the ceiling behind a range hood for drama. Choose grout that is one to two shades darker than the tile to hide stains. For more pattern, try a vertical stack to feel modern while staying simple.
Flooring
Wide plank wood or high quality LVP in a natural tone grounds the room. Keep sheen low. Avoid strong gray washes that can date quickly. Use a washable runner along the sink run to protect high traffic areas and add color quietly.
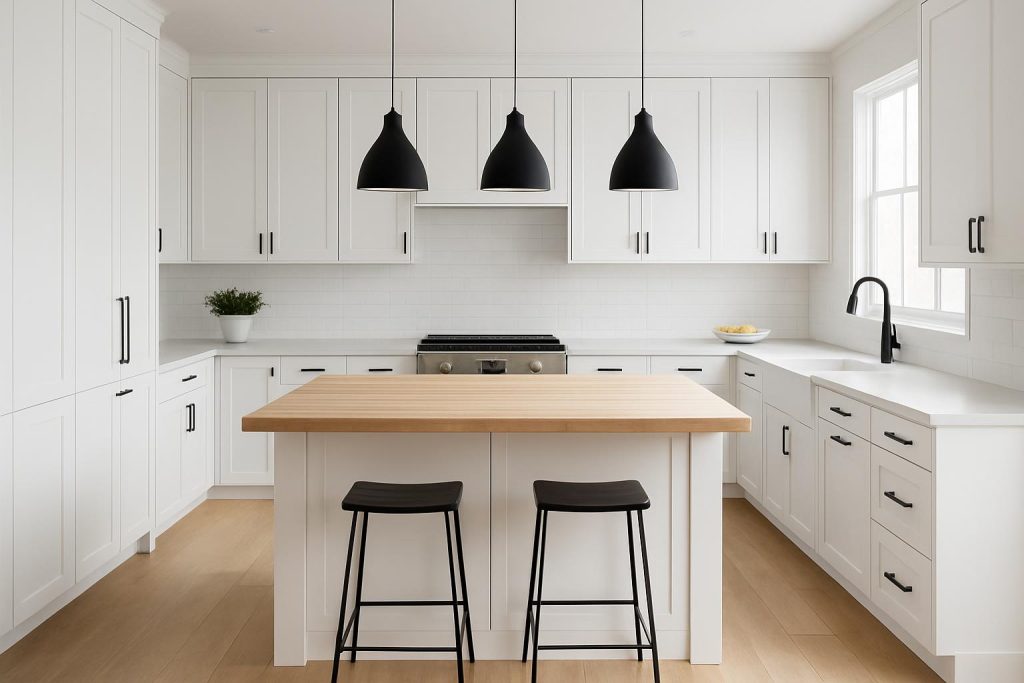
Lighting That Elevates
Layers of Light
Use three layers. Recessed or flush mounts for overall light. Pendants over the island for task and focus. Under cabinet lighting for clear prep work. Put each layer on dimmers to tune mood and save energy.
Fixture Scale and Placement
Over an island, center pendants and space them evenly. Two medium pendants work for shorter islands; three smaller for longer ones. Keep the bottom of the pendant 30 to 36 inches above the countertop. In a small kitchen, one larger pendant can anchor the space without clutter.
Appliances and Fixtures
Appliances That Blend
Stainless is easy and timeless. For a quieter look, use panel ready dishwashers and fridges to match cabinets. Slide in ranges keep lines clean. If space allows, a 36 inch range adds presence without heavy ornament.
Sinks and Faucets
Apron front sinks suit farmhouse style, but a large single bowl undermount is easier to clean and feels modern. Choose a high arc pull down faucet for reach. Pair finishes with your hardware plan to keep the mix tight.
Vent Hoods
A simple drywall hood with a wood or plaster wrap fits the style. Metal hoods in black or stainless also work. Keep shape simple with straight lines or a slight curve. Run tile high to frame the hood and elongate the wall.
Storage and Organization That Stick
Smart Storage Solutions
Install deep drawers for pots and pans under the cooktop. Use a tray divider for baking sheets. Add a pull out trash and recycling near the sink. Use corner drawers or a lazy Susan, not dead space. A narrow pull out for spices next to the range saves steps.
Open Shelves Done Right
Limit open shelves to a short run or a single wall. Keep only daily dishes, glassware, and a few wood cutting boards on display. Use matching white plates and clear glasses for a calm look. Dust stays low when items rotate daily.
Drawer Planning
Place flatware near the dishwasher. Keep knives, boards, and towels near the sink. Put tools and spices near the range. Use adjustable dividers so each item has a clear home. Label the inside of drawer fronts if multiple users share the kitchen.
Daily Systems
Use a tray on the counter for oil, salt, and pepper to catch drips. Place a basket in the pantry for snacks to stop box clutter. Set a weekly reset routine to clear surfaces, wipe shelves, and refill decanters. Small habits keep the style sharp.
Styling Without Clutter
Textiles and Greenery
Layer linen or cotton towels, a soft rug, and a few wood utensils in a crock. Add fresh herbs in a pot or a small vase of seasonal greens. Keep color muted and repeat tones already in the room.
Walls and Accents
Shiplap or beadboard works as an accent on one wall or a short backsplash run. Keep profiles thin and paint them the wall color to stay subtle. Hang one small piece of simple art or a vintage clock to add character without noise.
Trays and Groupings
Group items on trays or boards. Corral coffee items on a shallow tray near the machine. Place a wood bowl with fruit next to a cutting board on the island. Edit often. Empty space is part of the look.
Budget Friendly Updates
Quick Wins
Paint walls in a soft neutral. Swap hardware to matte black or warm brass. Replace pendants with clean shapes in the right scale. Add a wood cutting board, a crock with utensils, and a runner for instant warmth.
Weekend Projects
Paint cabinets with a durable enamel. Add peel and stick backsplash in a matte subway style for renters. Install under cabinet LED strips with adhesive backing. Build a simple open shelf from stained pine and sturdy brackets.
Thrift and Reuse
Refinish a small table as a coffee station. Use vintage baskets for produce and linens. Frame a single page from an old cookbook as art. These touches add soul for little cost.
Cleaning and Maintenance
Countertop Care
Wipe quartz daily with mild soap and water. Use a cutting board to avoid scratches. Clean butcher block with a damp cloth, dry well, and oil monthly. If you choose marble, wipe spills fast, use coasters, and accept etching as patina.
Wood Care
Dust cabinets with a microfiber cloth. Clean with a gentle, non abrasive cleaner and dry fully. Avoid harsh chemicals that dull finish. For floors, vacuum grit often and use pads under stools to prevent scratching.
Hardware and Fixtures
Buff matte black and brass with a damp cloth and dry to avoid water spots. For unlacquered brass, let it patina or polish as desired. Keep faucet aerators clean to maintain flow.
Backsplash and Grout
Use a soft brush and pH neutral cleaner on tile. Seal grout if needed and wipe splatters after cooking. Choosing a darker grout from the start makes upkeep easier.
Common Mistakes To Avoid
Too many finishes in one room. Skip heavy distressing that dates fast. Avoid busy countertops plus patterned backsplash. Do not overload open shelves. Do not forget enough lighting layers and dimmers. Do not push stools into tight aisles. Keep choices simple and repeated.
Step By Step Plan To Build Your Kitchen
Define how you cook and who uses the space. Set zones for prep, cook, serve, and clean. Choose a base palette of soft white or greige with black accents. Select shaker cabinets and durable quartz. Pick a backsplash in subway or vertical stack with calm grout. Plan lighting in three layers with dimmers. Choose a dominant metal finish and one secondary at most. Add one or two wood elements for warmth. Map storage to tasks with clear drawer dividers and pull outs. Style with textiles, a few trays, and greens. Set cleaning and reset routines. This order keeps decisions simple and focused.
Conclusion
Modern farmhouse kitchens succeed through balance. Clean lines meet natural materials. Simple colors meet layered texture. Smart planning meets easy upkeep. Start with function, repeat a tight palette, and add warmth with wood and textiles. Edit often. Your kitchen will feel timeless and look fresh for years.
FAQ
Q: What colors work best for a modern farmhouse kitchen
A: Soft whites, warm grays, or greige for cabinets and walls, with black or charcoal accents. Add muted greens or soft blues on an island or pantry door, and use light to mid wood tones like white oak to warm the space.
Q: What countertop is most durable and low maintenance for this style
A: Quartz is the low maintenance leader and resists stains and scratches. Choose light patterns that echo marble without the upkeep. Butcher block adds warmth on a small island if you can oil it regularly. Marble is classic but etches and stains easily.
Q: How do I mix metal finishes without clashing
A: Choose one dominant finish such as matte black, warm brass, or brushed nickel, then add one secondary in a small dose. Repeat the dominant finish across hardware and lighting, and avoid using more than two finishes in one small space.
Q: How much space do I need around an island and for stools
A: Leave at least 36 inches of clearance around an island and 42 inches where it is a main work aisle. Allow 48 inches behind stools if it is a walkway, plan 24 inches of width per stool, and use a 12 inch countertop overhang for knees.
Q: How can I get the modern farmhouse look on a budget
A: Paint walls, swap hardware to matte black or warm brass, replace pendants, add a runner, and style with wood boards and a utensil crock. Over a weekend, paint cabinets, install peel and stick backsplash, add under cabinet LED strips, and build a simple open shelf.