We are reader supported. When you purchase through links on our site, we may earn an affiliate commission. Also, as an Amazon affiliate, we earn from qualifying purchases.
Bedroom storage should work hard without taking over the room. IKEA Nordli is a strong base for this goal because it is modular, simple, and easy to customize. With a few targeted hacks, you can turn Nordli into smart bedside setups, built-in dressers, window benches, and platform beds that save space and look clean. This guide shows practical ideas you can copy, simple finish upgrades, safety notes you should not skip, and cleaning routines that keep everything running smoothly.
Read on to plan a layout that fits your room, build pieces that feel custom, and maintain them with little effort.
Why Nordli Works For Bedrooms
Nordli’s clean lines and push-to-open drawers reduce visual noise. The modules stack and sit side by side, so you can scale them to fit tight corners, long walls, and under-window spots. The shallow depth options help in small rooms. With a few tweaks, the range can pass for built-in furniture at a low cost.
Plan First: Measure, Map, and Decide Functions
Check clearances and flow
Measure wall length, bed size, door swing, drawer clearance, and walking space. Leave enough room to open drawers fully and to change sheets without bumping into corners. Keep outlets and vents in mind so you can plan cable paths and avoid blocking airflow.
Choose your core modules
Decide where you need deep storage versus low profile. Pick low two-drawer units for nightstands or a window bench. Use wider, taller combinations for a main dresser. If you plan a platform bed, confirm box spring height and mattress thickness so the final height feels right.
Plan for power and lighting
Mark where chargers, lamps, and an alarm clock will live. Note where to drill cable passthroughs and where a motion sensor light strip would help. Place power strips where you can reach them for cleaning and reset.
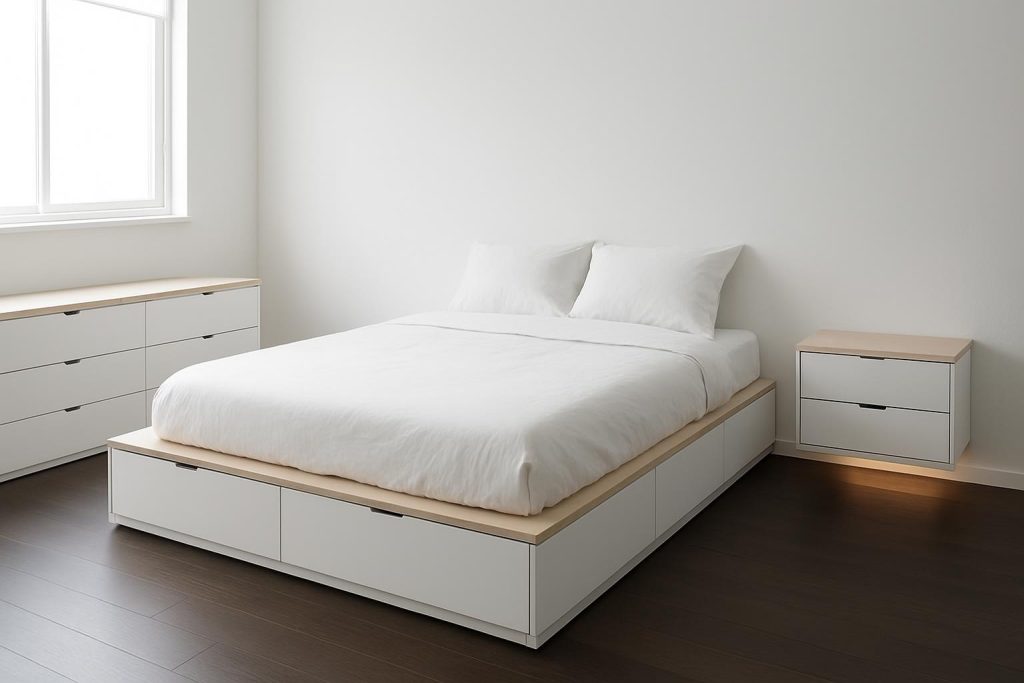
Nordli Platform Bed Hacks
Use Nordli drawers under a mattress platform
Line up several low Nordli units to form a base for a plywood platform that supports the mattress. Space them evenly, add a center support if the span is wide, and use non-slip pads between the platform and units. Keep the platform back from the wall slightly so the push latches do not rub.
Raise the feel with a finished top
Use a finished plywood or hardwood top. Round the front corners, sand smooth, and seal with a durable waterborne finish. Overhang the front slightly for a clean edge while keeping drawers clear. Attach with screws from inside the units or use cleats to keep the top removable for cleaning.
Integrate a headboard
Stand a simple headboard behind the platform or fasten it to the wall. Add a shallow shelf rail above for books and a reading light. Keep cables hidden with a notch behind the headboard and pass them down through a grommet behind a nightstand unit.
Floating Nightstands That Free Floor Space
Mount a Nordli unit to the wall
Mount a low two-drawer Nordli as a floating nightstand to make the room feel open and easier to mop or vacuum. Use a sturdy wall cleat or heavy-duty concealed brackets secured into studs or solid anchors. Check for level and confirm drawer clearance above any baseboard. Add an anti-tip strap or secondary support if the wall is weak.
Add charging and drawer organization
Drill a 25 to 35 mm hole in the top rear corner or back panel and fit a plastic or metal grommet. Mount a small power strip on the underside or back. Add a wireless charger tray on top with non-slip pads. Use shallow inserts inside the drawers to separate glasses, cables, and night creams so items do not slide into the push latches.
Light it for late-night ease
Stick a motion sensor LED strip under the floating unit. Aim it toward the floor to guide your steps at night without glare. Keep a small gap between the unit and the wall for airflow and to run cables without pinching.
A Long Dresser That Looks Built In
Combine modules into a single run
Place two or more Nordli dressers side by side to create a low, long storage wall. Align the fronts, shim and level the bases, and connect units together through side panels with short screws at the rear where they will not show. Anchor the total unit to studs with anti-tip straps.
Finish the top for a seamless surface
Add a single top board that spans all units. A hardwood or laminate worktop cleans easily. Leave a small reveal at the front and sides so drawers do not rub. Fasten the top from inside with short screws and washers.
Use scribe fillers and baseboard
Fill gaps to the side walls with scribe filler strips. Continue the room baseboard across the front or add a matching toe kick for a built-in look. Caulk seams lightly and paint filler pieces to match the units or the wall.
Keep the push-to-open function
Avoid adding knobs that can fight the push latches. If you want a different feel, apply subtle edge pulls on the underside of the drawer fronts so the latch still works. Test each drawer before finalizing.
Window Bench Storage Without Custom Cabinetry
Build a low bench with hidden drawers
Set low Nordli units under a window and top them with a finished plywood seat. Use a thin cushion with a non-slip mat to keep it in place. Leave a small gap to the wall to prevent scuffs and to allow curtain movement.
Distribute weight safely
Span across units with the top and add a hidden cleat at the back for extra support if the window width is large. Anchor the units to the wall to reduce tip risk when someone sits down. Use felt pads at the floor to protect wood or tile.
Blend it into the room
Paint scribe strips and the seat edge to match trim. Add a cordless shade above the window to reduce cord clutter. Keep seasonal bedding in the drawers, labeled by use so you can grab items fast.
Closet Towers For Folded Clothes
Stack for vertical storage
Use Nordli drawers inside a closet to hold T-shirts, gym wear, and sleepwear. Build a shallow plinth to clear any closet threshold. Anchor the tower to studs. Keep heavier items in the bottom drawers for stability and easy access.
Plan ventilation and lighting
Allow a small gap at the back for airflow. Add a battery motion light inside the closet to make drawer contents easy to see. Place a cedar block in one drawer to help control odor without adding liquids.
Small Room Wins
Low profile around the bed
Use low Nordli units instead of deep nightstands to open the walkway. Mirror above a low dresser to raise the sightline without adding bulk. Keep the top surfaces clear with a charging tray and a catchall insert in a drawer.
Corner-friendly layouts
End a long dresser run just before a corner and add a narrow wall shelf above for books or plants. Avoid wrapping drawers around corners where they can hit doors. Leave a vacuum gap under or float the nightstands for easy cleaning.
Cable And Device Management
Plan clean passthroughs
Drill a 25 to 35 mm hole for cables in the top rear or back panel and add a grommet. Notch the back panel for a power strip cord if needed. Mount the strip under the top or on the back face where you can reach it.
Control clutter behind the units
Use adhesive cable clips to route cords along the underside and back. Bundle cords with hook and loop ties. Keep a gentle loop for phone chargers so they do not pull. Leave a small airflow gap between the unit and the wall if you run power inside.
Finish Upgrades That Hold Up
Paint that resists wear
Scuff-sand lightly, clean with a degreaser, apply an adhesion primer, then a waterborne enamel. Allow proper cure time before reassembly. Mask latch areas so paint does not gum up push hardware.
Peel-and-stick film for a quick change
Clean surfaces thoroughly and apply a high-quality film slowly with a squeegee. Wrap edges neatly and trim from the inside edges so seams are hidden. Avoid covering the latch contact points.
Top surfaces that hide use
Add a durable top board or glass protector where you place keys or cosmetics. Use thin felt dots under trays and lamps to prevent scuffs.
Lighting That Improves Night Routines
Toe-kick or under-unit LEDs
Install a motion sensor LED strip under a dresser or floating nightstand. Set a short timer so it shuts off automatically. Warm white light is easy on the eyes and keeps the room calm.
Integrated headboard lighting
Mount a low-profile reading light on a wall rail above the bed. Route power down through a grommet behind a nightstand. Keep wall switches accessible from bed height.
Family And Renter Friendly Tweaks
Child safety
Anchor all dressers and stacked units to studs or solid anchors. Add child locks to drawers in kids rooms. Open one drawer at a time and keep heavy items low. Avoid placing TVs on top of low units in kids zones.
Renter safe methods
Use removable adhesive cable clips and non-slip pads for tops. If wall mounting is not allowed, float a narrow nightstand on small legs or place a low unit and keep clear floor under it with taller furniture sliders for cleaning.
Cleaning And Maintenance
Daily and weekly care
Wipe with a damp microfiber cloth and a drop of mild dish soap. Dry with a clean cloth. Avoid ammonia, bleach, and abrasive pads. For fingerprints, use a diluted isopropyl alcohol wipe on a test spot first, then proceed if safe.
Keep drawers running smoothly
Vacuum dust from runners. Apply a light silicone-based spray to moving parts if they feel sticky. Do not overapply. Avoid oil that attracts dust. Check that push latches align and tighten any loose screws.
Seasonal checks
Tighten cam locks and connector screws twice a year. Check wall anchors and anti-tip straps yearly. Replace worn felt pads on the base. Touch up small chips with a wax fill stick in a matching color.
Safety And Stability
Anchor and load smartly
Always anchor taller or stacked units to studs or solid anchors. Keep the heaviest items in the lowest drawers. Open only one drawer at a time. For floating nightstands, limit load to essentials and test for sag or movement.
Protect walls and floors
Use felt pads under units and behind corners that meet walls. Leave small gaps for airflow and to prevent rubbing. Avoid overhanging tops that can catch clothing and cause pulls.
Budget Tips
Cut costs without losing quality
Check the as-is section for panels or full units. Reuse a single long top to unify mixed-width modules. Save offcuts from trim for scribe fillers. Prioritize a durable top and quality lighting because those get daily wear.
Step-by-Step Mini Plans
Floating nightstand install
1. Mark height based on mattress top and pillow height. 2. Locate studs and mark bracket or cleat holes. 3. Pre-drill and mount bracket or cleat level. 4. Drill a grommet hole for cables. 5. Hang the unit and confirm drawer action. 6. Mount a small power strip to the underside. 7. Add a motion LED strip below. 8. Anchor with an anti-tip strap as backup.
Built-in dresser with top and trim
1. Place and level units side by side. 2. Join units through side panels at the rear. 3. Cut a single top with slight front and side reveal. 4. Fasten the top from inside with short screws. 5. Add scribe fillers to side walls and a toe kick or baseboard. 6. Caulk light seams and paint fillers. 7. Anchor the full run to studs.
Window bench with cushion
1. Set low units under the window and level them. 2. Join units and anchor to the wall. 3. Cut a plywood seat with rounded front corners. 4. Seal the seat and add a non-slip mat. 5. Place a cushion sized to the seat. 6. Leave a small gap to curtains and walls for airflow and easy cleaning.
LED toe-kick lighting
1. Clean the underside of the unit. 2. Stick the LED strip along the bottom edge set back from the front. 3. Mount the motion sensor at one end. 4. Route power through a grommet and secure cables with clips. 5. Set a low brightness and short timer.
Conclusion
Nordli is a flexible base for a calm, efficient bedroom. Start with clear measurements and a simple plan for power, light, and airflow. Build stable combinations, finish the tops for durability, and hide cables. Anchor everything, load the bottom drawers with heavy items, and keep hardware adjusted. Add motion lighting and organized drawers to make nightly routines smooth. With these steps, your bedroom will gain storage, stay easy to clean, and look finished without complex carpentry.
FAQ
Q: Can Nordli be wall-mounted as a floating nightstand
A: Yes. Use a sturdy wall cleat or heavy-duty concealed brackets secured into studs or solid anchors, check for level and drawer clearance, drill a grommet hole for cables, and add an anti-tip strap or secondary support if the wall is weak.
Q: How do I make a Nordli dresser look built in
A: Combine modules into a single run, add a single top that spans all units, use scribe filler strips and a toe kick or baseboard, caulk light seams and paint fillers, and anchor the full run to studs.
Q: What is the best way to add cable management to a Nordli nightstand or dresser
A: Drill a 25 to 35 mm hole and fit a grommet, notch the back panel if needed, mount a small power strip on the underside or back, route cords with adhesive clips and hook and loop ties, and leave a small airflow gap.
Q: How do I keep Nordli clean and the drawers running smoothly
A: Wipe with a damp microfiber cloth and mild dish soap, avoid ammonia and abrasives, vacuum dust from runners, apply a light silicone-based spray if they feel sticky, tighten connectors twice a year, check wall anchors yearly, and touch up chips with a wax fill stick.
Q: What safety steps reduce tip risk with Nordli in bedrooms
A: Anchor taller or stacked units to studs or solid anchors, keep heavy items in the lowest drawers, open only one drawer at a time, and for floating nightstands limit load to essentials and test for movement.