We are reader supported. When you purchase through links on our site, we may earn an affiliate commission. Also, as an Amazon affiliate, we earn from qualifying purchases.
Watering orchids in moss looks simple, but most problems start here. Moss holds water well. Orchids like air around roots. If you get the balance wrong, roots rot or shrivel. This guide shows you how to read the moss, water with confidence, and set up a routine that keeps roots healthy and the plant growing. Follow the steps, test your setup, and adjust with the signals your orchid gives you.
Understand Your Setup
Why Moss Is Different
Sphagnum moss absorbs and holds several times its weight in water. It stays moist on the surface and inside the pot. This is useful for homes with dry air, but risky if the pot has poor airflow or the moss is packed tight. Bark dries fast and needs frequent watering. Moss dries slow and needs careful timing. Your method changes with the medium.
Types of Moss and Mixes
Long-fiber New Zealand sphagnum is clean and long-lasting. Cheaper moss breaks down faster and compresses. Some growers blend moss with bark or perlite to add air. Pure moss needs lighter packing and close attention to moisture. A mix is more forgiving but still holds more water than bark alone. Know what you are using before setting a schedule.
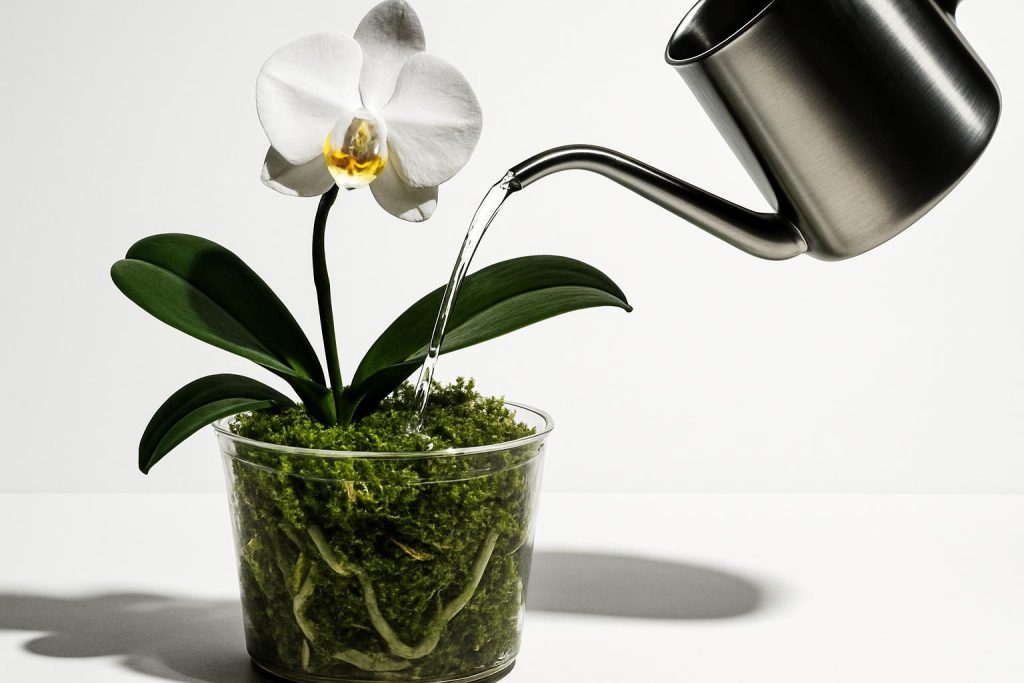
Pot Type and Drainage
Plastic pots hold moisture longer. Clay dries faster. Clear plastic pots with side slits bring air and help you see roots and moss color. Ensure many drainage holes. A cover pot without holes traps water. If you use a cachepot, keep the inner pot lifted so it never sits in runoff. Add pot feet or a grid to raise it above any water in a sleeve.
Your Orchid Type and Stage
Phalaenopsis is the most common orchid grown in moss. It prefers even moisture with air around the roots. Dendrobiums and Cattleyas often prefer drier media. Seedlings need steadier moisture. Freshly repotted plants with fewer roots need extra air and lighter watering. A plant in active growth uses more water than a resting plant.
Environment Factors
Light, temperature, humidity, and airflow decide how fast moss dries. Warm, bright, and breezy rooms dry moss faster. Cool, dim, and still rooms keep it wet. Indoor humidity between 40 and 60 percent is comfortable for many orchids. Place a small fan on low to move air gently. This reduces rot risk without drying the plant too fast.
The Core Rule: Water by Dryness Level, Not by Calendar
How Dry Should Moss Be Before Watering
Let the top of the moss feel dry to the touch. Inside the root zone, you want it almost dry but not bone dry. Aim for barely cool and only slightly damp inside before you water again. Consistent slight dryness triggers root growth and prevents rot. If in doubt, wait one more day. Overwatering in moss is harder to fix than slight underwatering.
Simple Tests to Judge Moisture
Use a wooden skewer or chopstick. Insert it to the pot bottom and leave for 10 minutes. Pull it out and feel it. If it feels cool and looks dark, it is still moist. If it feels just faintly cool with no visible wetness, you can water. If it is dry and warm, water now. Also lift the pot. A wet moss pot feels heavy. A dry pot feels light. With practice, weight is reliable. Look through clear pots. Green algae and condensation mean moisture. Beige moss with no fog on the sides signals dryness.
Signs of Underwatering and Overwatering
Underwatering shows limp leaves that recover after watering, wrinkled roots that turn silvery and stay hollow, and moss that dries within a day in average conditions. Overwatering shows leaves that stay limp and soft, dark brown mushy roots, sour smell, and moss that feels cold and wet for many days. Treat the cause, not just the symptoms.
Water Quality and Temperature
Pick the Right Water
Soft tap water is fine in many areas. Hard water leaves salts in moss and on roots. If your tap water is very hard, switch to rainwater, distilled, or reverse osmosis water. A total dissolved solids level near 50 to 150 ppm is gentle for orchids. If you use hard water, flush thoroughly each time and leach with pure water once a month to reduce salt buildup.
Use Room-Temperature Water
Cold water chills roots and slows recovery. Warm water promotes rot. Use water close to room temperature. Aim for between 20 and 25 degrees Celsius. Consistent temperature is more important than precise numbers.
Light Fertilizer Strategy
Fertilize weakly and frequently during active growth. Use a balanced orchid fertilizer at quarter strength. Many growers target about 50 to 75 ppm nitrogen once every 2 to 3 waterings. Always flush with plain water at least once a month to prevent salt accumulation in moss. Reduce fertilizer in low light or cooler months.
Step-by-Step Watering Methods
Method 1: Thorough Soak and Drain
Carry the pot to a sink or basin. Water the moss once to pre-wet and break surface tension. Then fill the pot slowly until water runs from every drainage hole. Let it sit and soak for 5 to 10 minutes if the moss was very dry. Lift and drain completely for 10 to 20 minutes. Never leave the pot standing in water. Return the plant only when no water is dripping. Do not share soak water between plants. This reduces disease spread.
Method 2: Slow Top-Flush
Place the pot in a sink. Pour room-temperature water slowly over the entire surface. Move the stream around so all areas wet evenly. Allow water to run out the bottom. Repeat two or three times to flush old fertilizer and stale water. This approach is safer than dunking if you worry about rot or contamination.
Method 3: Wick-Assisted Watering for Dry Homes
Thread a cotton wick through the bottom holes so one end touches the moss and the other dips into a small reservoir. Use a shallow jar with pebbles to keep the pot base above the water line. The wick pulls small amounts of water upward between waterings. Check daily at first. If the moss stays wet for more than three days, remove the wick. This method helps in very dry, warm rooms.
What Not to Do
Do not mist the moss and call it done. Surface mist evaporates fast and leaves the core dry. Do not let the pot sit in a saucer full of water. Roots drown in still water. Do not water the crown of a Phalaenopsis late in the day. Water trapped in the crown can cause rot. If water gets there, wick it out with paper and increase airflow.
Frequency Examples by Season and Environment
Typical Indoor Setup
Phalaenopsis in loosely packed sphagnum, clear plastic pot with side slits, bright shade, 22 to 24 degrees, 45 to 55 percent humidity. Water every 5 to 7 days in spring and summer. Water every 7 to 10 days in fall and winter. Confirm with the skewer test before each watering.
Warm, Bright, and Breezy Room
South or west window with sheer curtain, fan on low, 26 to 28 degrees daytime. Expect to water every 3 to 5 days with a thorough flush. Check daily when heat waves occur. Add a humidity tray if moss dries in under 48 hours.
Cool, Dim, and Still Room
North window, 18 to 20 degrees, high humidity. Moss may stay wet for 10 to 14 days. Increase airflow. Move to brighter light if possible. Water less often to avoid rot. Never water on a fixed weekly schedule in this setting. Use the skewer and weight test each time.
Repotting and Moss Density
How Tight Packing Changes Everything
Tight moss dries slowly and reduces airflow. Loose moss dries at a safe pace and lets roots breathe. If your moss was packed very tight at purchase, expect longer dry times and higher rot risk. Plan to repot into fresh, fluffed moss with a light hand.
When to Repot
Repot moss-grown orchids every 12 to 18 months, or sooner if moss collapses, smells sour, or shows heavy salt crust. Repot after flowering, or at the first sign of new roots for the best recovery. Do not reuse old moss. It breaks down and holds too much water.
How to Pack Moss Correctly
Pre-soak clean long-fiber moss, then squeeze to damp. Wrap roots gently with strands. Fill the pot in layers without compressing. Aim for springy and airy, not tight. Leave a small open channel in the center for airflow. Keep the crown above the media line. Choose a pot that leaves about 1 to 2 centimeters of space around the root mass, not a large pot with lots of extra moss.
Airflow and Drying Control
Use Gentle Air Movement
Place a small fan on low near the orchids. The leaves should only faintly flutter. This keeps the top layer clean and speeds even drying. It also reduces fungal problems. Do not aim strong air directly at the plant. Gentle and constant is the goal.
Manage Humidity Without Soggy Moss
Use a pebble tray with water that does not touch the pot bottom. Group plants together to raise local humidity. Avoid closing a moss-grown orchid inside a sealed cover pot or dome unless you manage airflow carefully. Trapped stale air increases rot risk.
Protect From Cold Drafts
Cold air slows drying and stresses roots. Keep plants away from winter windows and air conditioners. Maintain steady temperatures. Orchids prefer consistency over extremes.
Special Cases
Freshly Repotted or Root-Damaged Orchids
After trimming damaged roots, water lightly to settle the moss, then wait until the skewer reads almost dry before watering again. Keep the plant warm and bright with good airflow. Do not keep the moss constantly wet while roots recover. Slight dryness encourages new root growth.
Seedlings Versus Mature Plants
Seedlings have smaller reserves and dry faster. Use very loose moss in a small pot. Water when the skewer reads slightly damp rather than fully dry. Mature plants in larger pots dry slower. Be patient between waterings and focus on even moisture with air.
Spiking or Blooming Plants
During spike growth, maintain steady moisture and avoid big swings. During bloom, water as usual but avoid splashing the flowers. If rooms are cooler in winter bloom season, extend the interval between waterings accordingly.
Vacation Plan
Water thoroughly the day before you leave. Add a wick to a small pebble reservoir if your home is dry and warm. Keep the pot raised above the water line. Ask a helper to check once midweek if you will be away longer than 7 to 10 days. Leave clear, simple instructions based on the skewer test, not a fixed date.
Troubleshooting
Root Rot Rescue
Unpot the plant. Rinse roots in lukewarm water. Trim brown mushy roots with sterile scissors. Dust cut ends lightly with ground cinnamon on the roots only, not on living tissue at the crown. Let it air for an hour. Repot in fresh, loose moss. Increase airflow. Water sparingly until new roots appear. Keep warm and bright, out of direct hot sun.
Moss Always Feels Wet
Check pot size. Downsize if there is much empty moss around the roots. Add more slits or switch to a slotted pot. Reduce fertilizer and flush with pure water to clear salts. Increase airflow and warmth. Water only when the skewer is almost dry. Consider mixing in some bark to speed drying at the next repot.
Moss Dries in 24 Hours
Move the plant slightly away from direct heat or strong airflow. Add a humidity tray. Water with a thorough soak to saturate the fibers. Check pot size. A very small pot in hot conditions dries too fast. Repot into a slightly larger pot with the same airy pack if roots allow, but do not oversize.
White Crust on Moss or Pot
This is fertilizer or mineral salts. Flush with plenty of pure water. Reduce fertilizer strength. If using hard water, switch to rain or RO water. Repot if buildup is heavy or the moss is old.
Fungus Gnats
They thrive in constantly wet moss. Allow longer drying between waterings. Use yellow sticky traps to catch adults. Soak a small amount of mosquito control granules containing Bacillus thuringiensis israelensis in your watering water as directed, and use it weekly until the cycle clears. Improve airflow to the moss surface.
Cleaning and Hygiene
Clean Tools and Pots
Sterilize scissors with 70 percent alcohol or a flame before cutting roots. Wash old pots with soap, then soak 10 minutes in a 10 percent bleach solution. Rinse well and dry. Fresh, clean materials reduce disease transfer.
Safe Sink Watering
Clean the sink before watering to avoid soap or chemical residue. Do not let different plants touch the same runoff if you suspect pests or rot. A plastic colander or grid in the sink keeps pots out of pooled water. Dry the area after you finish to keep your home tidy.
Simple Weekly Routine
Check, Water, Flush, Observe
Pick two days a week to assess moisture, not to water on a schedule. Use the skewer and weight test. If almost dry, water with a slow flush using room-temperature water. If you fertilize, do it lightly according to growth. Once a month, flush with pure water to clear salts. Inspect roots through the pot, leaves for firmness, and the crown for dryness after watering. Adjust airflow and light as needed. Record what you changed and how long the moss took to dry. Small notes build a reliable routine fast.
Conclusion
Watering orchids in moss is about control and timing. Learn how your pot, moss, and room work together. Test moisture with a skewer. Water thoroughly, then let it approach dryness before watering again. Keep air moving and salts low. Repot before the moss breaks down. With these basics, moss becomes an ally that gives stable moisture and strong roots. Start with careful observation, make one change at a time, and your orchid will respond with steady growth and lasting blooms.