We are reader supported. When you purchase through links on our site, we may earn an affiliate commission. Also, as an Amazon affiliate, we earn from qualifying purchases.
Building an outdoor kitchen does not need a big budget. With smart planning, salvaged materials, and a few focused upgrades, you can cook, serve, and relax outside without overspending. This guide breaks down what to build, how to source it, and how to keep it simple, safe, and clean. Follow the steps, choose the options that fit your space and budget, and you can finish in a weekend or two.
Plan First, Spend Less
Define your zones
Divide the space into four zones: prep, cook, serve, and clean. A single countertop can do double duty for prep and serve. Keep the cooking zone separate from seating. Place the clean zone near a hose or existing water source.
Size and layout
Measure your patio or yard and sketch a simple L or straight run. Keep walkways at least 36 cm clear if possible. Place hot equipment away from walls and overhangs on a noncombustible surface. Follow the manufacturer clearance guidance for any grill or burner.
Set a firm budget and priorities
Pick one splurge, like a solid worktop or shade, and keep the rest basic. Decide what you must have now versus what can wait. A simple grill, a sturdy counter, and a lean storage setup will get you cooking fast.
Smart Sourcing on a Small Budget
Where to find bargains
Check local resale sites, community swap groups, and salvage stores. Look for grills, metal utility racks, pavers, bricks, sinks, faucets, and patio umbrellas. Shop off season for deep discounts on outdoor gear.
What to buy used vs new
Buy used: grills in good condition, metal racks, pavers, bricks, deck boxes, stools. Buy new: gas hoses, regulators, grill covers, food prep tools, sealing products, exterior screws, and GFCI rated extension cords.
Cheap, Durable Surfaces
Ground options
Level the area and add gravel for fast drainage. Top with concrete pavers for a stable, low-cost floor. Avoid placing grills on wood decking without a fireproof mat or pavers under the cook zone.
Bases and walls
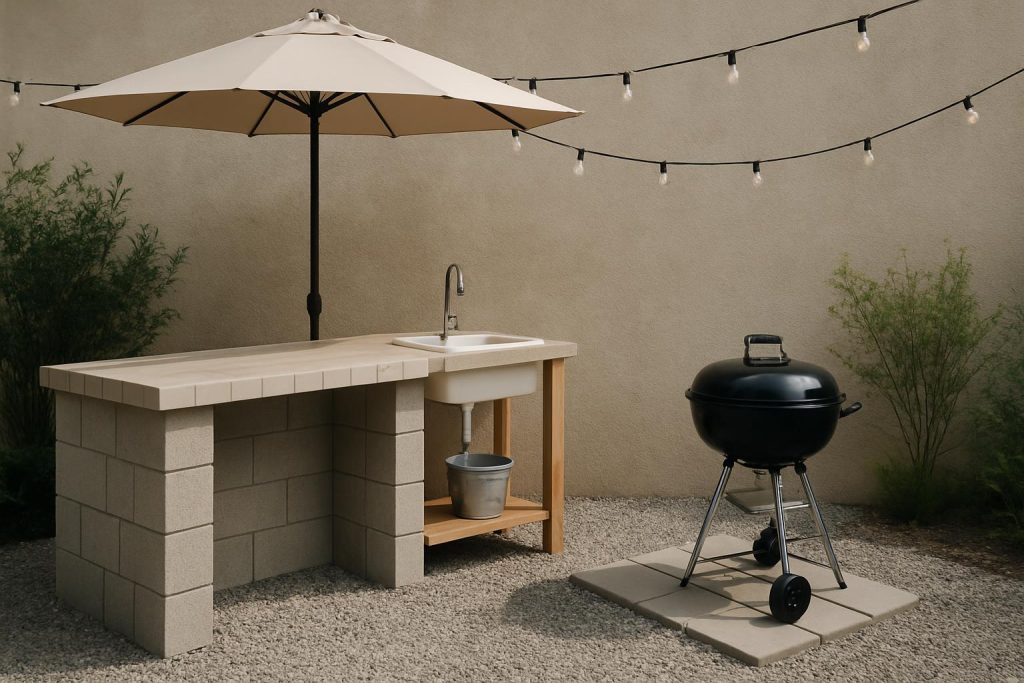
Cinder blocks make sturdy, fire resistant bases for counters and shelves. Stack and cap with pavers or a plywood and cement board top. If you use wood, choose pressure treated lumber or cedar and seal all cut edges.
Budget countertops that last
Exterior grade plywood plus cement board plus tile is a low cost, tough surface. Concrete pavers laid tight on a framed base also work and are easy to replace. A skim coat concrete finish over cement board gives a clean look. Seal tile grout and concrete to fight stains and water.
Low Cost Cooking Options
Grills and burners
A basic charcoal kettle grill is cheap and versatile. A used gas grill with a new regulator and clean burners can be a bargain. A tabletop propane griddle or a single camping burner adds a side burner function for sauces and sides.
Pizza and smoking on a budget
Add a pizza stone to any grill for crisp crusts. Use a small smoker box or a foil packet of soaked wood chips to add smoke flavor on a gas or charcoal grill.
Simple Sink Choices Without Plumbing
Hose and basin station
Attach a hose splitter with a shutoff and sprayer. Set a large basin in a counter cutout or on a shelf. Let it drain into a covered bucket under the counter. Empty the bucket per local rules.
Gravity fed jerry can sink
Place a jerry can with a spigot on a shelf above the basin. Open the spigot for handwashing and light rinsing. Drain to a bucket as above.
Placement tips
Set the sink station close to your hose bib to reduce hose runs. Keep soap and towels in a watertight bin at the station for fast access.
Storage That Works Outside
Weatherproof boxes and racks
Use a deck box for cushions, tableware, and dry goods. Choose a metal utility rack for pots, pans, and heavy items. Add clear bins with lids for utensils and spices to keep out dust and pests.
DIY cinder block shelves
Stack cinder blocks with 2×10 or 2×12 boards to form sturdy shelves. Seal the boards and add S hooks on the sides for tongs and spatulas.
Small space carts
A rolling kitchen cart or stainless prep table serves as counter and storage. Park it under a cover when not in use. Use magnetic hooks or an S hook rail on the cart for tools and towels.
Shade, Shelter, and Comfort
Budget shade picks
A large patio umbrella covers prep and serve zones fast. A shade sail kit adds wider cover at low cost. Anchor to sturdy posts or masonry, not flimsy rails.
Wind and privacy
Use moveable screens, planters with tall grasses, or a lattice panel to block wind and add privacy. Keep airflow clear around any grill.
Lighting and Power
Low cost lighting
Hang outdoor rated string lights for ambient light. Add solar stake lights around edges. Use battery puck lights under shelves for task lighting.
Safe power
Plug appliances into outdoor GFCI outlets. If you must use an extension cord, choose a heavy duty outdoor rated cord and keep connections off the ground and dry. Do not overload circuits.
Organizing Step by Step
Workflow and labels
Keep knives, boards, and oils in the prep zone. Store plates, cups, and napkins in the serve zone. Place grill tools by the cook zone. Label bins so everything goes back fast after use.
Cleaning caddy and grill kit
Build a caddy with dish soap, scrub pads, towels, gloves, and trash bags. Keep a grill kit with a brush, scraper, high heat gloves, long tongs, spray bottle of water, and a meat thermometer.
Finishes That Stretch a Dollar
Paint and tile accents
Use exterior paint on wood bases, posts, and fences. Refresh metal with rust inhibiting spray paint. Add a short tile backsplash behind the cook zone to protect walls and add color.
Hardware and textiles
Add simple handles to lids and drawers. Use outdoor rated rugs and cushions for comfort. Choose washable covers to manage spills and grease.
One Weekend Build Plan
Materials list
Gravel and pavers for a small pad. Cinder blocks and boards for base and shelves. Exterior grade plywood, cement board, thinset, and tile for the counter. Deck box or metal rack for storage. Basic grill or used gas grill in good condition. Umbrella or shade sail. String lights and battery puck lights. Hose splitter, sprayer, basin, bucket, and a jerry can. Exterior screws, construction adhesive, and sealers.
Step by step
Day 1: Mark and level a small pad. Lay gravel and pavers. Stack cinder block base and dry fit the counter. Cut plywood and cement board, then screw down. Tape seams, apply thinset, and tile the surface. Set up the grill on pavers with safe clearance.
Day 2: Build shelves with cinder blocks and boards. Install hooks and rails. Set up the sink station with hose splitter, sprayer, basin, and bucket. Assemble storage racks and deck box. Hang string lights. Seal grout and concrete. Load bins and label.
Sample Budgets
Under 100
Focus on a clean cook zone and a stable work surface. Buy a used charcoal grill, a bag of gravel, a few pavers, and a basic folding table with a heat proof mat. Add a basin and bucket for a simple clean zone.
100 to 300
Add a cinder block and board counter, a small deck box, and string lights. Upgrade to a shade umbrella. Build a hose and basin sink with a splitter and sprayer. Use bins for utensils and spices.
300 to 800
Tile a permanent counter, add a used gas grill or a new tabletop griddle, install a shade sail, and set up a metal utility rack. Include a gravity fed jerry can sink and a rolling cart.
Maintenance To Make It Last
Weekly and monthly
Wipe counters with soapy water after each cook. Clean grill grates and empty ash or grease trays. Check for rust on metal and touch up paint. Re seal wood and concrete every 6 to 12 months or as needed.
Seasonal
Cover the grill and counters when not in use. Store textiles in a deck box. Before winter, drain and dry the sink setup and hoses. In spring, check fasteners, re seal surfaces, and test lighting and power.
Common Mistakes and How to Avoid Them
Placing the grill too close to walls or under overhangs. Always use a noncombustible surface and follow the manufacturer clearances. Using indoor only cords outdoors. Use outdoor rated cords and GFCI protection. Skipping sealing on wood, tile, and concrete. Seal on install and maintain it. Building with particleboard or MDF. Use exterior grade plywood, cement board, or masonry. Forgetting drainage and slope. Ensure water can run off and do not let buckets overflow. Overbuilding without a storage plan. Start small with zones and add later.
Conclusion
A budget outdoor kitchen is about smart choices, not high costs. Build only the zones you need. Use cinder blocks, pavers, and basic racks for fast structure. Choose a low cost grill or griddle and add a simple sink station. Keep tools organized, seal surfaces, and follow safe clearances and power rules. With a small plan and a steady pace, you can cook outside, host friends, and keep maintenance low without stretching your wallet.
FAQ
Q: What is the cheapest way to build an outdoor kitchen?
A: Stack cinder blocks for a base, cap with pavers or a tile over cement board counter, use a basic charcoal grill or a clean used gas grill, add a metal rack or deck box for storage, and set up a hose and basin sink that drains to a bucket. Source used materials and keep the layout small to save the most.
Q: How can I add a sink without plumbing?
A: Attach a hose splitter with a sprayer to your hose bib, set a basin into the counter or on a shelf, and drain into a covered bucket. Or place a jerry can with a spigot above the basin for a gravity fed setup. Empty the bucket per local rules.
Q: Which countertop is most budget friendly outdoors?
A: Exterior grade plywood topped with cement board and tile is low cost and tough. Concrete pavers on a framed base also work. A skim coat concrete finish over cement board is another option. Seal tile grout and concrete to resist stains and water.
Q: How do I protect wood surfaces outdoors?
A: Use pressure treated lumber or cedar, seal all cut edges and fastener holes, place hot gear on heat proof mats or pavers, and sand and re seal every 6 to 12 months as needed.
Q: What mistakes should I avoid on a budget build?
A: Avoid placing the grill too close to walls or under overhangs, using indoor only cords outdoors, skipping sealing on wood, tile, and concrete, building with particleboard or MDF, forgetting drainage and slope, and overbuilding without a storage plan.