We are reader supported. When you purchase through links on our site, we may earn an affiliate commission. Also, as an Amazon affiliate, we earn from qualifying purchases.
Cast iron makes food taste better, lasts for decades, and looks good on any stove. A well-built gift basket centered on a cast iron skillet turns that power into an easy first win for any home cook. Build it right, and your gift guides the recipient from unboxing to a successful first meal in one smooth path. This guide shows you every step, from choosing the skillet to packing, styling, and care. Follow the plan, and your basket will be used weekly, not stored and forgotten.
Introduction
A cast iron skillet gift basket works for beginners and food lovers because it is practical and complete. The skillet is the hero, but the supporting pieces make the experience easy. The right handle cover keeps hands safe. The right oil keeps the surface smooth. The right tools stop sticking and scraping frustration. The right recipe cards deliver a first success. You will see exactly what to include, how to size the basket for your budget, and how to tailor it to the person you are gifting. Keep it simple and intentional so every item earns its place.
Why a Cast Iron Skillet Gift Basket Wins
It delivers clear value on day one because the recipient can cook immediately. It fits many cooking styles, from searing steak to baking cornbread. It is low waste because cast iron lasts, and the accessories are reusable. It teaches a durable skill set: heat control, seasoning, and simple maintenance. It looks premium without requiring a luxury price. Most important, it removes friction. The basket gives all the answers in one box.
Choose the Right Skillet Size and Shape
The skillet sets the tone. Pick a size that matches the recipient’s stove and typical portions. Then pick a shape that fits how they cook. Wide and low walls help with searing. Slightly higher walls help with baking and saucy dishes. A helper handle improves control when moving a hot pan.
8-inch vs 10-inch vs 12-inch
8-inch works for one person eggs, small sides, and compact storage. Heat control is easy and preheating is fast, but searing a large steak is tight. 10-inch is the everyday sweet spot for two to four servings, solid searing, and oven work with standard racks. It fits most burners and storage cabinets. 12-inch is great for families and big steaks but is heavy and needs more heat and space. If unsure, default to a mid-range size.
For a first-time cast iron user, a 10-inch pre-seasoned skillet is the most versatile starting point.
Pre-seasoned vs Vintage
Pre-seasoned is ready to cook and low risk for a beginner. The surface improves with use, and the learning curve is short. Vintage is a joy for enthusiasts but can be uneven if not restored well. If gifting to a collector, include a note about the pan’s origin and a care card. For most recipients, choose a reliable pre-seasoned option with solid weight and a smooth cooking surface.
Basket Blueprint: Core Components
Think in layers. The skillet anchors the basket. Safety and storage come next. Cleaning and care tools complete the set. Each item should support the first cooking session and the 100th.
The Skillet as the Anchor
Pick a skillet with a comfortable main handle, a helper handle, and walls that are neither too low nor too high. Ensure the cooking surface has an even factory seasoning layer. Check for flatness if the recipient uses an induction cooktop. If you include a matching lid or a universal lid, choose one that fits snugly to control splatter and oven bakes.
Handle Protection and Storage
Add a heat-safe handle cover that fits snugly. Silicone is easy to clean and good for stovetop work. Leather looks premium and insulates well but should be removed in the oven. Add two quality oven mitts or a folded kitchen towel to move the skillet safely. Include a thin pan protector or paper towel for stacking in a cabinet.
Cleaning and Care Essentials
Add a rigid pan scraper for removing fond without scratching. Include a chainmail scrubber or a gentle scrub pad for tougher bits. A small bottle of high smoke point oil supports both cooking and maintenance. A care card turns fear into confidence.
After cooking, scrape while warm, rinse with hot water, dry on the burner, then wipe on a whisper-thin coat of oil.
Flavor Boosters to Include
Add simple, bold flavors that love high heat. Keep it shelf stable and compact. Choose blends that work on steak, chicken, vegetables, and potatoes. Avoid fragile glass if you plan to ship.
Spice Blends That Love Cast Iron Heat
Use one all-purpose coarse salt and pepper mix for searing. Add smoked paprika for color and depth. Include a savory blend like Cajun or fajita for weeknight tacos and skillet chicken. A sweet-savory rub works for pork chops and roasted carrots. Label each blend with a short use tip on your recipe card.
Oils and Fats That Support Seasoning
Use a high smoke point oil such as grapeseed, canola, or avocado for both cooking and maintenance seasoning.
If you add butter, note that butter alone burns at high heat. Suggest starting with oil for the sear and finishing with a small knob of butter for flavor. A small tin of beeswax-based seasoning can be a premium touch for long-term care, but it is optional.
Cooking Tools That Make It Easy
Pick tools that solve common pain points. Sticking, tearing, and poor flipping often come from the wrong tool at the wrong time. Choose heat-safe materials and slim edges that slide cleanly under food.
For Stovetop Searing
Include a thin-edged fish spatula for clean flips of steak, fillets, and smashed burgers. Add spring-loaded tongs with a firm grip for turning chicken and vegetables. A compact splatter screen reduces mess on the stovetop. An instant-read thermometer builds confidence and stops guesswork.
For Oven and Baking
Include a silicone or wooden spoon for stirring and scraping along the curve of the pan. A pastry brush helps oil the surface before cornbread or pizza. A parchment round trimmed to fit makes skillet cookies or cornbread release cleanly. If the budget allows, add a compatible lid for braises and shakshuka.
Recipe Cards That Guide Success
Recipe cards remove hesitation. Aim for three to five cards with clear steps and short ingredient lists. Each recipe should highlight a different strength of cast iron. Include timing notes and a target internal temperature where it matters.
Starter Recipes for Any Skill Level
Seared steak with a simple salt and pepper crust, basting in the last minute. Crispy breakfast potatoes with smoked paprika and onion powder. Skillet cornbread with a preheated pan for a crisp edge. Shakshuka with eggs set around the edges and soft in the center. Pan pizza with a hot, oiled skillet and a finish under the broiler for color. Add a short preheat note to each card so heat management becomes second nature.
Styling and Packing the Basket
Good packing protects the seasoning and presents the gift cleanly. Keep it tight and simple so nothing rattles. Use items you already include as padding to avoid filler waste.
Basket Alternatives
Use a shallow wooden crate for structure and a clean look. Use a sturdy market tote for a practical extra gift. Use a low bowl or round tray that echoes the skillet shape. If shipping, choose a box over a basket for better protection and tape integrity.
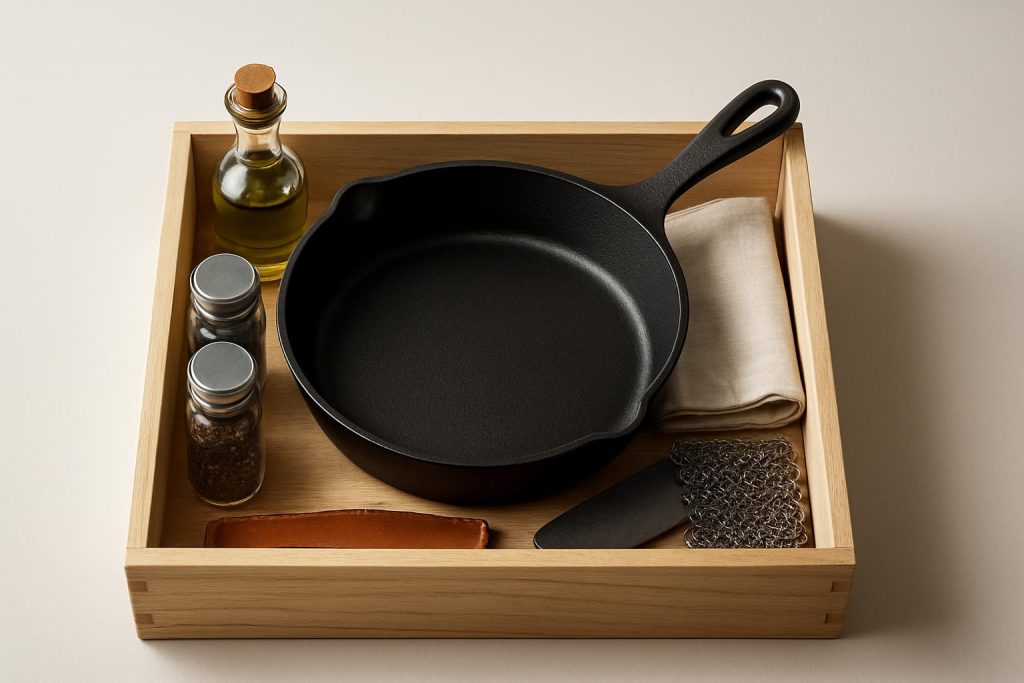
Layering for Protection
Place a folded kitchen towel inside the skillet to cushion tools. Nest the oil bottle in the handle area. Tuck spices and scrapers in the towel folds. Slide the handle cover onto the handle so it is visible and useful on unboxing. Wrap the whole set in kraft paper and secure with twine or a reusable cloth. Add the care and recipe cards on top for quick reading.
Budget Tiers and Sample Builds
Decide your tier first, then select the smallest number of items that deliver the most function. Avoid stuffing the basket with extras that will not be used.
Under 40 Basic Build
Include a pre-seasoned 8-inch or 10-inch skillet, a rigid pan scraper, one spice blend, and a printed care card. This build kickstarts a single or student kitchen. Keep packaging minimal and sturdy.
60 to 100 Upgraded Build
Include a pre-seasoned 10-inch skillet, silicone handle cover, pan scraper, chainmail scrubber, high smoke point oil, two spice blends, and three recipe cards. Add one solid kitchen towel for padding. This build feels complete and immediately useful.
For a complete starter basket, plan a budget of 60 to 100 for an upgraded build that feels generous without overspending.
150-plus Premium Build
Include a 12-inch skillet with a helper handle, a compatible lid, leather handle cover, oil and seasoning wax, chainmail scrubber, pan scraper, instant-read thermometer, fish spatula, tongs, two premium spice blends, parchment round, and five recipe cards. Pack in a wooden crate or market tote. This build suits an avid home cook or a wedding gift.
Personalize for Different Foodies
Match the add-ons to how the recipient eats and cooks. Keep the core the same. Shift the flavor and tool set to fit their habits.
The Baker
Pick a 10-inch or 12-inch skillet with slightly higher walls. Include parchment, pastry brush, a silicone spoon, and a cornbread or skillet cookie card. Add cinnamon sugar and flaky salt. Suggest preheating the pan before batter for crisp edges.
The Grill Lover
Choose a 12-inch skillet or a heavy grill pan if they cook outdoors. Include high smoke point oil, a robust steak rub, long tongs, and a splatter screen for indoor sears. Add a reverse sear steak card with target temperatures.
The Breakfast Fan
Choose a 10-inch skillet. Include a silicone spatula, a fish spatula, smoked paprika, and a simple potato and egg hash card. Add a note about preheating, then lowering heat for eggs to avoid sticking.
Safety, Maintenance, and Troubleshooting Tips
Cast iron is simple once the basics are set. Heat thoroughly before adding food. Use enough oil for the task. Dry fully every time. Avoid long acidic simmers until the seasoning is strong. If something sticks, adjust heat and preheating next time rather than adding heavy scrubbing.
Quick Seasoning Routine
When the surface looks dull or food starts to grab, refresh it. Warm the skillet, wipe on a whisper-thin coat of high smoke point oil, and heat it on the stovetop until just smoking. Let it cool and wipe off any excess residue. For a deeper reset, bake it oiled upside down at 230 C or 450 F for one hour and let it cool in the oven.
Rust Rescue
If you see orange specks or patches, act quickly. Scrub with chainmail or steel wool until you see clean metal. Rinse, dry on a warm burner, and season immediately. Seal it with several thin coats rather than one thick coat.
To rescue rust, scrub to bare metal, dry fully, then bake on three whisper-thin coats of oil at 230 C or 450 F for one hour each.
Gifting Logistics and Etiquette
Consider how the basket travels. Cast iron is heavy, so plan for safe handling. Add clear care notes so the recipient feels ready, not worried.
When Shipping
Use a tight box rather than an open basket. Wrap the skillet in a towel and kraft paper, then immobilize it with cardboard spacers. Place liquids in sealed bags. Add the care card on top so it is seen first. Choose ground shipping to reduce handling jolts.
When Hand-Delivering
Place the basket in a sturdy tote for easy carrying. Keep the skillet low in the basket so it does not tip. Hand the care and recipe cards to the recipient before they explore the rest. Offer a one-minute overview of preheating and oiling, then let them enjoy the unboxing.
Conclusion
A cast iron skillet gift basket becomes a weekly habit when built with intention. Choose a 10-inch pre-seasoned skillet for broad usefulness. Add a handle cover for safety, a scraper and oil for maintenance, and a few smart tools for easy cooking. Include bold but simple flavors and clear recipe cards. Pack it tight and clean. Personalize it to the recipient’s style. Your gift teaches a lasting skill set and delivers a reliable, satisfying cooking experience from day one.
FAQ
Q: What skillet size should I choose for a first-time cast iron user
A: For a first-time cast iron user, a 10-inch pre-seasoned skillet is the most versatile starting point.
Q: What oil should I include for seasoning and cooking
A: Use a high smoke point oil such as grapeseed, canola, or avocado for both cooking and maintenance seasoning.
Q: How do I clean the skillet after use
A: After cooking, scrape while warm, rinse with hot water, dry on the burner, then wipe on a whisper-thin coat of oil.
Q: How can I rescue a rusty skillet
A: To rescue rust, scrub to bare metal, dry fully, then bake on three whisper-thin coats of oil at 230 C or 450 F for one hour each.
Q: What budget should I plan for a complete basket
A: For a complete starter basket, plan a budget of 60 to 100 for an upgraded build that feels generous without overspending.