We are reader supported. When you purchase through links on our site, we may earn an affiliate commission. Also, as an Amazon affiliate, we earn from qualifying purchases.
Busy boards give toddlers a safe place to explore with hands and senses. You can build one at home with basic tools and common materials. It takes planning, a short list of parts, and careful assembly. The payoff is strong. You get focused play, better fine motor skills, and a tidy activity that stays in one place. Keep reading to learn how to plan, build, mount, clean, and upgrade a busy board that fits your space and your child.
Introduction
A well built busy board turns daily objects into a learning station. Toddlers pull, slide, spin, press, and match. Each action teaches cause and effect and builds strength in small muscles. The board also sets clear play boundaries. Everything lives on the board. Less mess spreads around the room. The process is simple. Start with a safe base. Add sturdy parts. Attach them well. Clean and review often. You can do this even if you are new to DIY. Follow the steps below.
Benefits of Busy Boards
Why sensory play matters
Sensory play helps the brain link touch, sight, sound, and movement. A busy board offers many inputs in one compact area. Textures build tactile awareness. Latches and zippers build finger control. Spinners and sliders build hand eye coordination. Switches and knobs teach sequence and control. The board supports focus and calm because hands stay busy and actions give instant feedback.
Age appropriate goals
10 to 12 months with close supervision. Focus on large parts, big textures, and easy movement. No small pieces. 1 to 3 years. This is the core age. Add latches, buckles, zippers, gears, and knobs. 3 to 4 years. Add simple threading, number matching, and two step tasks. Always supervise. Adjust modules to your child. Remove items that cause frustration or risk.
Safety first
Non toxic materials
Choose a sturdy wood base like plywood or pine board. Use child safe finishes. Pick water based, low VOC, nontoxic options. Food grade mineral oil and beeswax polish are safe for bare wood. Allow all finishes to cure fully before use. If you add fabrics, pre wash them. If you add plastics, pick BPA free, smooth edged parts.
Choking risk and attachment strength
Avoid small loose parts. Nothing smaller than 3.5 cm across should be detachable. Attach hardware with screws, bolts, washers, and locknuts. Do not rely on hot glue for load bearing parts. Use wood screws long enough to pass through the item and at least 12 mm into the board. Use machine screws with a washer and a locking nut on the back when possible. Add a backup with cable ties or metal brackets for items under frequent pull.
Smooth edges and safe finishes
Round every corner. Sand all edges to a smooth finish. Use 120 grit, then 220 grit sandpaper. Wipe dust before sealing. Check for sharp metal edges on hardware. File or cover edges with caps or heat shrink tubing. Keep cords and strings short. Under 18 cm is safer. Secure all battery compartments with a screw closed cover or pick sealed puck lights.
Plan your board
Board size and layout
Pick a size that fits your space. A wall board can be 40 to 60 cm wide and 60 to 80 cm tall. A portable mini board can be 30 by 30 cm. Aim for a thickness of 12 to 18 mm for strength. Sketch a simple grid. Leave 2 to 3 cm around each item so small hands can reach. Place moving parts at shoulder height for your child. Put tougher tasks lower so a child can brace elbows.
Theme ideas and zones
Divide the board into zones. Fine motor zone. Zippers, buckles, snaps, toggle switches. Texture zone. Fabrics, rubber mat, soft brush, silicone trivet. Motion zone. Spinners, wheels, castor, gear set. Practical life zone. Door latches, light switch plate, faucet handle, door chain. A light theme helps new users learn where to start. Use simple colors for calm focus. Add one bold color area to draw interest.
Budget tips and sourcing
Use what you have. Scrap wood, spare cabinet handles, old belts for buckles, fabric offcuts. Visit a hardware store for low cost parts. Doorstop, hinge, hasp, gate latch, PVC cap, drawer pull, spring, carabiner, chain link. Check craft stores for zippers, large buttons sewn onto a panel, felt. Choose sturdy options. Avoid fragile plastics that crack. Recycled items must be cleaned well and checked for damage.
Tools and materials checklist
You need a saw if cutting your own board. A hand saw or a store cut works. A drill with bits for pilot holes. A screwdriver. Sandpaper in medium and fine grit. A measuring tape, pencil, and masking tape for layout. Wood screws in sizes 16 to 25 mm. Machine screws with washers and locknuts for through holes. Nontoxic wood finish or mineral oil and beeswax. Cable ties and adhesive backed Velcro for removable modules. Felt pads for the back if leaning the board. Optional French cleat for wall mounting.
Build step by step
Prep the board
Cut the board to size. Sand the faces and edges until smooth. Round the corners. Wipe dust with a damp cloth and dry. Apply finish if you want sealed wood. Follow cure time on the label. Mark a light grid with pencil or tape. Keep lines straight so it looks tidy.
Arrange components and test layout
Place items on the board without screws first. Test spacing with your child if possible. Watch reach, interest, and any snag points. Put simple wins at the top to draw attention. Place trickier tasks lower. Balance textures around the board so hands travel. Take a photo of the layout. This helps you remember positions during mounting.
Attach hardware the right way
For wood screws, drill a pilot hole smaller than the screw core. Drive screws flush, not over tight. For through bolts, drill a clean hole. Add a washer under the head and under the locknut. Tighten until snug but still movable if the item needs to spin. For items that must be removable, use screws into a small backer block and secure that block with Velcro strips. Do not rely on peel and stick alone for high pull items. Back up adhesive with screws or cable ties.
Labeling and visuals
Keep visuals simple. A small painted dot or arrow can guide action. If you add numbers or letters, keep them large and high contrast. Seal any paint with a nontoxic topcoat. Avoid stickers that can peel. If you add a photo schedule for steps such as zip then snap then buckle, laminate it and screw it down under corner washers.
Sensory modules to try
Fine motor modules
Zipper panel. Sew a long zipper between two fabric strips and screw the strips to the board through washer backed holes. Buckle strap. Cut an old belt, add a side release buckle from a craft store, and screw each end to the board. Snap strip. Mount a canvas strip with metal snaps riveted in place. Lacing card. Screw a small plywood piece with large holes and add a short shoelace tied off at one end.
Cause and effect modules
Toggle light switch with a standard wall plate and a loose switch that is not wired. It clicks and resets. Door latch set. Add a hasp, hook and eye, and barrel bolt. Children learn motion and order. Castor wheel. Mount a small swivel castor that spins and rolls. Spring doorstop. It boings and returns. Mount with a screw through a base plate.
Texture and touch
Felt square for soft touch. Corduroy and denim strips for ridges. A silicone oven mat cut to size for grippy feel. A soft brush fixed through its base for gentle sensory input. Fine sandpaper square for light scratch feel. Ensure edges are framed or rounded so they do not lift.
Sound and motion
Large wooden bead on a captive cord threaded through two eyelets. Keep the cord short and secured with knots plus a clamp. A secure rattle tube made from PVC pipe with glued end caps, but only if you can solvent weld and then screw the tube to the board inside a metal strap. If not sure, skip the rattle tube. A spinner made from a fidget spinner core screwed through its center with a washer so it stays captive. Choose big parts that do not detach.
Practical life skills
Door with hinge and knob. Children open and close. Add a stop so fingers do not pinch. Faucet handle or valve knob. It turns left and right with resistance. Shoe tying bar. Add two eyelets with a short lace for practicing bows. Keep the lace short and fixed at both ends.
Removable busy patches
Mount two Velcro pads on the board. Build small panels on thin plywood or stiff felt. A matching color patch, a shape sorter outline, or a texture sampler. Swap patches to refresh interest without rebuilding the board. Store extra patches in a labeled pouch nearby.
Mounting and placement
Wall mounting
Find a stud with a stud finder. Use a French cleat for strong support. Fix one half to the wall into studs and the other half to the board. Aim for the bottom edge to sit 30 to 45 cm from the floor for sitters and crawlers. Raise to 45 to 60 cm for new walkers. Add felt pads behind lower corners to stop wobble. Never mount near cords or outlets.
Freestanding and portable options
Lean the board against a wall with non slip pads and a small anti tip strap. Or screw it to the side of a low shelf. For a mini travel board, add a handle cutout on top. Keep travel boards light and under 1.5 kg. Store them upright in a basket when not in use.
Cleaning and maintenance
Weekly wipe routine
Wipe the board once a week. Use a soft cloth and a mild mix of water with a drop of dish soap. Wring the cloth well. Wipe wood, metal, and plastic. Follow with a dry cloth. For high touch parts, use a 70 percent alcohol wipe on metal only, then dry. Avoid soaking wood or fabrics.
Monthly deep check
Inspect screws and nuts. Tighten any that moved. Check for splinters or chipped edges. Sand lightly and reseal if needed. Check cords and laces for fray. Replace at the first sign of wear. Remove fabric patches and launder in a mesh bag. Air dry fully before reattaching.
Material specific care
Wood. Refresh with mineral oil or beeswax polish every few months. Metal. Wipe with a damp cloth, then dry to prevent rust. Use a tiny dab of food safe mineral oil on hinges and latches if they squeak. Fabric. Spot clean with mild soap and water. Avoid bleach.
Rotation and upgrades
Swap modules on a schedule
Children like novelty. Swap or move two to three items every two to four weeks. Use Velcro backed patches for easy refresh. Keep a small bin of spare modules ready. Label the bin by type so you can switch fast during a busy week.
Observe and level up
Watch how your child uses the board. If a task is too easy, add a small challenge such as a second step or a stiffer latch. If a task frustrates, lower the resistance or move it to a lower traffic spot. Add simple counting dots near spinners for early number sense. Add left to right arrows near sliders to cue movement patterns.
Troubleshooting
If parts loosen or fall off
Stop use and remove the board from reach. Replace short screws with longer ones. Add a washer to spread force. Switch to a through bolt and locknut if the back is accessible. Avoid glues for repairs on load bearing parts. Choose mechanical fixes first.
If adhesive fails
Clean both surfaces with isopropyl alcohol. Let them dry. Use industrial strength Velcro with a full cure time. Add two small screws at the corners of the patch to back up the adhesive if it sees heavy use.
If your child loses interest
Reduce the number of items. Too much choice can overwhelm. Group tasks into a clear path from left to right. Introduce one new patch and play together for a few minutes to model actions. Rotate items that match current interests such as wheels, keys, or zips.
Sample layouts for quick starts
Starter mini board
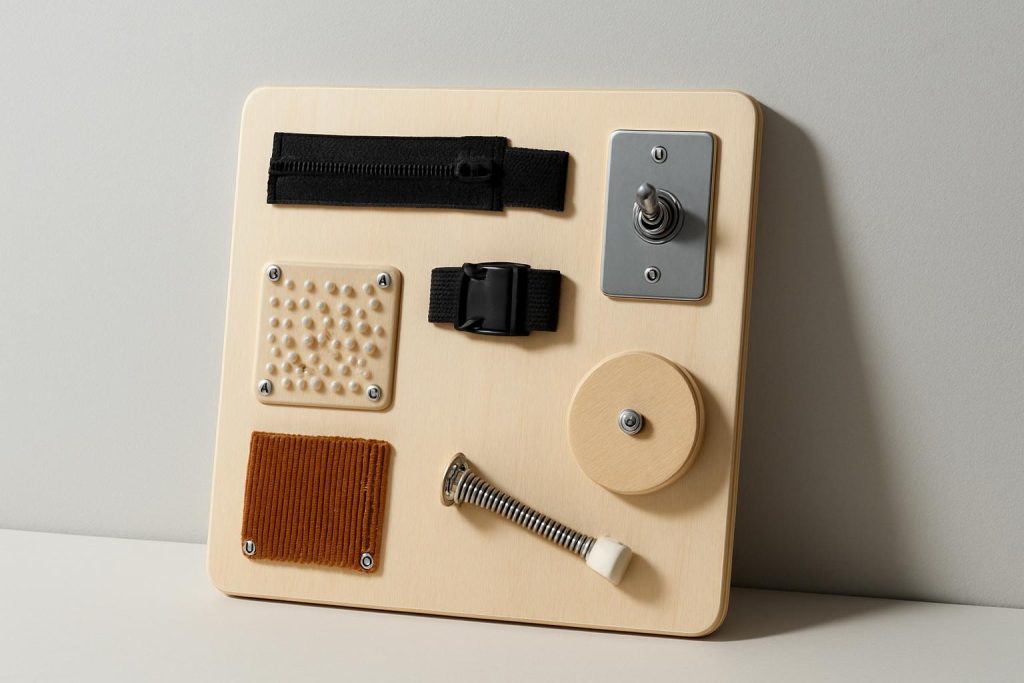
Size 30 by 30 cm. Top left, toggle light switch plate. Top right, silicone texture square. Bottom left, spring doorstop. Bottom right, zipper strip. One center spinner. This gives four actions and one fidget.
Full wall board
Size 50 by 70 cm. Top row, soft brush, corduroy patch, felt square. Middle row, latch trio with hasp, barrel bolt, hook and eye. Right side, castor wheel and spinner. Bottom row, buckle strap, lacing card, shoe tying bar. Leave a small blank area for a Velcro patch that you swap often.
Time and cost estimates
DIY from scratch
Plan for two to four hours of work including sanding and layout. Curing time adds more if you seal the wood. Cost varies by region. A basic build can sit in a low to mid budget range if you reuse parts. The biggest cost is the board, hardware pack, and the mounting kit. You control cost by choosing fewer modules at first and adding over time.
Checklist before first use
Final safety review
Run your hand over every edge. Nothing should catch your skin. Tug each item with firm adult force. Nothing should shift. Check that no part can twist off into a small piece. Confirm all finishes cured fully. Mount the board securely. Set a routine to inspect weekly. Start with short play sessions and stay nearby.
Conclusion
A busy board is a practical project that pays off every day. It channels curiosity into safe, focused play. It reduces clutter by giving small hands a single station to explore. You can build it with simple tools and parts you already own. Plan the layout, attach parts with strong hardware, mount it well, and clean it on a routine. Rotate modules to keep interest high. With care and checks, your board will grow with your child and serve for years.
FAQ
Q: What size should a busy board be for a toddler
A: A wall board can be 40 to 60 cm wide and 60 to 80 cm tall, while a portable mini board can be 30 by 30 cm.
Q: How do I attach items safely
A: Use wood screws or machine screws with washers and locknuts, avoid hot glue for load bearing parts, and back up high pull items with cable ties or brackets.
Q: What ages are busy boards best for
A: Start with simple, large parts at 10 to 12 months with close supervision, focus on 1 to 3 years for most modules, and add small challenges for 3 to 4 years.
Q: How do I clean a busy board
A: Wipe weekly with a damp soapy cloth and dry, do a monthly check and tighten hardware, spot clean fabrics or launder removable patches in a mesh bag.
Q: How should I mount the board
A: Use a French cleat into wall studs with the bottom edge 30 to 45 cm from the floor for sitters and 45 to 60 cm for walkers, or lean it with non slip pads and an anti tip strap.