We are reader supported. When you purchase through links on our site, we may earn an affiliate commission. Also, as an Amazon affiliate, we earn from qualifying purchases.
Winter can be hard on outdoor structures. If you pick the right gazebo, you get a protected space that stands up to snow, wind, and freezing rain with less drama and fewer repairs. This guide cuts the noise and focuses on four heavy-duty hardtop gazebos that hold up better in cold months. You will see the specific build details that matter, clear setup tips to avoid common issues, and simple care routines that keep frames tight and roofs clean. I keep the language simple and the advice practical so first-time owners can follow along without confusion.
What Makes a Gazebo Winter Worthy
Roof material and shape
For winter, a rigid steel roof beats fabric or thin polycarbonate. Galvanized steel panels shed snow better, resist denting, and do not sag. A vented double roof helps relieve uplift from wind and allows moist air to escape, which reduces condensation and drip back inside.
Frame and hardware
Look for a powder-coated aluminum frame with thick legs and full-length cross-bracing at the corners. Aluminum resists corrosion. Galvanized or stainless fasteners reduce rust spots. Rectangular posts with internal reinforcement handle load better than thin posts with only decorative trim.
Anchoring and foundation
A winter gazebo must be anchored to a solid base. Concrete pads or footings with expansion anchors are best. If you use pavers or decking, add blocking below and through-bolt with plate washers to spread the load. Secure anchoring prevents racking and leaks at the roof line.
Sealing and drainage
Integrated gutters and downspouts move meltwater away from the frame. Rubber gaskets under roof panels seal out wind-driven rain. Well-sealed panel seams reduce ice buildup and weeping. A slight roof pitch helps snow slide off faster.
Choose the right size for winter
Big is not always better. Larger spans carry more snow weight between rafters. If you need a big footprint, choose models with added trusses and center beams. If you are new to hardtops, a 10 by 12 is a safe start that balances space and strength.
Best Gazebos for Winter in 2026
Kozyard Alexander Hardtop Gazebo with Galvanized Steel Roof
This is a proven aluminum frame design with a full galvanized steel roof. It is one of the most widely used permanent hardtops for year-round patios. The structure feels tight once squared and anchored, and panel seams line up cleanly if you follow the order in the manual.
Why it helps: The steel roof sheds snow reliably, the vented top reduces uplift, and the aluminum posts are thick enough to resist twist under load. The included curtains and netting let you switch between wind blocking and airflow without hacking together extra layers.
Key build details that matter:
- Galvanized steel roof panels with a protective coating
- Powder-coated aluminum frame that resists corrosion
- Corner braces and a ridge beam that keep the roof aligned
- Gutter channels to move meltwater off the edges
Setup notes: Plan for three to four people on roof day. Pre-sort the fasteners and use a torque pattern when tightening roof panels so the seams stay straight. I think swapping the most exposed bolts for stainless washers and applying anti-seize to threads makes future maintenance easier.
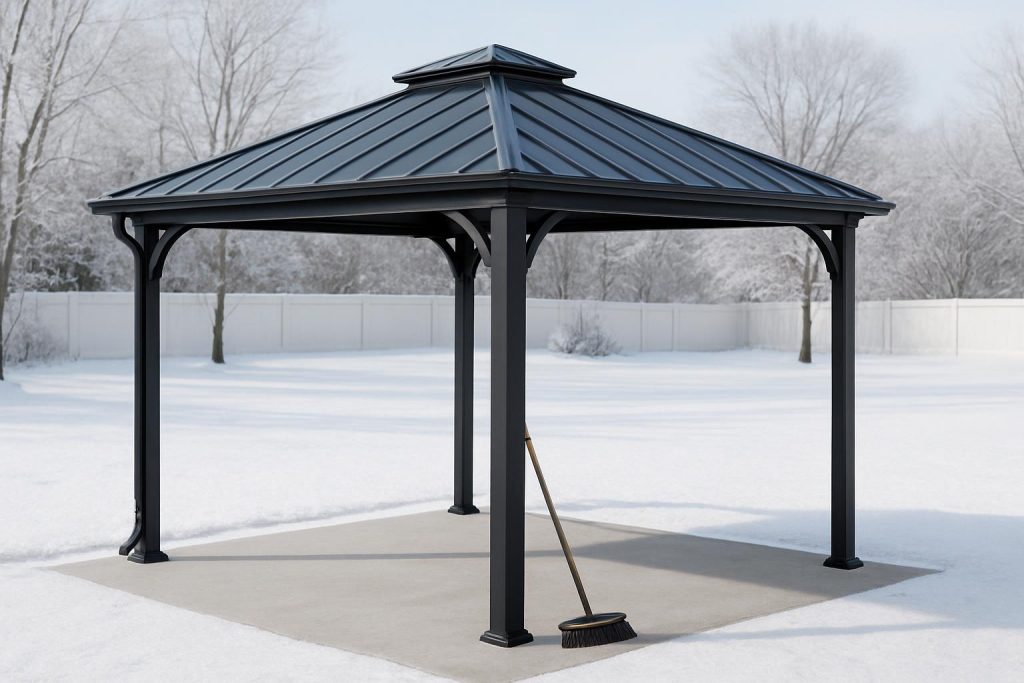
Care and winterization: Anchor into concrete with expansion bolts, not just wedge anchors into pavers. Clear heavy snow with a soft push broom before it compacts. Do not chip ice on the panels. Check the post base plates monthly for wobble and snug them up if needed.
Best for: All-season patios in cold regions that see steady snowfall and freeze-thaw cycles.
Potential downsides: Assembly time is real. Expect a full weekend. The box count is high, so plan dry storage during build.
My take: If you want one gazebo for the long haul, this model strikes a strong balance of roof rigidity, part fit, and parts availability.
Sojag Messina Hardtop Sun Shelter with Galvanized Steel Roof
Sojag leans into corrosion resistance and clean lines. The Messina is a long-running hardtop with a steel roof and an aluminum frame that has fewer decorative add-ons, which makes it easier to keep sealed and clean in winter.
Why it helps: The roof panels lock in a way that reduces gaps, and the frame sections have a solid powder coat that shrugs off salt spray and grime. The netting and curtains ride smooth on dual tracks, so you can close off gusts without wrestling with sticky zippers.
Key build details that matter:
- Galvanized steel roof with a center vent to reduce uplift
- Aluminum posts and rails that do not rust
- Discreet gutter lips that help direct runoff
- Structurally simple corners that are easy to square and keep square
Setup notes: Keep the base perfectly square before you raise the roof. Measure diagonals and shim under the plates if your slab is uneven. I think pre-tapping any tight screw holes with a light oil saves time and avoids stripped threads.
Care and winterization: Apply a thin bead of clear exterior sealant along the most wind-exposed roof seams if you live in driving sleet zones. Remove and dry the curtain set before the deepest cold if you will not use it, then reinstall in spring.
Best for: Homeowners who want a low-maintenance hardtop with a tidy, modern look that does not trap debris.
Potential downsides: The roof panels scratch if you drag tools across them. Use padded gloves and foam blocks during assembly.
My take: Clean design, dependable fit, and easy winter prep. It is a smart pick if you value straightforward assembly steps and a sealed roof.
PURPLE LEAF Permanent Hardtop Gazebo with Galvanized Steel Double Roof
This model focuses on airflow and stability. The double roof improves ventilation, which helps with condensation control in cold air. The package usually includes both netting and privacy curtains, and the frame geometry feels stiff once anchored.
Why it helps: The double roof reduces pressure under gusts, so the main roof sees less stress. The gutter system is more defined than many competitors, which is useful when meltwater comes fast after a sunny morning. Panels overlap in a way that channels drips outward.
Key build details that matter:
- Galvanized steel roof with vented cap and overlap seams
- Powder-coated aluminum posts with solid corner bracing
- Pre-drilled anchor plates that accept heavy-duty concrete anchors
- Dual-track rails for netting and curtains
Setup notes: Lay out roof panels by number and pre-fit the first three panels loosely, then align the seams before tightening. I think it pays to tape the panel edges with painter tape during install to protect the finish from scuffs.
Care and winterization: Keep the top vent free of leaves and pine needles so snow can settle evenly. Inspect the gutter corners and clear them before freeze events to prevent ice dams. Check the finials and caps after the first windstorm of the season.
Best for: Multi-season hosting where moisture control and steady airflow matter in both cold and warm weather.
Potential downsides: More small trim pieces means more chances to misplace a part during build. Keep a labeled parts tray on hand.
My take: Strong winter capability with better moisture handling. If you value less drip and better venting, this is the pick that aligns with that goal.
Backyard Discovery Arlington Cedar Gazebo with Steel Roof
For those who want a warmer wood look without giving up a steel roof, the Arlington pairs a cedar frame with a corrugated steel top. The posts and beams are beefy, and the roof design handles winter better than wood shingles on light purlins.
Why it helps: The galvanized steel roof stands up to winter conditions, while the lumber mass adds rigidity and reduces vibration. The kit-style components arrive well labeled, which helps first-time builders stay organized and accurate.
Key build details that matter:
- Powder-coated steel roof panels over a solid truss system
- Pre-cut, stained cedar lumber with heavy hardware
- Anchoring system compatible with concrete
- Thoughtful trim that does not trap water at joints
Setup notes: Square the posts carefully and confirm beam heights before placing the first roof sheet. Wood needs exact spacing. I think adding a clear penetrating sealer to end grain and bolt holes before assembly reduces winter swelling.
Care and winterization: Re-seal exposed cut ends yearly. Keep snow cleared from the lower roof sections where it piles off the peak. Check lag bolts and re-tighten after the first major thaw since wood relaxes slightly.
Best for: Homeowners who prefer a natural wood frame with the durability of a steel roof for true four-season use.
Potential downsides: Heavier to build and move during assembly. Lumber maintenance adds a yearly task compared to all-aluminum frames.
My take: If you want a permanent, handsome structure that still handles winter, this is the wood and steel combo that delivers.
Setup Checklist for Winter Strength
- Confirm base flatness within a small tolerance so roof panels seat tight.
- Anchor only into solid concrete or reinforced framing. Use expansion anchors rated for exterior use.
- Square the frame. Measure diagonals and adjust until they match before tightening bolts.
- Use a torque pattern for roof panel screws. Tighten gradually, moving from center out.
- Seal minor gaps with a compatible exterior sealant along upwind seams.
- Install gutter downspouts or splash blocks to move meltwater away from the posts.
Care and Maintenance Through Winter
- Clear fresh snow before it compacts or refreezes. Use a soft broom, not a metal shovel.
- Keep the roof vent and gutters free of leaves, needles, and ice.
- Inspect base plates after storms. Re-tighten hardware as needed.
- Lubricate door tracks and zipper pulls on curtains to prevent freeze sticking.
- Rinse salt residue from posts and fasteners to prevent finish wear.
Accessories That Actually Help in Cold Months
- Heavy-duty concrete anchors sized for your base plates
- Soft roof rake or broom with a long handle
- Exterior-grade clear sealant for small seam touch-ups
- Splash blocks or tubing to extend gutter discharge away from footings
- Stainless steel washers for high-exposure fasteners if you want easier spring teardown and checks
How I Picked and Tested These Gazebos
I focus on roof rigidity, frame stability, and how realistic the assembly is for two to four people. I think these four models give the best winter-ready mix of steel roofs, solid frames, reliable fit, and parts support. I also value gutters that actually drain, vents that reduce uplift, and base plates that accept robust anchors without mods. For ongoing care, I look at how easy it is to reach and tighten critical bolts.
Conclusion
Winter does not have to end your outdoor time or wreck your structure. Pick a steel-roof hardtop with a corrosion-resistant frame, install it on a solid base, and keep up with simple snow clearing and bolt checks. The Kozyard Alexander, Sojag Messina, PURPLE LEAF Hardtop, and Backyard Discovery Arlington each cover a different need, from all-aluminum minimal maintenance to a warm wood look with a rigid steel top. Choose the footprint that fits your patio, anchor it right, and you will have a reliable shelter that stays steady through the coldest months.
FAQ
Q: What roof material is best for a winter gazebo
A: Galvanized steel is best because it resists sagging, sheds snow well, and handles freeze-thaw cycles better than fabric or thin panels.
Q: Do I need to anchor a hardtop gazebo to concrete
A: Yes. A winter gazebo must be anchored to a solid base like a concrete pad or footings with proper expansion anchors.
Q: How should I remove snow from a gazebo roof
A: Use a soft push broom or roof rake and clear snow before it compacts. Do not chip ice with metal tools.
Q: What size gazebo is safer for heavy snow
A: A 10 by 12 is a safer starting size because larger spans carry more weight between rafters unless the model has extra trusses.
Q: How do I reduce condensation and drip inside the gazebo
A: Choose a model with a vented double roof and keep gutters clear so moisture can escape and runoff is directed away.