We are reader supported. When you purchase through links on our site, we may earn an affiliate commission. Also, as an Amazon affiliate, we earn from qualifying purchases.
Beach themed crafts bring a calm coastal vibe into any home. You can start small and build up to statement decor without complex tools. This guide gives you clear steps, safe methods, and beginner friendly projects that look polished. Follow the plan, choose the right materials, and finish with clean, durable results you can enjoy year round.
Plan Your Coastal Craft Session
Choose a calm coastal palette
Pick colors that echo the shoreline. Soft whites, sandy beige, driftwood gray, seagrass tan, sea glass green, and ocean blue work well together. Keep most items neutral and add one or two accents so your room feels light and cohesive.
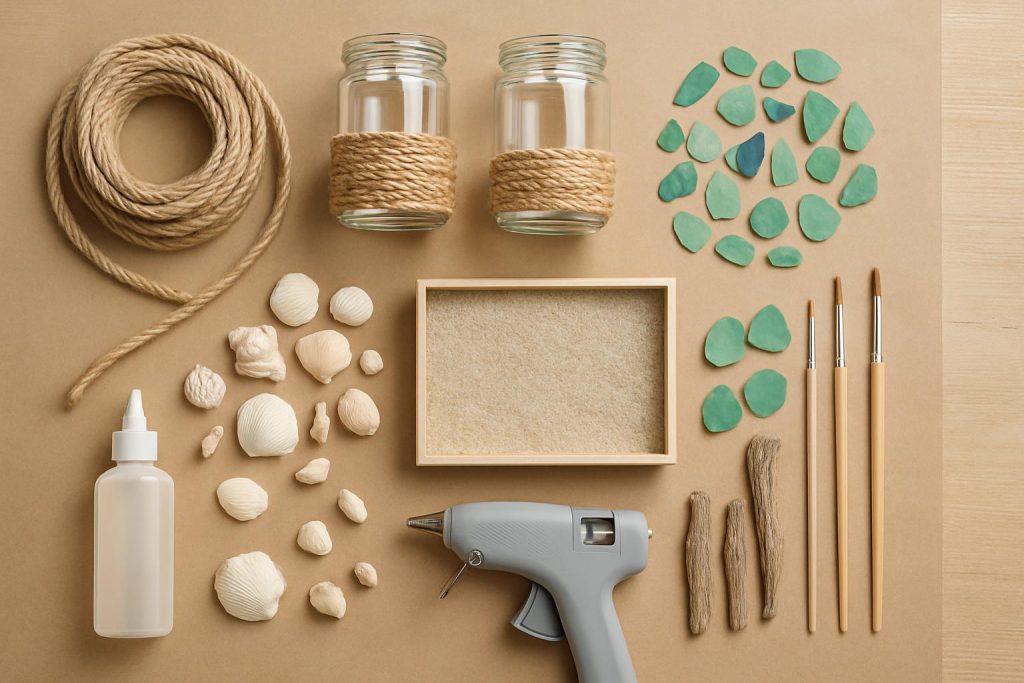
Gather simple, safe materials
Start with clear craft glue gel, a small hot glue gun, natural jute or cotton rope, clean shells, driftwood, sea glass, dry sand, plain glass jars, simple photo frames, and a matte or satin clear sealer. Add painter’s tape, fine sandpaper, small brushes, and kraft paper for your surface. Use ventilated space when using sprays or hot glue.
Set up and plan cleanup
Cover the table with kraft paper. Keep a tray or shallow box to contain sand. Place a small trash bin nearby. Keep a damp cloth for glue smudges and a lint roller for grit. End with a quick vacuum using the hose to pick up fine sand. Plan 15 minutes for cleanup so the area stays tidy.
Source and Prep Beach Finds
Where and how to collect
Gather shells, driftwood, and sea glass from permitted public areas. Take only what you need and avoid live shells. You can also buy clean, sorted packs online or at craft stores to save time and ensure consistency.
Clean shells and sea glass
Soak in warm soapy water for 20 to 30 minutes. Scrub gently with a soft brush to remove residue. Rinse well and air dry on a towel. For extra sanitation on shells only, a quick dip in a mild bleach solution followed by a thorough rinse can help, then dry fully. Do not soak sea glass in bleach for long because it can dull the finish.
Prep driftwood safely
Brush off loose debris outdoors. Rinse in clean water and let it sun dry for several days until fully dry to the core. This reduces moisture and makes it more stable indoors. If you want a smoother finish, lightly sand sharp spots after drying.
Seal when needed
Use a matte clear acrylic sealer on driftwood and shells if you want to reduce dusting and enhance durability. Test on a small area first to confirm the look. Sealing is optional for a natural finish but helpful for high touch items.
Quick Starter Projects
Rope wrapped glass jars
Clean a jar and dry it. Add a small dot of hot glue at the base. Press rope into the glue and wrap upward in even coils. Add small glue dots every few inches to secure. Stop at your desired height, trim, and tuck the end at the back with glue. Use as a vase, utensil holder, or candle sleeve with a clear glass insert. This takes under an hour and looks crisp and coastal.
Shell shadow box
Open a shadow box frame. Line the backer with linen fabric or kraft paper using craft glue. Arrange shells in a grid or organic cluster before gluing so spacing looks balanced. Glue with clear craft glue gel, press lightly, and let cure flat. Close the frame and hang or place on a shelf.
Beach memory jar
Use dry sand only. Add sand to a clean jar in a thin layer. Place a few shells or a small piece of driftwood on top. If the jar will be moved often, mist exposed sand with a diluted white glue solution and let dry to reduce shedding. Close with a lid or a cork for a mess free display.
Statement Crafts for Walls
Driftwood wall hanger
Select a straight, smooth piece of driftwood. Seal if desired and let it dry. Tie two equal lengths of jute rope to each end with a tight knot for hanging. Space simple hooks or small eye screws along the wood for lightweight items like keys or necklaces. Mount on a wall anchor so it holds securely.
Sea glass mosaic frame
Pick a plain wooden frame. Lightly sand, then paint in a coastal tone and let dry. Arrange sea glass around the frame edge with pieces touching but not crowded. Adhere with clear craft glue gel or a thin epoxy layer for heavy glass. Wipe away squeeze out while wet. Seal with a clear spray for a finished look.
Coastal wreath
Use a grapevine or foam wreath base. Wrap sections with burlap or rope, leaving some areas open for texture. Glue a few shells and small driftwood pieces in clusters. Keep it simple to avoid a heavy look. Add a loop of ribbon or jute for hanging on a door or above a console.
Functional Coastal Decor
Nautical rope coasters
Cut a felt circle slightly larger than your finished coaster size. Coil cotton rope from the center outward on top of the felt using craft glue. Press as you go to keep the coil flat. Trim the end cleanly and seal the tip with a tiny dab of glue. Let cure fully before use to prevent shifting.
Sand candles in containers
Use heat safe glass containers. Add a layer of dry sand. Nest a tea light or a votive holder into the sand so the flame stays above the rim. Keep sand away from the wick area. Do not add loose shells close to the flame. Never leave a burning candle unattended and keep out of drafts.
Stenciled pillow covers
Choose plain cotton or linen covers. Place a stencil of a simple motif like a shell or wave. Use fabric paint with a small brush or sponge and dab lightly to avoid bleed. Remove the stencil while paint is wet, then let dry. Heat set as directed on the paint label. Pair with rope trimmed jars for a coordinated look.
Artful Touches
Painted shells
Pick smooth shells. Clean and dry thoroughly. Paint simple stripes, dots, or bands in your chosen palette using acrylic paint. Leave some natural shell visible for balance. Seal with a clear matte or satin spray once fully dry. Display in a shallow bowl or use as place markers.
Simple watercolor coastal prints
Use watercolor paper. Paint soft gradients of sand to sea with beige, blue, and green. Keep shapes minimal for a calm look. Let dry, flatten under books if needed, then frame in a light wood or white frame. Hang as a pair for symmetry.
Photo frame with jute and shells
Wrap the outer edge of a basic frame with jute twine using craft glue for grip. Add a few tiny shells to one corner for a clean accent. Keep embellishments light so the photo remains the focus. Use a neutral mat to tie in your palette.
Finishing, Sealing, and Care
When to seal
Seal high touch items, items near moisture, and pieces with sand or painted surfaces. Use matte for a natural look or satin for a soft sheen. Always test on a small area first. Apply thin, even coats and allow full cure per product directions.
Hanging hardware tips
Use D rings and picture wire on frames for stable hanging. For driftwood hangers, install a center wall anchor and check that rope knots are tight. Measure twice before drilling. Use small clear bumpers at frame corners to prevent wall scuffs and to keep frames level.
Cleaning and maintenance
Dust with a soft brush or microfiber cloth. For jars and sealed items, wipe with a slightly damp cloth and dry right away. Avoid harsh cleaners that can cloud finishes. Keep sand crafts in low traffic spots to reduce disturbance. Refresh sealer if surfaces show wear.
Organizing Your Craft Supplies
Label and store by type
Use clear lidded jars for shells, sea glass, and sand. Label by type and color so you can match future projects quickly. Store rope and jute in a basket to prevent tangling. Keep glues upright and sealed to avoid drying out.
Divide small items
Use a divided craft box for tiny shells, hooks, eye screws, and beads. A simple index card in each compartment lists quantity and size so you can restock efficiently. This prevents waste and keeps your workspace clean.
Make a coastal craft kit
Assemble a bin with your most used tools, adhesives, painter’s tape, brushes, and a roll of kraft paper. Add a small tray for sand. Having a ready kit shortens setup time and helps you start and finish in one session.
Budget and Time Planning
What to DIY and what to buy
DIY items with visible texture like rope jars, shell frames, and driftwood hangers. Buy specialty items that require tools you do not own, such as premade wreath bases or heavy duty hooks. Combine both to save time and achieve a curated look.
Weekend plan example
Day one morning, clean and dry materials. Day one afternoon, make rope wrapped jars and a memory jar. Day two morning, build a shell shadow box and a sea glass frame. Day two afternoon, seal and mount. This simple plan creates a cohesive set in one weekend.
Cost saver tips
Reuse jars and frames you already have. Buy rope and jute in larger rolls for better value. Choose paint sample pots rather than full cans. Mix natural finds with a few purchased shells to control look and cost.
Common Mistakes and Fixes
Sand shedding
Always start with fully dry sand. Keep sand in contained layers inside jars or shallow trays. For exposed sand, mist with diluted white glue and let dry, or seal lightly with a clear sealer. Do not over apply or the surface can look cloudy.
Shells not sticking
Make sure surfaces are clean and dry. Lightly roughen the back of shells with fine sandpaper for better grip. Use clear craft glue gel for small shells, hot glue for quick tacking, and epoxy for heavy or glass on glass bonds. Hold in place until initial set forms.
Rope fray at cuts
Wrap the cut point with painter’s tape before cutting. After cutting, remove the tape and seal the tip with a small dab of glue. Press the fibers together until the glue sets for a neat edge.
Seasonal Variations
Summer accents
Add a touch of bright coral or aqua to jars or painted shells while keeping the base neutral. Swap in a striped ribbon on the wreath for a fresh seasonal update.
Neutral winter coast
Emphasize driftwood gray, warm beige, and linen. Remove bright accents and keep glass and rope textures visible. Add more matte finishes for a calm, cozy look.
Conclusion
Beach themed crafts are approachable and rewarding when you follow clean steps, prep materials well, and finish with care. Start with simple rope wrapped jars and a memory jar. Build up to a shell shadow box, a sea glass frame, and a driftwood wall hanger for a complete coastal set. Keep your palette soft, your workspace tidy, and your materials organized so each project feels simple and looks refined.
FAQ
Q: What is the easiest beach themed craft for beginners
A: Rope wrapped glass jars or a beach memory jar require only a jar, rope or sand and shells, basic glue, and take under an hour.
Q: How do I clean and prepare shells and driftwood
A: Soak shells in warm soapy water, scrub, rinse, and air dry. For extra sanitation on shells only, use a quick dip in a mild bleach solution, rinse, and dry. Brush driftwood, rinse, and sun dry for several days until fully dry. Seal if desired after drying.
Q: What glue works best for shells and sea glass
A: Use clear craft glue gel for small pieces, hot glue for quick tacking, and epoxy for heavy pieces or glass on glass bonds. Make sure surfaces are clean and fully dry and lightly roughen for better grip.
Q: How do I keep sand from shedding in decor
A: Start with fully dry sand, keep it contained in jars or trays, mist exposed sand with diluted white glue, or seal lightly with a clear sealer once fully dry.
Q: How can I organize leftover beach craft supplies
A: Store shells, sea glass, and sand in clear lidded jars labeled by type and color, keep small items in a divided box, and assemble a coastal craft bin with basic tools so the next session starts fast.