We are reader supported. When you purchase through links on our site, we may earn an affiliate commission. Also, as an Amazon affiliate, we earn from qualifying purchases.
Replacing a two handle bathtub faucet is a clean upgrade that stops drips, refreshes the look, and improves function. You can do it in an afternoon with basic tools and calm steps. This guide shows you how to plan, remove the old parts, install the new faucet, seal everything, and test for leaks. Follow along and do each step once and right.
Why Replace A Two Handle Bathtub Faucet
Old handles can seize, stems can leak, and finishes can flake. A new faucet makes the tub easier to use and easier to keep dry. You also get smoother operation and better parts availability. If your spout diverter fails, you lose shower performance. A straightforward replacement restores pressure and control.
Tools And Materials
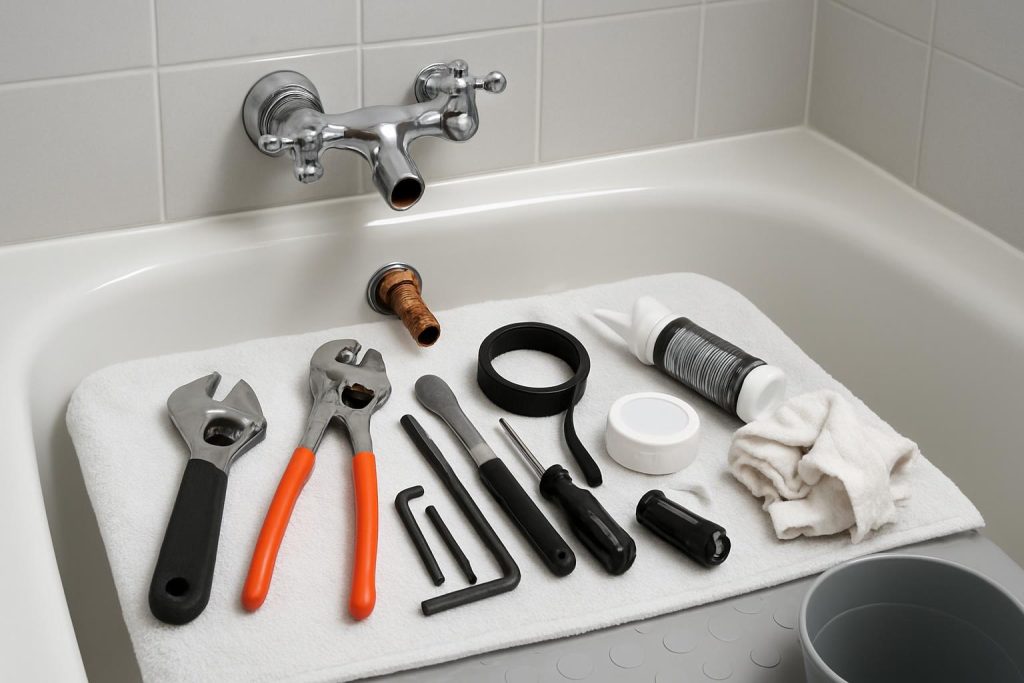
You do not need specialty gear to complete this project, but having the right basics saves time.
You will need screwdrivers, adjustable wrench, channel-lock pliers, strap wrench, Allen keys, utility knife, seat wrench or hex key for valve seats, penetrating oil, plumber’s grease, PTFE tape, silicone sealant, rags, a small bucket, a flashlight, and a handle puller if parts are stuck.
Have your new faucet kit ready. For many two handle tubs, a kit includes two handles, two escutcheons, stems or cartridges, and a tub spout with or without a diverter. Verify the kit matches your valve brand or is a universal replacement for your existing setup.
Plan And Identify Your Setup
Confirm Faucet Style And Valve Type
Two handle bathtub faucets come in a few patterns. Many have two stems mounted through the wall that control hot and cold. Some include a separate third control, but most use a diverter built into the spout. Look at your wall. If you see only two handles and a tub spout, you likely have two compression stems behind the wall. Check your brand if visible on the trim or take a stem to a hardware store for matching if you will replace stems.
Check The Tub Spout Connection
Tub spouts attach in two common ways. A slip-on spout clamps to a smooth copper pipe with a set screw. A threaded spout screws onto a male threaded pipe. Look under the spout near the wall. If you see a small opening for a set screw, it is likely slip-on. If you do not, it is likely threaded.
Measure Clearance And Reach
Confirm the length of the spout stub from the wall face to the pipe end. Slip-on spouts usually need a specific copper stub length. Threaded spouts need enough thread engagement to seal and align. Check the instructions for your new spout and compare to your wall depth and pipe length.
Choose A Compatible Replacement
Match the handle style to your valve stems or plan to change stems to fit the new handles. If you have a known brand, buy a brand-matched kit. If not, choose a universal two handle tub trim kit plus a new spout that matches your pipe connection. If your stems are badly worn, include new compression stems and new valve seats.
Preparation
Shut Off Water
Find and close the local shutoff valves if present near the tub or in an access panel. If none are present, plan to use the main house valve.
If there are no local shutoff valves, close the main house valve, then open the tub handles to drain pressure.
Protect The Tub And Work Area
Place a towel or rubber mat in the tub to prevent scratches. Put a rag in the drain to catch screws. Keep a small bucket nearby for any water in the lines. Set out a flashlight for better visibility behind trim.
Release Any Remaining Pressure
Open both handles to relieve pressure. If there is a shower diverter on the spout, set it to tub mode so water does not spray from the shower arm during testing.
Remove The Old Faucet
Remove Handles
Pop off index caps on the handle faces with a small screwdriver. Remove the handle screw. Pull the handle straight off. If it is stuck, use a handle puller or apply a small amount of penetrating oil and try again after a few minutes. Avoid prying against the wall tile.
Remove Escutcheons And Trim
Unscrew or pull off the escutcheons. Some are threaded, some are held by a trim ring. If there is silicone at the wall, slice it carefully with a utility knife. Note any foam or gaskets for reuse or replacement.
Remove Stems Or Cartridges
Loosen and remove the packing or retaining nuts that hold each stem. Pull the stem out. If you plan to reuse stems, inspect washers and o-rings. If you plan to replace them, match the new stems to the old ones by thread size and length. If your valve uses replaceable seats, remove the seats with a seat wrench or hex key and inspect them. Replace if pitted or worn.
Remove The Tub Spout
Check under the spout near the wall for a set screw or slot. Determine if it is slip-on or threaded before forcing anything.
For a slip-on spout, loosen the underside set screw with an Allen key, pull the spout straight off the copper pipe, then clean the pipe.
For a threaded spout, protect the finish with a strap wrench and turn the spout counterclockwise to remove. If it is stuck, add penetrating oil to the joint at the wall and try again. Do not twist the pipe in the wall.
Clean The Work Area
Remove old plumber’s putty, tape, and silicone. Wipe the wall clean. Clean the pipe threads or the copper stub. Smooth any burrs on copper with fine sandpaper. The cleaner the surfaces, the better the seal.
Install The New Faucet
Install New Seats And Stems If Needed
If your valve uses seats, thread new seats in by hand, then snug them with a seat wrench. Do not overtighten. Grease the stem o-rings and threads lightly with plumber’s grease. Insert each stem and tighten the packing or retaining nut until snug, then back off slightly so the handle turns smoothly.
Mount Escutcheons And Backplates
Dry fit the escutcheons to check coverage and clearance. If gaskets are provided, seat them on the back of each escutcheon. If not, plan to seal with silicone after testing for leaks behind the plate.
Install Handles
Position handles on the stems in the off position. Install handle screws and tighten just firm. Align the handles so off is straight up or aligned to your preference. Press on the index caps.
Install The Tub Spout
Confirm again whether your new spout is slip-on or threaded. Prepare the pipe accordingly.
For a threaded spout, wrap the wall pipe clockwise with 4 to 6 wraps of PTFE tape, thread the spout on by hand, then finish with a strap wrench until it faces straight down.
For a slip-on spout, slide the spout onto the copper pipe until it seats against the wall. Align it so the outlet faces straight down. Tighten the set screw firmly without stripping it.
Seal The Escutcheons
Once you confirm there are no leaks behind the trim, seal against water entry from the tub side. This prevents water from running into the wall during use.
Run a thin bead of 100 percent silicone around the top and sides of each escutcheon and leave the bottom open as a weep hole.
Turn Water On And Test
Restore Water Supply
Close both handles. Slowly open the main shutoff or local valves. Check behind the escutcheons for any sign of water. If dry, proceed to functional tests.
Bleed Air And Check Operation
Open the cold handle slightly, then the hot. Let air purge until flow is steady. Turn off and on several times to ensure smooth action. Test the spout diverter if present. Make sure shower and tub modes both work and the diverter fully returns.
Check For Leaks And Fix Them
Inspect around each stem and the spout connection while water is running and while shut. Look for drips or seepage.
If the stem leaks around the handle, snug the packing nut a quarter turn; if it still seeps, remove the handle and replace the packing or the stem.
If the spout weeps at the wall, remove it, clean the joint, and reinstall with fresh PTFE tape or adjust the set screw for a slip-on model.
Final Seal And Cure Time
After a dry test, run a final bead of silicone where needed. Smooth it with a damp finger. Follow the cure time on the sealant before shower use to keep water out of the wall.
Common Issues And Quick Fixes
Stuck Handles Or Trim
Handles often seize on splines. A handle puller removes them without wall damage. Do not pry against tile. Apply penetrating oil to the handle hub and wait before pulling.
Corroded Or Worn Stems
If the faucet still drips after new handles, the washers or seats are likely worn. Replace washers on compression stems and replace seats if pitted. Grease new o-rings lightly to prevent tearing during install.
No Match On Replacement Stems
Take the old stem to a plumbing parts counter for a match. Stems vary by thread pitch and length. If you cannot match stems easily, consider using a universal handle trim that fits your existing stems or plan a full valve replacement which may require wall access.
Misaligned Threaded Spout
If the spout bottoms out before it faces down, remove it, add a wrap or two of PTFE tape, and try again. If it faces down before sealing, remove a wrap or two. Aim for hand tight plus a final snug turn with a strap wrench.
Wall Or Tile Gaps
If new escutcheons do not fully cover the old footprint, use larger escutcheons or a thin remodel plate. Always seal the top and sides to keep splash out of the wall cavity.
Safety Notes And When To Call A Pro
If you find soft wall material, black staining, or a persistent wet area inside the wall, stop and address the leak before installing new trim. If the valve body inside the wall is cracked or heavily corroded, replacement of the valve body is required. That work may involve opening the wall and soldering or adapting threaded connections. Call a licensed plumber if you are not equipped for that scope.
Use only moderate force on old piping. Twisting a galvanized nipple can break it inside the wall. Use proper support and the right wrench for each task.
Maintenance After Installation
Operate both handles weekly to keep seals lubricated. Do not overtighten handles when closing. Wipe the spout and escutcheons dry after use to prevent mineral buildup. If a handle becomes stiff, remove it and add a small amount of plumber’s grease to the stem splines and o-rings.
Inspect silicone annually. Reapply if you see gaps or peeling. A dry seal keeps water out of the wall and extends the life of the installation.
Time And Cost Expectations
Most two handle tub faucet replacements take one to three hours for a beginner, including cleanup. Costs vary by finish and brand, but a basic kit is affordable. A handle puller or seat wrench is a small additional investment that makes the job smoother. If you run into damaged piping or need a valve body replacement, plan for a larger project or professional help.
Conclusion
Replacing a two handle bathtub faucet is manageable with patient steps and simple tools. Identify your setup, shut off water, remove the old handles and spout, install compatible parts, seal carefully, and test under pressure. Small details make the difference, like using a strap wrench to protect finishes and leaving a weep gap in the silicone. With this method, you get a clean, dry, and smooth running tub that lasts.
FAQ
Q: What tools and materials do I need for this project
A: You will need screwdrivers, adjustable wrench, channel-lock pliers, strap wrench, Allen keys, utility knife, seat wrench or hex key for valve seats, penetrating oil, plumber’s grease, PTFE tape, silicone sealant, rags, a small bucket, a flashlight, and a handle puller if parts are stuck.
Q: How do I shut off the water to a bathtub with no local valves
A: If there are no local shutoff valves, close the main house valve, then open the tub handles to drain pressure.
Q: How do I remove a slip-on tub spout
A: For a slip-on spout, loosen the underside set screw with an Allen key, pull the spout straight off the copper pipe, then clean the pipe.
Q: How do I seal the escutcheons to the wall
A: Run a thin bead of 100 percent silicone around the top and sides of each escutcheon and leave the bottom open as a weep hole.
Q: What should I do if the stem leaks around the handle after install
A: If the stem leaks around the handle, snug the packing nut a quarter turn; if it still seeps, remove the handle and replace the packing or the stem.