We are reader supported. When you purchase through links on our site, we may earn an affiliate commission. Also, as an Amazon affiliate, we earn from qualifying purchases.
Summer door decorations set the tone the moment students and families walk in. You can build a bright, organized, and durable display without stress. This guide gives you simple plans, practical material choices, and fast build steps. You will learn how to make decor that holds up to hallway traffic, cleans easily, and stores flat for reuse next year. Follow the steps and finish your door in under an hour, or choose a more detailed theme and spread it over two short sessions.
Introduction
Classroom doors work hard. They handle daily bumps, temperature changes, and frequent cleaning. A good summer door decoration must look fresh, be safe, and stay put. Start with a plan, use classroom-safe adhesives, and build in reusable parts. Keep each step simple and repeatable. You will save time now and later when you refresh or store it.
Plan Before You Craft
Define the goal. Decide if you want a quick welcome, a themed scene, or an interactive display. Match the project to your time and budget. If you must finish fast, select one focal element and one accent. If you have more time, layer a background, medium elements, and small details.
Measure the door. Note the clear space, the handle, the window, and any signage you must not cover. Take width, height, and the position of the handle. This prevents rework.
Check school rules. Confirm fire code, allowed materials, and adhesive limits. Many schools require nonflammable paper or fabric, a visible door window, and easy removal for safety checks.
Choose a theme that supports learning. Summer scenes can carry name recognition, color practice, writing prompts, or classroom jobs. Build function into the design so it earns its space all season.
Tools and Materials That Work in Classrooms
Base materials. Butcher paper, bulletin board paper, or thin cotton fabric make sturdy backgrounds. Felt works for small cutouts. Cardstock and poster board keep shapes flat. Precut letters save time and keep alignment neat.
Adhesives. Use low tack painter tape for walls and door edges. Use removable mounting putty for lightweight items. Use masking or gaffer tape on the back side to anchor background seams. For semi permanent hold on paper to paper, use double sided tape sparingly. Avoid hot glue on painted doors.
Cutting and layout. Use sharp scissors, a craft knife with a cutting mat, a metal ruler, and a pencil. A letter trimmer helps with borders and straight edges.
Finishing. Self adhesive laminate sheets or clear contact paper protect name tags and labels. Hook and loop dots create reusable, movable parts. Dry erase sleeves or clear pockets add function for notes.
Cleaning and repair. Keep alcohol free wipes for surface prep. Hold painter tape, extra dots, and a small stapler for touch ups on a cork border or paper frame. If you staple, keep staples to a bulletin border only, not the door.
Prep the Door Safely
Clean the surface. Wipe the door with a mild, non oil cleaning wipe. Dry fully so tape adheres.
Protect hardware. Do not cover the handle, lock, window, or required signage. If the window must stay visible, frame it as part of the design.
Plan the base layer. Hang the background first. For paper, run painter tape along the top edge, press the paper, then smooth downward. Add small tape tabs on the sides and bottom. For fabric, fold the top edge once, tape the fold to prevent fray, then tape to the door.
Test a corner. Stick a small sample of each adhesive on an unseen spot. Leave for 15 minutes. Remove to confirm it does not lift paint.
Fast Theme Ideas With Step by Step Guides
Sunny Welcome With Student Names
Why it works. High impact, low cost, fast build. Great for meet the teacher and the first week of summer session.
Materials. Yellow and orange cardstock, blue background paper or fabric, black or white letter stickers, removable mounting putty, hook and loop dots for names.
Steps. Cover the door with a blue background. Cut a large sun circle for the upper corner. Cut rays in two lengths. Place the sun and rays first for balance. Add a simple welcome line across the center. Make small name tags as mini suns or circles. Laminate or cover with clear contact paper. Mount name tags with hook and loop dots so students can move their tag to a task chart or mood check later.
Time and cost. About 45 to 60 minutes if letters are precut. Cost stays low if you use existing paper and a small pack of dots.
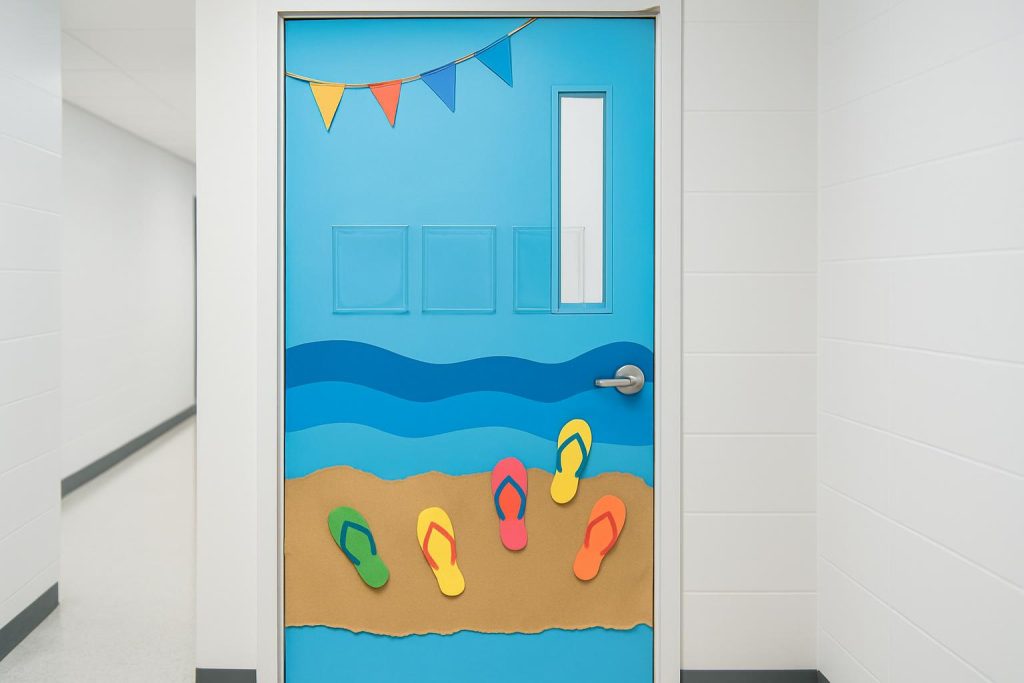
Beach Day Scene
Why it works. Calm colors, easy layers, and room for student work.
Materials. Blue and teal paper strips, craft sand colored paper or kraft paper, flip flop cutouts or templates, string or thin rope for a simple banner, removable mounting putty, clear pockets for notes.
Steps. Create ocean bands with blue strips across the lower half of the door. Overlap edges slightly for motion. Add a sand strip at the bottom using torn kraft paper for a natural edge. Cut or trace flip flops and add student names on the straps. Hang a small banner across the top with short strips of tape hiding behind the flags. Add two or three clear pockets labeled notes from the beach where students leave quick exit slips.
Time and cost. About 60 to 75 minutes. Keep costs down by cutting flip flops from classroom scrap boxes.
Watermelon Slice Topper
Why it works. Bold colors, few parts, and strong contrast that reads across the hallway.
Materials. Red and pink poster board, green and light green strips, black oval seeds, white strip for rind line, alphabet letters for a greeting, putty or double sided tape for paper to paper.
Steps. Cut a giant half circle from red poster board to span the top third of the door. Add a thin white strip, then two green strips for the rind. Place black seeds evenly. Add a direct greeting under the slice. Use student names on seeds at the edges for a personal touch. Frame the door with alternating green strips as a border.
Time and cost. About 40 minutes. Poster board controls curling and lasts well.
Camping at the Classroom
Why it works. Neutral colors, multiple teaching tie ins like jobs and goals, and reusable parts.
Materials. Kraft paper for a tent, dark green paper for trees, red and orange tissue for a fire, brown paper for logs, job cards, hook and loop dots, painter tape.
Steps. Build a tent shape on one side with overlapped kraft paper triangles. Add two or three simple pine trees. Make a small campfire with tissue flames layered over paper logs. Do not use lights. Add trail sign cards for classroom jobs or centers. Mount job cards with hook and loop dots so you can rotate names quickly.
Time and cost. About 75 to 90 minutes for a full scene. Reuse the tent base across seasons by swapping the fire for a lantern or a backpack image.
Under the Sea With Learning Pockets
Why it works. Quiet palette, movement, and practical pockets for ongoing tasks.
Materials. Blue fabric or paper, bubble wrap circles for texture, fish cutouts, clear pockets or small envelopes, adhesive dots, marker for labels.
Steps. Set a blue base. Add a few bubble wrap circles near the top for interest. Cut fish shapes in bright colors. Label clear pockets with fast tasks like pick a book or write one kind word. Mount the pockets at student eye level. Add fish above each pocket to draw attention without clutter.
Time and cost. About 60 minutes. Clear pockets and fish cutouts can be reused in future themes.
Make It Reusable All Summer
Lamination. Light lamination or clear contact film on small pieces like names, labels, and icons stops frayed edges and lets you wipe with a damp cloth.
Movable parts. Use hook and loop dots on name tags, job cards, and targets. Students can relocate their parts for routines such as attendance or goals without wear.
Modular build. Keep the background and main graphic fixed. Swap small elements weekly. For example, leave the beach base and change the banner message or the pocket prompts.
Neutral backers. Mount small items on 3 by 5 cardstock backers. The backers take adhesive, not the art. Replace the backers when glue builds up.
Keep It Budget Friendly
Use what you have. Gather scrap boxes for borders, small shapes, and letters. Mix shades of one color family for a layered look with no extra cost.
Print smart. Print black and white outlines on colored paper instead of full color. Trace a few good shapes onto cardstock and use them as templates.
Share and swap. Trade themes or border rolls with teammates. Split a value pack of hook and loop dots.
Repeat colors. Pick two or three colors and reuse them across elements. This saves supplies and keeps the door cohesive.
Organize the Process
Set up a clean work zone. Clear a table, gather tools in a bin, and pre cut the largest pieces. Label small stacks with sticky notes so you do not mix sizes.
Batch tasks. Cut all rays, then all letters, then all name tags. Mount all hook and loop dots at once. This reduces handling time.
Use a fast build schedule. Day one prep and background 20 minutes, main graphic 20 minutes, message and names 20 minutes. Day two small details 20 minutes, pockets or dots 10 minutes, final alignment 10 minutes. If needed, stop after the main graphic. The door will still look complete.
Plan a weekly refresh. In 15 minutes, press loose edges, rotate a few small pieces, and wipe dust. Keep a mini repair kit in your desk.
Safety and School Policies
Follow fire code. Keep the window clear if required. Do not use string lights or any heat source. Avoid covering the whole door with felt if that is restricted.
Use removable adhesives. Painter tape and putty reduce damage and ease end of term removal. Do not use hot glue on paint.
Watch allergies. Skip scented markers and adhesive sprays. If using natural items like dried leaves or shells, confirm they are clean and sealed.
Use ladders safely. If you must reach high, ask for help and use a step stool, not a rolling chair.
Troubleshooting Common Issues
Peeling corners. Round corners on paper elements and burnish tape with a clean cloth. Add a small tape tab under any raised point. Switch to putty on textured spots.
Sagging fabric. Use a light fabric only. Create a taped fold at the top edge. Add two vertical tape strips behind the center to carry weight.
Heavy add ons. Mount on a cardstock backer and use two or more putty dots spaced wide. If the door surface is cool, warm the tape with your hand before pressing.
Crooked letters. Draw a faint pencil line with a ruler. Place letters from the center outward. Step back two feet and check. Adjust before pressing hard.
Color fade. Choose mid tone colors and avoid fluorescent paper on sun facing doors. Laminate small pieces. Rotate the top layer every two weeks if a bright highlight starts to fade.
Clean, Store, and Reuse After Summer
Remove in layers. Take off small pieces first and stack by type. Roll the background paper downward to avoid creases. Keep a trash bag for tape scraps so you do not litter the hall.
Clean gently. Wipe the door with a mild cleaner after removal. If tape residue remains, use a soft cloth and a small amount of adhesive remover approved by your school.
Label sets. Group items by theme in large zip bags or flat document folders. Include a note with door measurements, counts, and what to cut next time.
Store flat. Place laminated pieces between two sheets of cardstock. Slide everything into a shallow box or a portfolio. Keep hook and loop pieces mated so the hook side does not catch fabric.
Sample Build Plans You Can Copy
Plan A One Hour Welcome Door
Background. Single color paper. Focal. Large sun or watermelon slice. Message. Short welcome in high contrast letters. Names. Laminate small tags and mount with dots along the bottom or around the focal. Finish. Simple border using scrap strips in one color family.
Plan B Interactive Sea Door
Background. Blue paper or fabric. Focal. Three fish across the center. Function. Three clear pockets labeled with tasks. Names. Place on small bubbles near each pocket. Finish. A few bubble wrap circles high on the door for texture.
Plan C Camping Jobs Door
Background. Kraft paper on the lower third only. Focal. Tent on one side. Function. Job cards as trail signs with hook and loop dots. Names. On small leaf tags to move under each job. Finish. Two trees for balance.
Pro Tips for a Clean Look
Limit fonts. Use one bold style. Precut letters or print and trim for straight edges.
Repeat shapes. If you use circles for the sun, use circles for name tags. This links parts visually.
Mind eye level. Place the message around adult chest height and student names a bit lower. Keep the top third simple.
Check edges. Run a final finger press along all seams. Loose edges catch hands and backpacks.
Conclusion
A strong summer door decoration is simple, organized, and durable. Start with a clear plan, use classroom safe materials, and build modular parts you can reuse. Pick a theme from this guide, follow the steps, and finish with confidence. Maintain it in minutes each week. Store flat at the end and your next setup will be even faster.
FAQ
What materials stick well to a classroom door without damage
Use low tack painter tape for edges and background seams, removable mounting putty for lightweight pieces, and double sided tape sparingly for paper to paper areas. Avoid hot glue on painted doors. Test a small spot first.
How can I make a summer door display reusable
Laminating small pieces, using hook and loop dots for names and job cards, and building with modular layers makes the display reusable. Keep the background fixed and swap small elements weekly.
What is a quick door decoration I can finish in under an hour
The Sunny Welcome with Student Names and the Watermelon Slice Topper both build fast. Use a single color background, one large focal shape, a short welcome, and laminated name tags mounted with hook and loop dots.
How do I keep decorations from peeling or sagging
Round corners, burnish tape, add small tabs under raised points, and use putty on textured areas. For fabric, tape a folded top edge and add vertical tape strips behind the center. Mount heavier pieces on cardstock backers with two or more putty dots.
How do I store the decorations after summer
Remove in layers, clean gently, label sets by theme, and store flat in folders or a shallow box. Keep hook and loop pieces mated and place laminated items between cardstock sheets.