We are reader supported. When you purchase through links on our site, we may earn an affiliate commission. Also, as an Amazon affiliate, we earn from qualifying purchases.
Minecraft makes party planning easy because its shapes are simple, colors are bold, and ideas convert into clear steps. This guide gives you a full plan for decor, food, and games that looks professional, stays on budget, and cleans up fast. Follow the timeline, copy the build steps, and run the party with smooth flow from arrival to favors. New to DIY and hosting is fine. Every section lists tools, materials, and quick fixes so you can execute without stress.
Plan First: Timeline, Budget, Guest Count
Three-Week Timeline That Prevents Rush
Three weeks out: set date, time, and guest count. Pick indoor, outdoor, or mixed location. Confirm any allergies with caregivers when you send invitations.
Two weeks out: lock your theme palette and core activities. Order or print invitations and printable labels. Gather boxes, cardstock, tape, scissors, and basic balloons. If you plan a cake, decide if you will bake or order.
One week out: pre-cut paper squares for decor, build sample centerpieces, and test one game indoors. Buy shelf-stable food and drinks. Prepare favor bags and label each with the guest name.
Two days out: shop perishables. Pre-assemble backdrop tiles, table signs, and TNT bundles. Stage zones with painter tape on the floor so setup is plug and play on party day.
Party day: decorate in this order to save time: backdrop wall, table covers, centerpieces, signage, balloons, and games. Add food last. Set a timer for each step to avoid drift.
Smart Budget Ranges and Cost Savers
Budget light: reuse shipping boxes for block decor, print labels at home, serve square sandwiches, and run free yard games. Focus on one wow wall and one themed dessert.
Mid budget: add a grass block cake, potion drink station, and mixed balloons. Use LED cubes for ambient lighting.
Higher budget: rent a photo booth frame, add custom vinyl backdrops, and offer multiple craft stations. Hire a helper for two hours to manage games and reset tables.
Theme And Color Palette That Pops On Camera
Core Palette For Instant Recognition
Use grass green, dirt brown, stone gray, creeper green with black, sky blue, and nether red. Anchor the room with green and brown, and punctuate with black creeper faces for contrast.
Simple Printables And Signage
Create signs for Food, Potions, Crafting, Mining, and TNT Toss. Use large block fonts and solid color backgrounds. Print on cardstock. Mount on foam board for durability.
DIY Decor That Looks Pro And Packs Flat
Pixel Backdrop Wall In One Hour
Materials: square paper plates or 5 to 6 inch construction paper squares, foam board or kraft paper backing, double sided tape, painter tape.
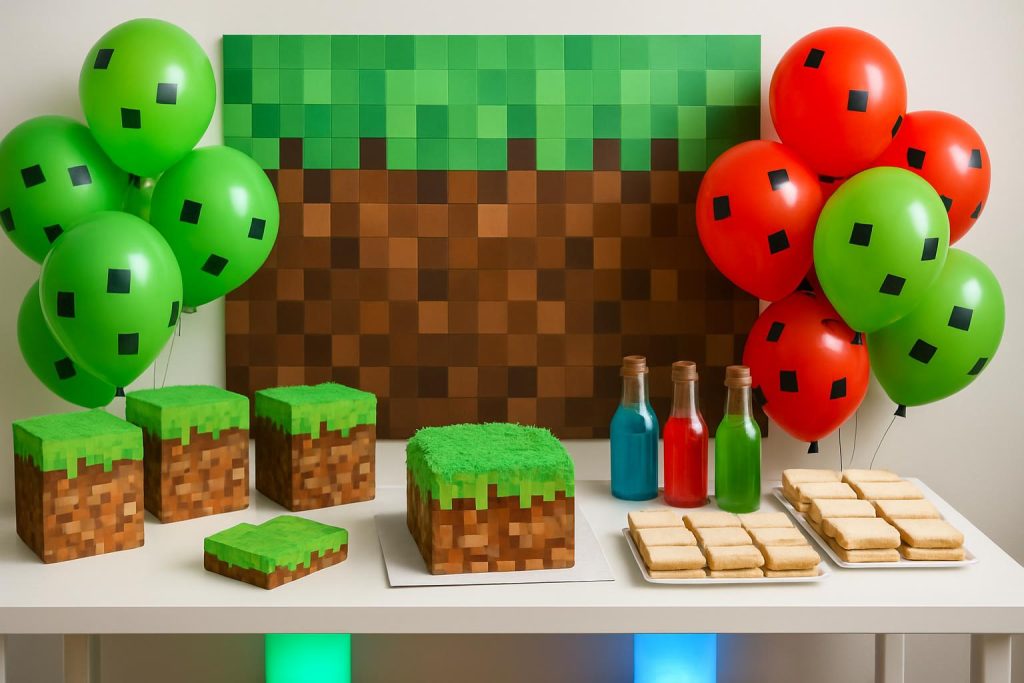
Steps: lay backing flat. Create a grid of green and brown for a grass block top. Randomize shades for depth. Tape squares edge to edge. Mount the panel to the wall with painter tape. Add a creeper face panel with four black squares to center a photo spot.
Table Setup That Doubles As Photo Props
Use solid green table covers. Centerpieces: wrap small boxes with brown paper for dirt blocks, top with green paper for grass. Add a few diamond or emerald cutouts. TNT bundles: wrap three red paper towel tubes with a white strip labeled TNT and tie with black yarn. Potion bottles: use clear plastic bottles with colored drinks and simple labels.
Balloons For Height And Texture
Create a cluster of green balloons with black vinyl squares for creeper faces. Add a nether cluster with red, black, and orange. Tie clusters to heavy blocks or water weights to avoid tipping.
Lighting And Ambience
Place battery LED cubes or warm string lights under the table lip. Keep pathways bright for safety. Avoid open flames. Candles are for cake only.
Easy Crafts That Keep Hands Busy
Foam Pixel Sword Build
Materials: foam sheets in black, gray, and blue, pre-cut into 1 inch squares; glue sticks; printed sword grid on cardstock. Kids place foam squares on the grid and glue. Dry time is short. Store finished swords in a labeled bin.
Perler Bead Mobs Or Tools
Offer small pegboards, bead colors that match the palette, and simple mob or tool templates. Ironing is handled by an adult at a side table. Use parchment. Label finished pieces with name tags.
Paper Cube Mobs
Print cube templates on cardstock. Pre-score folds for easy assembly. Kids glue tabs to form creepers, pigs, or chests. Provide black markers for details.
Food That Fits The World And Cleans Up Fast
Main Dishes And Savory Snacks
Square sandwiches: ham and cheese, turkey and lettuce, or hummus and cucumber. Trim crusts for clean edges. Arrange in grids.
Pizza blocks: cut pizza into even squares and label as stone slabs. Offer a simple salad in square bowls. Serve pretzel sticks as sticks and cheese cubes as gold blocks.
Themed Labels That Kids Understand
Coal cookies: chocolate cookies. Redstone bites: strawberry gummies. Golden apple slices: apple wedges brushed with lemon juice and a light sprinkle of yellow sanding sugar. Melon squares: cubed watermelon.
Grass Block Cake Or Cupcake Swap
Grass block cake: bake a square chocolate cake. Frost sides with chocolate buttercream. Top with vanilla frosting tinted green. Press green tinted shredded coconut on top for grass. Add a small creeper face made of black fondant squares.
Or use cupcakes: chocolate base, green frosting piped flat with a grass tip. Arrange cupcakes in a square on a tray to mimic a block.
Potion Drink Station
Use clear pitchers or bottles. Blue sports drink for water breathing, red punch for healing, green lemonade for jump boost. Provide plain water. Add ice in a separate bucket. Place a parent at the station to pour and manage refills. Use lids for outdoor setups.
Allergy Friendly Swaps
Offer gluten free crackers and veggie sticks. Include a nut free dessert option. Add a dairy free dip such as hummus. Place clear labels near each item. Keep allergen items on a separate tray with its own tongs.
Game Ideas Indoors And Outdoors
Creeper Dodge Tag
One player is the creeper with a soft green ball. Light touches below the shoulder turn others into creepers. Last survivor wins. Indoors use a smaller play area and slow pace. Outdoors expand the zone.
TNT Toss
Use red beanbags or soft cubes. Mark three throwing lines for different ages. Targets are cardboard boxes labeled with point values. Highest score after three rounds wins.
Diamond Mine Scavenger
Hide blue gem stones or blue paper diamonds around the yard or room. Each child gets a small chest box or bag. Set a timer. Trade five diamonds for a small prize at the end.
Obsidian Relay
Build a simple obstacle path with cones and painter tape lines. Kids carry a black foam cube from start to finish without dropping it. Time each run. Fastest time wins.
Redstone Circuit Challenge
Provide snap cubes or magnetic tiles. Goal: build a bridge that holds a small toy. Set a five minute timer. Group vote for most stable build.
Quiet Corner For Downtime
Set a small table with coloring sheets, stickers, and craft scraps. Add noise level rules on a sign. This resets energy before cake.
Party Flow That Reduces Chaos
Arrival And Warm Up
As guests arrive, lead them to the crafting table. Hand each child a name label. Early crafts prevent crowding at the door and give you buffer time.
Rotate Games In Short Blocks
Run two to three active games for 10 to 12 minutes each. Announce transitions. Use a bell or a short song clip. Keep lines short by splitting into teams.
Food Break And Hydration
Seat everyone. Serve mains first, then snacks. Keep drinks on one side of the room to avoid spills near crafts. Wipe tables quickly with a damp cloth between courses.
Cake, Photos, And Presents
Move to the backdrop wall for group photos. Sing and serve cake. If you open gifts, have a helper record who gave what. Store wrapping and ribbons in a single trash bag for fast cleanup.
Goodbyes And Favors
Set a favor station near the exit. Hand out one labeled bag per child. Thank each family. This prevents backtracking and keeps the doorway clear.
Favors That Do Not Become Clutter
Useful And Fun
Mini notebooks with pixel covers, sticker sheets, and a themed snack. Add the craft they made. Skip fragile toys. Focus on items kids will use within a week.
Simple Packaging
Use brown paper treat boxes as chests. Add a green square label with the child name. Pack all favors the day before. Place boxes in a bin by the exit.
Room Layout, Setup, Cleaning, Safety
Zone Your Space
Divide the area into four zones with clear signs: crafting, gaming, food, and photo. Leave a walkway around the room. Put the loudest activity farthest from the front door.
Protect Surfaces And Walls
Cover tables with reusable plastic or washable cloth. Use painter tape on walls. Avoid hot glue on painted surfaces. Anchor tall decor to prevent tipping.
Fast After Party Reset In 20 Minutes
Use three bags: trash, recycling, and keep. Clear food first. Seal leftovers in containers and refrigerate. Stack reusable decor in one bin by category: backdrops, balloons, signage, games. Wipe tables and high touch surfaces. Sweep or vacuum main zone. Do a final lost and found sweep.
Safety Checklist
Confirm allergies before shopping. Keep small beads and choking hazards at the craft table only and supervise. Tape down extension cords. Use battery lights. Keep first aid basics handy. Hydrate kids between games.
Printable Style Checklist Summary
Core Supplies
Cardstock, construction paper squares, scissors, glue sticks, tape, painter tape, markers, foam board, balloons, table covers, boxes for blocks, plastic bottles for potions, serving trays, napkins, wipes, bins for trash and recycling.
Decor Steps
Assemble pixel backdrop, set tables, add centerpieces, place signage, inflate balloons, set lighting, stage photo spot.
Food Steps
Prep square sandwiches, cut fruit, plate cookies and gummies, fill potion station, label allergens, place water prominently.
Game Steps
Lay out targets and cones, set timers and score sheets, assign a helper per station, define play boundaries with tape.
Cleanup Steps
Bag trash and recycling, pack reusable decor, wipe surfaces, vacuum or sweep, final lost and found check.
Conclusion
A strong plan turns a Minecraft theme into a clean, fun, and stress free party. Build a clear palette, craft a simple backdrop, serve square foods with bold labels, and run short games with smooth rotations. Zone the room, protect surfaces, and keep cleanup tight. Use this guide as your template and adjust for space and budget. The result is a polished event that kids enjoy and adults appreciate.
FAQ
Q: What is a simple Minecraft decor backdrop I can make fast
A: Tape green and brown paper squares onto a foam board to form a grass block pattern, add a black creeper face panel, and mount it with painter tape.
Q: How do I set up a safe potion drink station
A: Use clear pitchers with colored drinks, keep plain water available, place ice in a separate bucket, and assign a parent to pour and manage refills.
Q: What are quick indoor game ideas
A: Run creeper dodge tag with a soft ball, TNT toss with beanbags and box targets, and a diamond mine scavenger with blue paper diamonds.
Q: How can I keep setup and cleanup efficient
A: Pre assemble decor two days early, stage zones with painter tape, and after the party use three labeled bags for trash, recycling, and keep.
Q: What are easy allergy friendly food swaps
A: Offer gluten free crackers, veggie sticks, a nut free dessert option, and a dairy free dip such as hummus with clear labels on each item.