We are reader supported. When you purchase through links on our site, we may earn an affiliate commission. Also, as an Amazon affiliate, we earn from qualifying purchases.
Spanish Mediterranean kitchens are warm, functional, and easy to live with. The look balances natural materials, earthy colors, artisanal tile, and classic metalwork. This guide breaks the style into clear steps you can follow. You will learn what to choose, how to lay it out, what to DIY, and how to clean and maintain it for years of use.
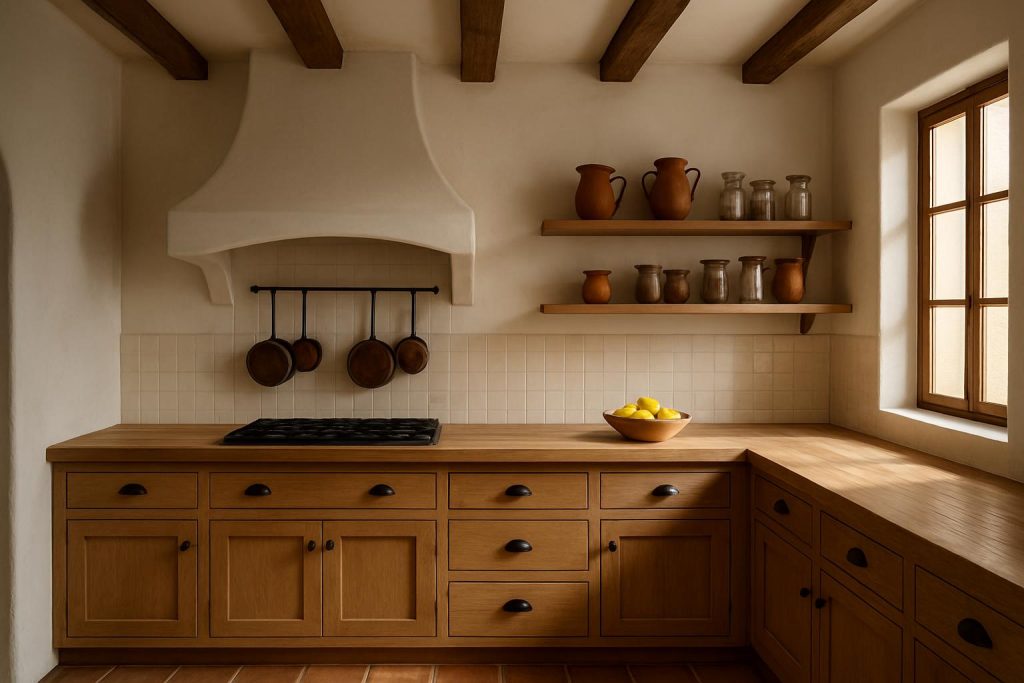
What Defines a Spanish Mediterranean Kitchen
Before buying anything, set a clear direction. Spanish Mediterranean style focuses on honest materials, simple forms, and craftsmanship. The room should feel collected, not themed. Aim for durable surfaces, balanced color, and practical storage.
Core traits
– Natural materials: terracotta, stone, wood, plaster, hand-formed tile
– Soft, sun-washed palette: warm whites, creams, sand, clay, olive, indigo accents
– Artisanal details: zellige, saltillo, cement tile, hand-hammered copper, wrought iron
– Traditional shapes: arches, niches, simple beams, curved range hoods
– Open display: pottery, glass jars, spices, copper pots
Build Your Palette
Base colors
– Walls: warm white or soft ivory to keep light consistent
– Cabinets: natural oak, walnut, cream, or muted sage
– Floors: terracotta or warm wood to ground the room
Accent colors
Use color in controlled hits. Choose one dominant accent and one secondary. Deep blue, emerald, mustard, or rust work well. Repeat accents in tile borders, textiles, and pottery.
Material mix
Balance matte and sheen. Pair matte plaster or limewash with glazed tile. Combine wood grain with metal. Keep patterns focused so the room reads calm, not busy.
Surfaces That Make The Look
Floors
– Saltillo terracotta tile adds warmth and texture. It is porous and needs sealing.
– Encaustic cement tile gives bold pattern in a small area like a rug layout.
– Wide plank wood in a medium stain also fits the style if tile is not practical.
Walls and paint
– Limewash or mineral paint adds soft movement and masks minor wall flaws.
– Smooth plaster finish on a range hood or a feature wall reinforces the look.
– Keep most walls light to bounce natural light and highlight wood and tile.
Backsplash
– Zellige tile in white, cream, or pale green gives handmade texture.
– Patterned border tile above a stove adds a focal point without overwhelming.
– If budget is tight, use a simple field tile and add a decorative accent behind the range only.
Countertops
– Honed marble or limestone looks classic but needs sealing and gentle care.
– Honed granite or soapstone offers more stain resistance.
– Butcher block brings warmth and is easy to refinish. Keep it away from the sink zone if you want low maintenance.
Cabinetry And Wood Details
Door styles and finishes
– Shaker or simple recessed panels fit the style.
– Mix closed bases with a few glass fronts or open shelves.
– Finish options: natural oil, light stain, or painted cream or muted green.
Hardware
– Choose aged brass, antique bronze, or black iron pulls and knobs.
– Cup pulls on drawers and simple knobs on doors keep it timeless.
– Use latches on select uppers for a traditional touch.
Beams and ceiling
– Faux or real wood beams add structure. Keep scale proportional to room size.
– A simple tongue-and-groove or plaster ceiling suits this style.
Tile That Sets The Tone
Pattern strategy
Pick one hero pattern. Use it in a defined area such as a range panel or a floor rug zone. Keep surrounding tile calm with solid or tonal pieces. This prevents visual noise.
Layout tips
– Staggered or stacked layouts both work. Stacked feels cleaner with zellige.
– Use a tile border to frame a patterned section.
– Plan trim pieces early. Matching bullnose or a simple metal edge keeps the finish clean.
Grout choice
– Match grout to tile for a softer, traditional look.
– Use a slightly darker grout on floors to hide wear.
– For zellige, expect size variance. Use wider joints and a flexible grout approach.
Lighting Plan With Layers
Ambient lighting
– Ceiling fixtures or recessed lights provide even base light.
– Warm color temperature between 2700K and 3000K suits the palette.
Task lighting
– Under-cabinet lights for counters.
– A focused pendant or liner light over the island.
– Ensure adequate lumens at the sink and cooktop.
Accent lighting
– Wrought iron or brass lantern-style pendants for character.
– Wall sconces near shelves or a range hood for depth.
– Dimmer controls on all layers for flexibility.
Storage And Organization That Feels Collected
Zones and workflow
Create clear stations: prep, cook, clean, brew, and serve. Keep each zone complete with tools and ingredients. This reduces steps and clutter.
Open shelves that work
– Limit open shelves to daily-use items and display-worthy pieces.
– Store plates by size, align lips to the front, and keep heights consistent.
– Use one to two colors of pottery to avoid a busy look.
– Add a wall rail with hooks for ladles, strainers, and mugs.
Drawer and cabinet inserts
– Use wooden dividers for cutlery and utensils.
– Add a spice drawer insert near the cooktop.
– Install roll-outs for pots and pans. Lids go in a vertical rack.
– Use a tray divider for baking sheets.
Vertical storage
– A wall-mounted plate rack saves cabinet space and adds character.
– A pot rack over an island or rail on a backsplash keeps tools in reach.
– Baskets on top of cabinets collect seasonal items.
Styling Essentials
Textiles
– Add striped or embroidered cotton towels.
– Use a flat-woven runner near the sink with a non-slip pad.
– Seat cushions or banquette upholstery in linen or cotton canvas.
Pottery and glass
– Terracotta pitchers, olive jars, and simple clear glass bottles fit the look.
– Decant pantry staples into glass canisters with airtight lids.
– Limit label colors for a calm shelf view.
Greenery and produce
– Fresh herbs in clay pots near light.
– Lemons, oranges, or seasonal produce in a shallow bowl for color accents.
– Olive branches or rosemary sprigs for a quick centerpiece.
Budget Friendly Updates
Paint and hardware first
– Repaint walls in a warm white and cabinets in cream or sage.
– Replace knobs and pulls with aged brass or iron.
– Swap switch plates to match metal finishes.
Smart tile saves
– Use a small area of hand-made or patterned tile as an accent only.
– Consider peel-and-stick for a temporary backsplash in a rental.
– Stencil a floor rug motif over concrete as a weekend project.
Fabric skirts and softening
– Add a tailored fabric skirt under a sink or open base to hide storage.
– Use washable cotton or linen with a simple rod and clip rings.
Thrift and mix
– Source vintage copper, pottery, and wood boards from markets.
– Mix old and new for a collected feel without overspending.
DIY Projects Step by Step
Limewash a feature wall
Tools: drop cloths, painter tape, primer if needed, limewash paint, brush, bucket.
Steps:
1) Clean the wall and fill holes. Sand smooth.
2) Prime if the wall is glossy or patchy.
3) Dilute limewash per product guide. Stir well.
4) Apply in X strokes with a large brush. Work in small sections.
5) Let it dry. Add a second coat for depth.
6) Avoid splashing on floors and counters. Wipe drips quickly with a damp cloth.
Install an open shelf with wrought iron brackets
Tools: stud finder, level, drill, screws, anchors, solid wood shelf, brackets.
Steps:
1) Mark stud locations. If no stud, use proper wall anchors rated for the load.
2) Pre-drill bracket holes. Use a level to align.
3) Mount brackets securely. Test with firm pressure.
4) Place shelf, pre-drill, and screw from below.
5) Seal the shelf with food-safe oil or matte varnish.
Safety: confirm load rating, keep electrical lines in mind, and avoid overloading with heavy pottery.
Seal cement or saltillo tile
Tools: vacuum, microfiber mop, penetrating sealer for porous tile, applicator, clean rags.
Steps:
1) Clean tile and grout thoroughly. Let dry completely.
2) Apply sealer evenly with an applicator. Do not flood joints.
3) Wipe excess after dwell time to avoid haze.
4) Apply a second coat if the tile still absorbs quickly.
5) Re-seal per manufacturer schedule or when water no longer beads.
Cleaning And Care
Daily routine
– Wipe counters and backsplash with a soft cloth and pH-neutral cleaner.
– Shake or vacuum the runner to remove grit that can scratch tile or wood.
– Dry water around the sink to avoid mineral spots on stone and metal.
Weekly tasks
– Mop floors with a damp microfiber mop and neutral cleaner.
– Dust shelves, beams, and light fixtures with a soft brush.
– Polish hardware with a dry cloth to remove fingerprints.
Monthly and seasonal
– Check grout lines for cracks. Re-caulk around sinks as needed.
– Refresh cutting boards and butcher block with food-safe oil.
– Inspect and clean range hood filters.
– Re-seal porous stone or tile on schedule.
By material
– Zellige and glazed tile: use gentle cleaner and soft sponge. Avoid harsh scrub pads.
– Cement and saltillo: always keep sealed. Clean with neutral pH only.
– Natural stone: use stone-safe products. Blot spills quickly.
– Wood: clean with a slightly damp cloth, then dry. Re-oil finished wood.
– Copper and brass: accept natural patina. For bright spots, use a gentle polish sparingly and rinse. Dry fully to prevent water marks.
Small Kitchen Tips
– Keep walls and major surfaces light to maximize brightness.
– Choose one patterned tile moment rather than many small patterns.
– Use slim open shelves instead of deep uppers on one wall.
– Add a narrow rail system for utensils and spices to free counter space.
– Pick a compact bistro table or a drop-leaf for eat-in function.
– Panel-ready or counter-depth appliances reduce visual bulk.
– Mirror the backsplash behind a shelf in glossy tile to bounce light.
Common Mistakes And How To Avoid Them
– Overdoing pattern: select one hero tile and keep others quiet.
– Skipping sealer on porous materials: seal on install and maintain on schedule.
– Cool lighting temperature: choose warm bulbs to match the palette.
– Cluttered open shelves: display daily-use items and keep a tight color range.
– Heavy dark finishes everywhere: balance with light walls and reflective tile.
– Underbuilt shelves: use studs or heavy-duty anchors and confirm load limits.
Conclusion
A Spanish Mediterranean kitchen succeeds when you combine durable natural materials, a tight color palette, and practical storage with a few artisanal touches. Start with a warm base, add one pattern moment, layer in aged metals and wood, and plan lighting in three layers. Keep cleaning simple with neutral products and maintain sealers on porous surfaces. With a clear plan and a few focused DIY projects, you can build a kitchen that looks classic and works hard every day.
FAQ
Q: What are the key materials in a Spanish Mediterranean kitchen?
A: Focus on terracotta, stone, wood, plaster or limewash walls, hand-formed tile like zellige or cement, and metals such as aged brass, bronze, copper, and wrought iron.
Q: How can I get the look on a budget?
A: Repaint walls and cabinets, swap hardware to aged brass or iron, use a small accent area of artisanal tile, add a fabric skirt to hide open storage, and source vintage copper and pottery from markets.
Q: What lighting works best for this style?
A: Use warm ambient lighting at 2700K to 3000K, add task lights under cabinets and over the island, and finish with accent pieces like iron or brass pendants and wall sconces on dimmers.
Q: How do I care for cement or saltillo tile?
A: Keep them sealed, clean with a pH-neutral cleaner, avoid harsh scrub pads, wipe spills quickly, and re-seal when water no longer beads on the surface.
Q: How do I keep open shelves organized?
A: Reserve shelves for daily-use items, group by color and size, align plate lips to the front, repeat two to three materials like wood, glass, and terracotta, and move extras to closed storage.